Jul 27, 2013

Dried Mint

This spring, I had a *brilliant* idea - I decided to plant some mint cuttings in one of my flower pots.  I thought it would be pretty and practical.  It didn't work - the mint took over.  Charlie recently suggested I trim the mint back a little.  I thought it was a great idea. 


However, now I had all these trimmings and I just couldn't put them in the compost pile!  I decided to dry them.  


I plucked the leaves off the stem and laid them out in a single layer on my food dehydrator trays.


By the way, make sure to check each of the leaves (top and bottom) for impurities.... very important.  I found a little surprise.


I have found in the past that the food dehydrator is the best way to dry herbs - they really keep their color and have an intense flavor.  I have tried air drying, but they loose their color and a lot of their flavor.  I have heard you can also use the microwave, though I haven't tried it. I think oven drying would be the next best thing to using the dehydrator. 


If you have a dehydrator, set it to the lowest temperature.


The mint dried for about 21 to 22 hours.  You just keep the dehydrator going until the leaves are crispy.  I was really surprised it took so long, but then I read that herbs that have a lot of essential oils take the longest to dry.


Ok, next: I think I'll try mint tea.  What do you do with your mint?


Shortbread

One of the things Charlie likes is shortbread - which is great for me because it is so quick and easy to make!  Flour, butter, sugar pulsed in the food processor, put in a greased pan, bake - done!  Crisp, buttery and sweet. 


I have a "shortbread" pan I found at a thrift shop, but you could easily use a round cake pan or a springform pan.  


Shortbread


1/4 cup powdered sugar
1/4 cup sugar
1 cup cold butter
2 cups flour

Preheat oven to 350 degrees F.  Lightly grease a shortbread pan or a round cake pan.  Pulse all ingredients together in food processor - it will be very dusty looking - this is ok.  Dump it all in the prepared pan.  Bake for 30 minutes or until slightly golden brown on edges.  Place on wire rack, and slice into wedges while still warm.  Let cool completely.

Jul 26, 2013

Christmas Cactus Cuttings

My Christmas Cactus plant grew from a cutting off of my Great-Grandma's plant, and having that kind of history behind a plant is special to me.  When we moved from our house in town a few years ago, my big beautiful Christmas cactus plant started going downhill.  I couldn't figure it out!  Then, I talked to a friend and she asked if we have soft water, and said that the salts build up.  The Christmas Cactus plant is especially sensitive the soft water, she said.  So, by the time I got the plant on a well-water-only regimen, many of the leaves had dropped off.  My clever husband suggested I take some cuttings on what is left of the plant, and I thought that was a great idea! 

So here are the cuttings I picked off the mother plant.


This is the origional plant, looking sad.


I used potting soil and rooting hormone.


Dipping the ends of the cuttings in the rooting hormone (this end is where I want the plant to root).


Make sure to press down the soil around the cutting well - you want good stem/soil contact.


A tray of cuttings!  Hopefully some of them will take.  I am leaving them outside in a well light spot that doesn't get direct sunlight.  As they grow, you want to make sure to pinch off all of the flower buds that grow - we want all of the energy to go into making a healthy plant.  I will let you know how they do!


Jul 23, 2013

Beef Short Ribs

Last fall we bought a 1/4 beef, 2 lambs and 1/2 pork from local farmers.  We have had fun trying out new cuts of meat and figuring out different ways to use them.  This last weekend we decided to try some short ribs, neither having tried them before. 


Jul 22, 2013

Of Beans and Peas....and Flowers

I went out this morning to pick peas and beans, and thin the carrots.  I am late in thinning the carrots (as usual) but found some tender little carrots to munch on...


I picked a nice pile of peas.


And a pile of green, yellow and purple beans.  


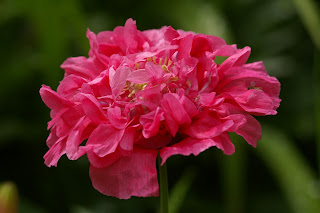
...then I got distracted and started taking pictures of the flowers.  I love these double pink poppies.


The cottage gardens are coming along.


The blue delphiniums are starting to bloom.


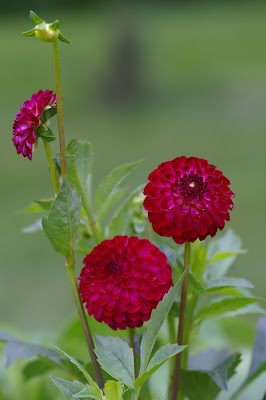
And the dahlias are starting to bloom!  I love this one.


 The unfurling petals are actually almost lilac colored.


Cute little pom-pom dahlias.


 The love-lies-bleeding is finally growing longer!


A tiny hop blossom.


The grapes are growing.


More poppies!


And just to keep it real (as most gardens have issues): an asparagus row that is very weedy.


More weeds (they sure are healthy).


 Yes, those are all individual tiny little itsy-bitsy weeds. 


The gophers are leaving mounds.


One of the rhubarb plants is a little less than happy.


This plant died for no apparent reason. 


 And the bugs have to eat, too.


But aside from all that, I found the first hollyhock blooming!  I am in love with this color.


My first time growing borage.  The true-blue color of this herb is surreal.


 The pansies are happy.


 This was a flower in a wildflower seed packet - I think it is a yellow poppy?


 More poppies.  Notice the crinkles on the petals?


The wildflower garden (such as it is right now). 


Zinnias!  Last year was the first time I had ever planted zinnias.  I enjoy their bright splashes of color, and they are pretty heat and drought tolerant (a definite plus).


Zebrina Malva - a relative of the hollyhock.


Another double poppy.


The sunflowers are budding.


Well, I guess I'd better get working on those beans and peas...  Have a lovely day!

Jul 18, 2013

Tar Heel Pie

Chocolately, fudgy, nutty.  When the latest issue of Cooks Country came in the mail the other day, Charlie spent a bit of time reading the article for Tar Heel Pie.

*loving hint, hint to wife* 

Though the name is strangely catchy, what will really grab you is the intense chocolately-ness and just-right crispness of the toasted pecans.  I think this could also be called Chocolate Brownie Pecan Pie. 


You parbake a single crust pie shell, line it with slightly toasted pecans, and make your batter.


Spread the (thick) batter in the pie shell.


Bake at 325 degrees F for 30 to 35 minutes. 


Serve warm with a scoop of homemade vanilla ice cream!


Happy husband.  And wife. 

Tar Heel Pie


  • 1 (9-inch) single-crust pie shell, baked until lightly golden brown
  • 1 cup semisweet chocolate chips
  • 4 tablespoons unsalted butter
  • 1/4 cup vegetable oil
  • 2 tablespoons unsweetened cocoa powder
  • 3/4 cup packed dark brown sugar
  • 2 large eggs
  • 1 tablespoon vanill extract
  • 3/4 teaspoon salt
  • 1/4 cup all purpose flour
  • 1 1/4 cup pecans, toasted and chopped course

  • Preheat oven to 325 degrees F.  In microwave or double boiler, melt 2/3 cup chocolate chips and butter, stirring often.  Whisk in oil and cocoa until smooth.  In separate bowl, whisk sugar, eggs, vanilla, and salt together until smooth.  Whisk chocolate mixture into sugar mixture until incorporated.  Stir in flour and remaining 1/3 cup chocolate chips just until combined.  Spread pecans in bottom of pie shell, then pour batter over top, using spatula to level.  Bake pie until toothpick inserted in center comes out with thin coating of batter attached, 30 to 35 minutes.  Let pie cool on wire rack until barely warm, about 1 1/2 hours.  Serve warm with vanilla ice cream, if desired.  (the vanilla ice cream is recommended).  To reheat pie, either place in 300 degree oven for 10 to 15 minutes or until warm or microwave for a little bit, til warm.