Showing posts with label big green egg. Show all posts

Sep 3, 2013

Brined Lamb Chops

I hadn't been planning on sharing this recipe for brined lamb chops, but they were so delicious that I decided I had to share!  I must apologize that there aren't better pictures, but I hadn't planned on posting this recipe. 

This was one of those things where I just threw a bunch of spices and herbs in the brine, and let the whole thing sit in the fridge overnight.  After they were off the grill, we found out that these lamb chops were so delicious and flavorful, they didn't need any type of sauce at all. 

Have you ever tried brining lamb?  How about brining other meats?


Brined Lamb Chops


  • 8 lamb chops, thawed
  • 1/4 cup kosher salt
  • 1/4 cup sugar
  • 1 teaspoon cumin
  • 1 tablespoon Old Bay Seasoning
  • 1 tablespoon dried minced onions
  • 1 teaspoon garlic powder
  • 1 teaspoon dried oregano
  • 1 teaspoon dried mint
  • 1 teaspoon paprika
  • 1 teaspoon whole black peppercorns
  • 2 quarts water
Place all ingredients except for lamb in a gallon bag or large container.  Stir until the salt is dissolved.  Add lamb chops.  Refrigerate for about 12 hours.  About 1/2 hour before you are ready to cook them, remove from the refrigerator and remove from brine to wire rack.  This will allow the lamb's temperature to come up a little before grilling.

Prepare grill to medium-high heat.  Grill lamb chops to desired doneness, about three minutes per side for medium-rare. Transfer lamb chops to platter and let rest for a good 10 minutes or so. Garnish with fresh oregano or mint sprigs and serve.

Aug 2, 2013

Lamb Shanks

Last year we bought two lambs from a local farmer.  We have enjoyed experimenting with all of the different cuts of lamb.  Lamb Shanks anyone?  This was both the first time I have cooked and eaten lamb shanks.  After doing some research, I decided to try using two different methods and compare them.

The first recipe was a Barbecue Lamb Shank style.  For this one, I made a fresh herb paste, using fresh thyme, oregano, rosemary and mint from the garden.


I trimmed the "silver skin" off of the lamb shanks (or at least as much off of it as I could).


Then I coated the shanks in the paste.


And tucked them away in a zip lock baggie for about 12 hours in the refrigerator.


The next recipe was a long slow braising technique which finished on the grill.  All this recipe used was chicken broth, red wine, lots of fresh garlic and a squeeze of lemon.


Put all the ingredients in the pot and simmer for about three hours, flipping the shanks every 1/2 hour.


I also put together a pan of fresh vegetables to roast on the grill - par cooked potatoes, celery, carrots, onions and a mix of sweet peppers - brushed with olive oil and sprinkled with a little kosher salt.


The barbecue lamb shank when on the grill one hour and twenty minutes before eating time at about 250 degrees F.  We put the carrots on at about the 1/2 hour mark.


Then piled the braised lamb shanks and the rest of the veggies at about 20 minutes left. 


The delicious platter of lamb shanks and grilled vegetables.


While both recipes were good, I liked the barbecue lamb shank recipe better.  It had so much flavor from the fresh herb paste, and also from being in the grill for longer. 


Recipe #1 - Barbecue Lamb Shanks


  • 1 1/2 tablespoons salt
  • 1 tablespoon paprika
  • 3 3/4 teaspoons black pepper
  • 2 1/4 teaspoons garlic powder
  • 3/4 teaspoon dried thyme
  • 3/4 teaspoon dried rosemary
  • 3/4 teaspoon dried oregano
  • 3/4 teaspoon ground ginger
  • 3 tablespoons extra-virgin olive oil
  • 2 tablespoons soy sauce
  • 2 tablespoons Dijon mustard
  • 1 tablespoon fresh lemon juice
  • 4 lamb shanks
  • Finely chop fresh herbs.  Combine all chopped herbs and everything else except the lamb shanks.  Stir  until the mixture forms a paste.  Trim as much silver skin as you can from the lamb shanks. Coat the shanks with the seasoning paste, place in a plastic storage bag, and refrigerate for 12 hours.  Build a fire (wood or a combination of charcoal and wood) for indirect cooking by situating the coals on only one side of the grill, leaving the other side void. When the cooker reaches 250°F, place the lamb shanks on the void section of the grill. Cook for 1 hour and 15 minutes, or until the internal temperature of the lamb reaches 125°F for rare, 135°F for medium rare, or 145°F for medium. Let the lamb rest for at least 15 minutes before serving.

    .

    Recipe #2: Braised Lamb Shanks

    • 4 lamb shanks, each about 1 pound
    • 1 cup Port or red wine
    • 8 cloves garlic (don't bother to peel them)
    • 1 cup chicken broth
    • Salt and freshly ground black pepper to taste
    • 1/2 fresh lemon 
     Combine the lamb shanks, wine, chicken broth, and garlic in a skillet just large enough to hold the shanks. Turn the heat to high and bring to a boil; cover and turn the heat so that the mixture simmers gently. Cook, turning about every 30 minutes, until the shanks are tender, at least 2 hours and more likely longer.  Remove the shanks and strain the sauce. Preheat a charcoal or gas grill or the broiler; the rack should be 4 to 6 inches from the heat source, and the fire hot.  Grill or broil the shanks until nicely browned all over, sprinkling them with salt and pepper and turning as necessary; for about 15 minutes. Meanwhile, reheat the sauce gently; season it with salt and pepper, then squeeze the lemon and add juice. Taste and add more seasoning if needed. Serve the shanks with the sauce.
 Note: I cooked a total of 4 lamb shanks and cut each of these recipes in half.  

Jul 23, 2013

Beef Short Ribs

Last fall we bought a 1/4 beef, 2 lambs and 1/2 pork from local farmers.  We have had fun trying out new cuts of meat and figuring out different ways to use them.  This last weekend we decided to try some short ribs, neither having tried them before. 


Jul 14, 2013

Grilled Lamb Chops and Vegetables

We are constantly trying to eat healthier, and I keep trying to be creative in eating/introducing vegetables to our menu.  For our lamb steak night, I got the idea of trying to grill a bunch of miscellaneous vegetables with the lamb, just to try it.  As it turned out, we loved pretty much all of the vegetables we tried!  We tried fresh sweet peppers, mushrooms, peas, green beans, chayote squash, corn, carrots and Brussels sprouts. 


Before grilling, I skewered the small vegetables on these handy metal kabobs.  Then I brushed them with a little olive oil and sprinkled them with a little kosher salt. 


For the chayote squash, I peeled it and sliced it in about 1/2 inch thick slices.  The chayote squash was a first for us, and we were eager to try it.
 

A refreshing beverage - our homemade beer.  Mmmm.  More posts on that later.


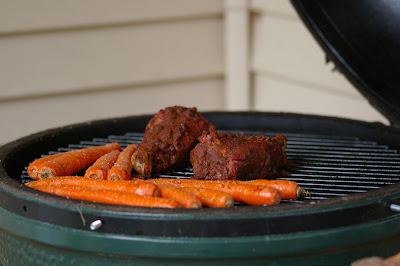
The finished grilled carrots.  They were beautiful, soft, a little smokey and had a rich carrot-y flavor.
 

The brussels sprouts were delicious as well!


The lamb steaks - super easy as well.  Lamb steak + kosher salt + black pepper = amazing.


Grilled Vegetables

This won't really be a recipe because the directions and ingredients will be entirely flexible based on what you have on hand and what you like to cook!  We just used vegetables we had around, and I think part of the fun of this is expiramenting.  As far as cooking time, we put the vegetables we thought would take a little longer (like the carrots, brussels sprouts and chayote squash) on first, then after a few minutes added the vegetables that seemed like they would need less cooking.  Here are our impressions of the vegetables we grilled:

Carrots - delicious
Brussels sprouts - great
Corn on the cob (in the husk) - great - no butter needed
Choyte squash - amazingly good and creamy!
Mushrooms - okaaayyyyy (we are still learning to like mushrooms so they weren't our favorite)
Green beans - tasty
Sugar snap peas - very good
Sweet peppers - of course amazing

Future vegetables I would like to try to grill:
Asparagus!
Eggplant
Onions
Zucchini

What kinds of vegetables do you like to grill?


Lamb Chops

4 lamb chops
olive oil
kosher salt
freshly ground black pepper

Rinse and pat the chops dry.  Brush both sides of each chop with olive oil.  Sprinkle with salt and pepper.  Leave meat out of the refrigerator to come up to room temperature for about 1/2 hour. 

Next, to prepare the grill.  We used our big green egg, which we let heat up until about 350F.  Once the grill is ready and the chops have been out of the fridge for 1/2 hour, carefully oil the grates with a paper towel dabbed in vegetable oil.

Add the lamb chops to the grill and grill over high heat for about 4 minutes.  If you get any flareups, move the chop to a cooler part of the grill until the flames die down.  After about 4 minutes, turn the chops over and cook for another 4 to 5 minutes.  As always, this varies based on the temperature outside, the temp and thickness of the meat, and the grill temp.  If you use a instant read thermometer, 155° F is medium.  Remove the meat from the grill, cover and let it rest for 5 minutes.  Enjoy with your grilled vegetables! 

Jul 8, 2013

Smoked Turkey


I still had a small turkey in the freezer that I had bought after Thanksgiving last year, and needed to use it up.  I got the idea to try smoking it - and it really turned out with such a delicious smoked flavor and was so moist.  I am already a HUGE fan of brining turkeys, so I combined the techniques of brining and smoking and we got a great meal (well, a few great meals). 

I started by brining the turkey for about 8 hours (I think more time in the brine wouldn't hurt at all, I just got it brining too late!  I usually brine turkeys overnight).  I used onions, the peel from two lemons, sugar, molasses, kosher salt and a head of garlic.


Then, the "stuffings"- a quartered onion, two whole lemons, a head of garlic, chopped potatoes, and fresh herbs from the garden: variegated thyme, oregano, sage, parsley and rosemary.  These stuffings were just for aromatics.


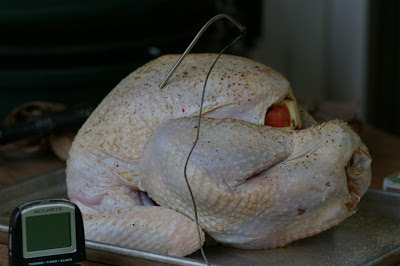
The stuffed turkey, with a brushing of olive oil and a sprinkle of freshly ground pepper.


Using a digital probe thermometer is the only way I cook turkeys anymore.  Time to go on the big green egg!  We put hickory chips in our little smoke box. 


The finished turkey, about three hours later!  The skin browned beautifully, and left the meat protected and moist inside. 


Slices off the finished turkey - can you see how moist it is?  It tasted delicately smokey, with such a nice freshness from the lemon and garlic.  It was a big hit with Charlie too!

Smoked Turkey


For the brine:
  • 1 turkey, the one I used was about 10 pounds
  • 1 gallon water
  • peeled fresh rind off 2 lemons
  • 1 cup kosher salt
  • 1/2 cup sugar
  • 1/4 cup molasses
  • 2 onions, quartered
  • 1 head garlic, with the top and bottom sliced off
  • a couple of trays of ice cubes
For the aromatics:
  • 2 lemons, quartered
  • 1 onion, quartered
  • 1 cup roughly chopped potatoes
  • 1 head garlic, top and bottom sliced off again
  • Several sprigs of fresh herbs; I used parsley, thyme, sage, rosemary, oregano
For the outside:
  • olive oil
  • freshly ground black pepper

To smoke this turkey, we used our big green egg.  However, I looked it up and it looks like you can smoke turkeys in – of course – a smoker, on a Weber, a gas grill with a wood chip smoke box or with whatever you have.  The reason we like our big green egg so much is because it holds at a certain temperature so well (even for hours).  In this recipe, I will just share how we did it on the big green egg.  

For the brine, bring water to a just-over-lukewarm-temperature in a large pot (we just want to be able to dissolve the sugar and kosher salt, which is harder to do in cold water).  Add all of the brine ingredients: lemons, kosher salt, sugar, molasses, onions and garlic.  Heat and stir just until the salt and sugar is dissolved.  Immediately remove from heat.  Once it has cooled, add the rinsed turkey (remove the neck and giblets and save for another use) to the brine (making sure the turkey is completely covered).  You can either put the turkey and brine in a large 2 ½ gallon resealable plastic bag, or any container that is large enough to hold both turkey and brine, or leave it in the large pot.  I left mine in the large pot.  Lastly, sprinkle a couple dozen ice cubes in the pot.  Refrigerate at least 8 hours, preferably overnight.  

Preheat the big green egg to around 350, without the plate setter.   If using wood chips (recommended), soak them in water for about an hour.  

Remove turkey from the brine, rinse well and pat dry.  Discard the brining liquid and solids.  Stuff the turkey with the lemons, onions, potatoes, garlic and herbs.  I really jammed mine in there!  It’ll be ok if the ingredients are a little squished.  Brush the outside of the turkey with olive oil and season with desired amount of freshly ground black pepper.  I also folded the wings under the body so we didn’t have to worry about them burning.  Now, outside to the smoker!

You can either scatter about one cup of the hickory chips over the hot coals, or if you have a little wood-chip-smoke-box, put them in there and set the box right in the coals.  Then, place the plate setter (legs up) in the egg.  Put a drip pan on top of the plate setter (or make your own out of tin foil like we did!).  Put on the wire grate.  Place digital thermometer probe into deepest part of the breast (I know this sounds wrong – but keep reading!  We “accidentally” came up with this great technique!).   Once the turkey is settled on the wire rack, close the lid of the big green egg.  The temperature should level out to around 300ºF.  Cook for about 2 ½ hours, until the instant thermometer registers 165ºF.  During this time, feel free to add more wood chips based on how smokey you want your meat!

Remove the turkey from the smoker and let rest for a good 20 minutes. Carve the white meat and serve immediately.  The white meat with be perfect – but the dark meat will be a little bit underdone.  Just enjoy the white meat for this meal!  Here’s what we found out: if you carve all of the white meat off the turkey, leaving just the slightly underdone thighs and drumsticks – the next day you can place the whole rest of the bird on a cookie sheet, cover it with tin foil and roast it in the oven at 300ºF for about an hour and a half – the dark meat will now be perfectly cooked and melt in your mouth.  This way (even though it’s a little more work and you have to split up your meals) you can have perfectly cooked white and dark meat!

Note: if you aren't into this technique and want to eat the white and dark meat together, place the digital thermometer probe into the deepest part of the turkey thigh and cook until the meat registers 165ºF.