Jan 29, 2014

Cherry Snowflake Pie

Did you ever have that Raspberry Snowflake Pie way back when?  It used to be one of our Thanksgiving traditions, but we eventually decided several things:

a) The pie was much too sweet.
b) The pie didn't hold any shape.
c) The raspberry seeds got stuck in our teeth.

This last Thanksgiving, I had a hankering for the pie again, however, I wanted to make a few changes - hopefully for the better.  I decided to:

a) Cut out a bunch of sweetness.
b) Add unflavored gelatin to the cream cheese layer to help it hold its shape.
c) Change the pie filling to cherry to eliminate the "seedy" problem. 

All in all, these changes had a great effect on the pie and my family gave it excellent marks.  This pie will definitely be going back on our traditional Thanksgiving menu!

As a side note, I also thought that this pie would make a lovely wintry Valentines Day special dessert for that special someone in your life!  You could even get really creative and cut the round "snowflake" into a heart shape.  Then, you could lay out the cherries in a matching heart shape on the top of the pie.  Please send me some pictures if you try this, I would love to see them!


P.S. As you can tell from the pictures, I forgot to dust the top of the snowflake with powdered sugar.  Next time!

P.S.S. You can also probably tell from the pictures that the left side of the snowflake broke.  Make sure to handle with care, the snowflake is very delicate! 


Cherry Snowflake Pie

  • 1 15 oz Refrigerated Pie Crust (or a bottom and top homemade crust)
  • 1 21 oz can cherry fruit pie filling
  • 1 8 oz package cream cheese, softened
  • 1/2 package unflavored gelatin
  • 1/4 cup water
  • 1/2 of a 14 oz can sweetened condensed milk (7-ish ounces)
  • 1/4 cup lemon juice
  • 1/2 teaspoon almond extract
  • 1/2 to 1 teaspoon powdered sugar

Heat oven to 450 degrees F.  Prepare one pie crust as directed on package using 9 inch pie pan. Bake for 9 to 11 minutes. Cool.  Next, to make snowflake crust, unfold remaining crust onto ungreased cookie sheet; press out fold lines.  Cut crust into 7 1/2 inch diameter round; discard scraps.  Refold round into fourths on cookie sheet. With knife, cut designs from folded and curved edges; discard scraps.  I tried to be as creative as I could by using a knife to cut designs and also a large cake tip to cut small circles.  Unfold your snowflake.  Bake on the cookie sheet for 6 to 8 minutes or until crisp.  Cool completely.

Now to fill the pie.  Add the unflavored gelatin to the water and let sit for 5 to 10 minutes.  Reserve about a 1/2 cup of the cherry pie filling; spoon remaining filling into baked, cooled shell.  In large bowl, beat cream cheese until light and fluffy.  Add softened unflavored gelatin and beat well.  Add sweetened condensed milk; mix well.  Add lemon juice and almond extract; mix well again.  It doesn't hurt this filling to get extra air into it.  Spoon cream cheese filling over cherry pie filling in crust.  Refrigerate at least one hour.

To decorate the top, spoon reserved cherry pie filling around edge of pie.  I thought it looked nice to arrange the cherries fairly evenly around the edge.  Place snowflake crust over top, balancing on the cherries.  Refrigerate the pie for several hours.  Sprinkle the pie with powdered sugar just before serving.

Jan 28, 2014

Peanut Butter Trifle

Are there some days you are just in the mood for chocolate and peanut butter?  If so, this trifle might be just the thing for you.  Layers of chewy brownies, fluffy peanut butter cream, crunchy peanuts and peanut butter cups - this was really a hit with my family!


Peanut Butter Trifle


  • 1 9x13 pan of baked brownies (box or homemade - it doesn't matter), with peanut butter chips baked in (not required but extra tasty)
  • 2 packages mini peanut butter cups
  • 1/2 to 1 cup peanuts
  • 2 cups cold 2% milk
  • 2 small packages instant vanilla pudding
  • 1/2 cup creamy peanut butter
  • 1 teaspoon vanilla extract
  • 1 8 ounce carton frozen whipped topping, thawed
  • chocolate sauce

 Cut cooled brownies into 3/4 inch pieces.  Combine milk and pudding mix and whisk for about two minutes or until thickened.  Stir in peanut butter and vanilla, mix well.  Fold in whipped topping.  To assemble, drizzle some chocolate down the sides of the trifle dish for decoration.  Next, place a third of the brownies in a trifle dish or glass bowl, top with 1/3 mini peanut butter cups.  Sprinkle with 1/3 of the peanuts.  Spoon a third of the pudding mixture over top.  Repeat layers twice.  Garnish with reserved peanut butter cups.  Refrigerate until chilled.  

Jan 26, 2014

Walleye

A couple of Charlie's friends have recently given him walleye filets, and yesterday we decided to cook some of them.  Let me tell you, these were the best walleye filets we had ever eaten!  The delicious white, flaky fish combined with this perfect crust and topped with a squeeze of fresh lemon really made a delectable dinner - and will make for some great leftover walleye sandwiches for lunch!


The setup: the first bowl you see is the rinsed walleye filets, next, the seasoned flour, then the egg mixture, then the crushed saltine crackers, the fry pan on the stove, to the final resting plate next to the sink.


The walleye filets frying, a few at a time.


The walleye resting on the paper towel after cooking.


Look at that beautiful crust and the succulent, flaky fish... Mmmm.


Best Ever Walleye


  • 10 - 12 walleye fillets
  • 1 cup flour
  • dash garlic powder
  • dash pepper
  • dash salt (or to taste)
  • dash lemon pepper seasoning
  • dash old bay seasoning
  • 2 eggs, beaten
  • 1/4 cup milk
  • 1 tablespoon soy sauce
  • 1 and 1/3 sleeves saltine crackers, crushed but not finely (put them in a plastic bag and wack with the bottom of a saucepan)
  • 1 inch of oil in a fry pan

Heat the oil in a deep-fryer or large skillet over medium-high heat to 350 degrees F.  Check the fillets to ensure all bones and skin have been removed.  Place the beaten eggs, milk and soy sauce in a bowl and set aside. Combine the flour, garlic powder, salt, old bay seasoning, lemon pepper and pepper in another bowl.  Pour the cracker crumbs into a third bowl.  Dip the fillets into the flour mixture, then the eggs, and then the cracker crumbs and set fillets aside on a plate.  Test the oil: it will crackle and pop when a cracker crumb is dropped into it.  Carefully lower 2 or 3 or 4 (depending on the size of the fillet) fillets into the hot oil.  Cook until browned, about 3 to 4 minutes per side, depending on how big your filets are, using tongs to turn the fillets.  Transfer to a paper towel-lined plate and repeat with remaining fillets.  Serve with fresh lemon wedges.

Note: you could easily cut this recipe in half if need be!

Jan 25, 2014

Homemade Caramel Coconut Chocolate Shortbread ... you know, those Girl Scout Cookies?

It is just about that time of year again - girl scout cookie time.  I recently got a craving for those coconut/chocolate/caramel/shortbread rings.  Do you know the ones I am talking about?  Since my freezer stash is gone, I decided to try making my own.  I started with a favorite crispy shortbread cookie that I cut into rings (using, of all things, a biscuit cutter and a large pastry tip).  Next, the caramel coconut.  Rather than taking all the time to make a caramel from scratch, I decided to "fix up" store bought caramels, and added toasted coconut to this caramel mixture.  I had problems keeping this coconut mixture on the cookie rings, so I used some of the caramel as glue.  This worked pretty well.  Then, I dipped the bottoms in chocolate and did a chocolate drizzle. 

All in all, the cookies were a bit fussy to make.  But, they tasted really, really good.  And, as I ate another cookie and drank some ice cold milk, I decided it was all worth it. 


Rolling and cutting out the shortbread rings, using a biscuit cutter and the end of a large cake decorating tip.


Stirring together the caramel and toasted coconut.  Mmmm, this mixture smelled so delicious as I was stirring!


This is where I spread a thin layer of caramel on each baked shortbread ring to act as "glue."  It worked very well.


Then, all I had to do was put on the caramel/coconut mixture and do the chocolate.  A quick chill to set the chocolate, and they were ready to eat.


Whoops!  I guess this one didn't make it through the photo shoot. 


The layers: chocolate, shortbread, a caramel/coconut mixture, and drizzled chocolate.  Are you hungry yet?


Homemade Caramel Coconut Chocolate Girl Scout Cookies


For the shortbread cookies:
  • 3/4 cup butter, softened
  • 1/3 cup sugar
  • 1 1/4 cup flour
  • 1/4 teaspoon baking powder
  • 1/4 teaspoon salt
  • 1 tablespoon milk or whipping cream
  • 1 teaspoon vanilla extract
For the coconut caramel and chocolate layer:
  • 2 1/2 cups shredded toasted coconut
  • 1 14 ounce bag caramels
  • 1/4 cup milk
  • 1/4 teaspoon salt
  • 8 to 12 ounces chocolate (I used semisweet)

Preheat oven to 350 degrees F.  Cream butter and sugar until light and fluffy.  Add flour, baking powder, salt, milk and vanilla extract, blending just until combined and the dough begins to come together.  Wrap in plastic wrap and refrigerate for about an hour or until chilled.  Once the dough has chilled, roll each disk out onto a lightly floured surface to 1/8-inch thickness.  Cut out circles with holes in them (I used a round biscuit cutter and a large tip, but you could use a spice or condiment lid).  Place cookies on a Silpat or parchment paper-lined baking sheet and repeat with remaining dough.  Try to re-roll out the dough as little as possible.  Bake the cookies for 10 to 12 minutes, and transfer the cookies to a wire wrack to cool completely.

To make the coconut topping, melt the caramels, milk and salt in a non-stick skillet or double-boiler.  Cook, stirring, until the caramels are fully melted.  Remove from the heat and combine about 3/4 of the caramel with the toasted coconut.  I found that a gentle folding maneuver worked the best.

Carefully spread the remaining 1/4 cup of caramel on top of the cooled cookies, using an offset spatula.  Then press on a portion of the coconut mixture.  I found this worked better when I put on food safe gloves to handle the coconut/caramel mixture.  If the caramel-coconut mixture gets too difficult to work with, microwave it for a few seconds.

Melt the chocolate in a double-boiler or in the microwave.  Dip the bottoms of the coconut/caramel topped shortbread cookies in the chocolate and place them on a wax paper-lined baking sheet.  This is a little tricky to do, but I found that if I held onto the coconut mixture, I didn't lose as many cookies in the chocolate (they aren't as pretty when they take a whole bath in the chocolate).  To do the drizzle, I melted some chocolate in a sandwich baggie, and after the chocolate was melted, made a tiny cut at the corner.  This allowed me to drizzle the chocolate with a lot more control (I am not good at drizzling with forks or spoons).  Refrigerate the cookies for about 10 minutes to allow the chocolate to completely set.  Then: time to eat!


Jan 24, 2014

Vietnamese Pho

Have you ever eaten Pho?  (pronounced "fuh").  Have you ever heard of it?  A couple of years ago, Charlie came home from work and said he had heard about an interesting thing on the radio.  They were talking about the Vietnamese national soup, Pho, and, he said it sounded really tasty.  Since I love to experiment and cook new foods, I decided to do some research and give it a try.  Our first taste of pho was amazing.  Even though the soup is quite a bit of work to put together, we decided it was totally worth it - plus one batch is quite a few meals.  Let me share with you how we make our pho.

The finished pho, ready to enjoy! 


The pho spice mixture: dried chili pepper, whole fennel, a cinnamon stick, whole coriander, whole star anise and (since I didn't have any whole) ground cardamom. 


I pack these spices in a little cotton spice bag and they are ready to add to the broth.  


I couldn't resist playing around with the star anise - isn't it a beautiful spice?


By the way, I LOVE these little cotton spice bags.


Now, onto the ginger and onions.  I brushed the cut sides with oil, and next, they will be charred under the broiler.  


The charred ginger and onion imparts a great flavor and color to the broth.


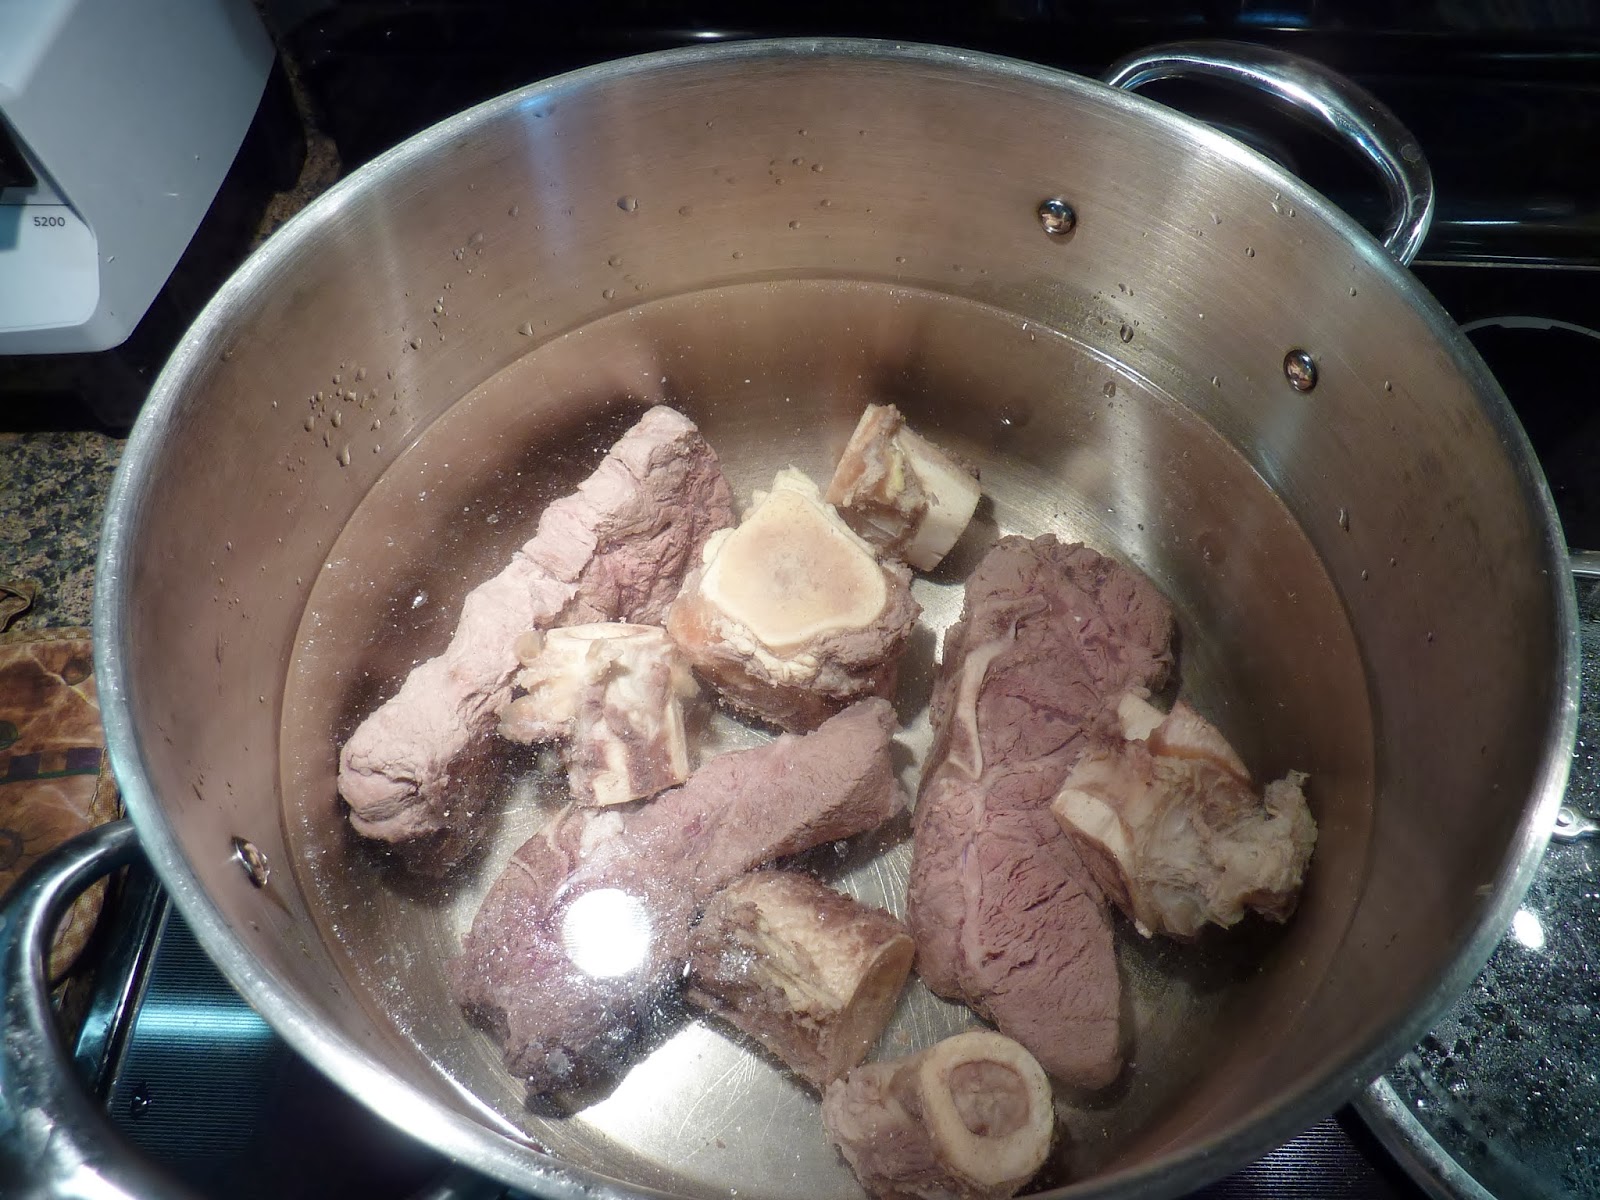
The first part to making the broth is to parboil the bones to remove impurities.  The bones: look at that beautiful marrow.  Sometimes I add a few chunks of cheap beef to the broth, just to give it some extra flavor.  For this batch, I also added some beef neck chunks of meat.


The impurities - also called "scum" - rising to the top while parboiling the bones. 


Then, dump out the icky water and rinse out the pot and rinse the bones/meat.  Add them back to the pot with 6 - 7 quarts of cool, clean water and bring back to a boil. 


Add the charred onions and ginger, the spice bag and salt, sugar and fish sauce. 


As the broth is simmering, you might get more scum.  Try to spoon off as much as you can-


Until you can see just beautiful broth.


Next, time to prepare your fresh salad.  Cilantro is a must.


Add whatever else you feel like for the fresh salad: here, I have cilantro, fresh snow peas, fresh bean sprouts, chili peppers and fresh lime wedges.


For this most recent Pho Fresh Salad, I have added sliced fresh onions, sliced green onions, red peppers and mixed greens to the "regulars." 


After you finish the broth and the fresh salad, it is time to put together the meal.  Start with thin slices of beef -


And place them in your bowl - yes, raw.  Bear with me.


Then, ladle the boiling broth over the raw meat.


As you can (hopefully) see from this picture, the boiling broth gently cooks the meat to perfection. 


Next, the rice noodles.  Add a few to your bowl.  Or, you could add a whole bunch if you want.


The wonderful thing about pho is that the meal changes as you eat.  Add a handful of this, and a dash more of that.  The following pictures are bowls of pho at various meals and at various times throughout the meal (just to give you an idea of how it works). 


I have to admit, I cheat a little.  Rather than just using chopsticks, I also use a spoon to scoop up that delicious broth.  Can't let it go to waste, right?


The flavors are rich, meaty, spicy and fresh, all at the same time.  Of course, since you are making your "own" bowl, you can change the flavors to whatever you want.


Yum! 


Pho

The broth:
  • 2 large yellow onions, halved
  • 4 - 6 inch piece fresh ginger 
  • about 6 beef leg bones (the bones with more marrow make a tastier pho)
    • Note: (as you might notice from my pictures, you can have some chunks of meat in your broth as well, to help give it a little more flavor) I added 3 chunks of beef neck meat
  •  1 to 2 tablespoons sugar
  • 1 1/2 tablespoons kosher salt
  • 1/4 cup fish sauce
  • a spice bag with:
  • 1 cinnamon stick
  • 1 tablespoon whole coriander seed
  • 1 tablespoon whole fennel seed
  • 5 whole star anise
  • 1 whole cardamom pod (or 1 teaspoon ground)
  • 6 whole cloves  
  • 1 dried chili pepper
First, char your onions and ginger.  This helps sweeten and mellow the ingredients.  Raise your oven rack to the highest setting and  preheat broiler.  Place halved onions and halved ginger on cookie sheet, and brush some cooking oil on the cut sides.  Broil on high until charred, turn over and continue to char - this should take 115 to 20 minutes total.  Set aside. 

Next, parboil the bones.  Bring a large stockpot of water to a boil.  Add the bones and keep the heat on high.  Parboil bones for a good 10 minutes in rapidly boiling water to get rid of impurities - they will look like a grayish/whitish foam floating up to the surface. After 10 minutes, dump out all of the water, rinse out your pot, rinse the bones, and refill with 6 quarts of clean, cool water and the bones/meat.  This will help create a clear, delicious tasting broth.  Bring the bones and water back to a boil, and lower the heat to a simmer - you really don't want this to boil any more.  Using a ladle or fine mesh strainer, remove any scum that rises to the top. 

Now, to your pot (that has the parboiled bones and clean water in), add the charred onions, the charred ginger, the sugar, salt, fish sauce and the spice bag.  As the broth is simmering, you might be able to see some more of that "scum."  Try to use a fine strainer or a spoon and strain out what you can. Simmer the broth for 3 hours.  Pour through a fine mesh strainer to remove the onions, ginger, bones and any bits of onion skin, ect... that might be floating in the broth.  Return the broth to the pot and taste - add more fish sauce, salt, sugar, ect... until the broth the flavor shines.  Continue to simmer for another 1/2 to 1 hour.  Now, time to make the soup!


The Soup Ingredients

  •  About 1 pound very thinly sliced flank steak, London broil, sirloin or eye of round steak
  •  Rice noodles (as you could see, I used the thin, flat rice noodles)
  • condiments such as Sriracha sauce, plum sauce and Thai Sweet Chili Sauce

To thinly slice meat, freeze the whole piece of meat for 15 minutes or 1/2 hour, and slice across the grain. Prepare rice noodles according to package instructions.


The Fresh Salad Ingredients

  • fresh lime wedges
  • fresh cilantro
  • fresh snow peas
  • fresh greens 
  • fresh bean sprouts
  • sliced fresh red pepper
  • sliced onion
  • sliced green onions
  • what else would you like?
The fresh salad can be as versatile as you are.  What fresh veggies do you like to eat?  What do you have around?


Putting It All Together

Make sure your broth is at a good simmer.  Have the rest of your soup ingredients ready at the table - the meat, the rice noodles, the fresh salad and the sauces.  Place raw meat slices in bowl and quickly add the simmering broth.  Add rice noodles, fresh salad and sauces to taste.  Time to start enjoying!  The thing we love about this is the meal is able to evolve - feel like a little more cilantro?  Add a bit.  Add some more fresh bean sprouts, or a squeeze of Sriracha or Sweet Chili Sauce.

I hope you enjoy your Pho as much as we do!