Apr 27, 2014

Updates...

Hi!  First of all, I wanted to apologize for my lack of blogging lately!  Between working full time still and trying to get ready for the baby, its been a little too busy to do very much blogging.

Want to see some of the things I have been up to? 


I took the plunge and finally decided to stop storing all of these Taste of Home magazines!  I am going through each magazine, entering the recipe I want to try or keep on the Taste of Home website, and adding it to the virtual "recipe box" on the website.  No more storing all of these paper magazines! (the chair is the 'done' pile and the table is the 'to do' pile - yay - I am almost done!).


Apr 22, 2014

Raspberry Tartlets

Ah, the temperature has finally risen to the 60's, and even the 70's on some days!  The sun is shining and the snow is pretty much gone. I think spring is finally on its way!

To celebrate I made these Raspberry Tartlets.  I love making pastries, and I love making mini pastries even more!


These raspberry tarts begin with crisp-but-not-too-sweet almond crust. 


Apr 14, 2014

Homemade Self Rising Flour

How many times have you been baking, and realized you need self rising flour?  This has happened to me more times than I can count.  Of course, you can buy pre-made self rising flour, but did you know it is also very easy to make on your own? 

All you have to do is stir three basic ingredients together - flour, baking powder and salt.  Easy peasy!


Apr 13, 2014

German Chocolate Cake Cookies

The other day I wanted to make a batch of cookies, but I didn't know what kind to make.  So I asked Charlie what kind of cookies he was in the mood for.  He didn't really have anything in mind either.

Where to find inspiration??  I grabbed my Taste of Home cookie cookbook.  As I was paging through the book, Charlie randomly suggested to make the cookies on page 38, in the top left corner (such a fun idea!).

I hurriedly turned to the correct page, and found a recipe for German Chocolate Toffee Cookies.  Mmmm, they sounded delicious!  But, as I read through the recipe, I realized I didn't have all of the ingredients.  I ended up creating these German Chocolate Cake Cookies, chock full of sweet German Chocolate, coconut and toasted pecans.

They were a hit!


Apr 12, 2014

Sauerkraut and Kielbasa

One night last week, we decided to crack open a jar of homemade sauerkraut from last fall and add some chunks of kielbasa.  While we haven't eaten this in a while, it is a dish we've occasionally eaten since we got married.  This time though, I decided to change it up a little. 

I added a peeled diced apple and a sliced onion to the sauerkraut, and a few other little dabs of ingredients.  At first, Charlie wasn't too sure.  But after he tried it, he said he loved it.  I wrote the recipe down and will make sauerkraut and kielbasa this way all the time in the future!

One of the things I love about this dish is that it is so quick and easy, it is hearty and filling, and it is a "one pot" meal. 


Apr 11, 2014

Raspberry Curd

Since I was a teenager, I have been known (at least in tiny circles) for my lemon curd - particularly lemon curd that I make into lemon tartlets.  I first became interested in making fruit curds when I was a late teenager.  Fruit curds are luscious and bursting with flavor, and able to go on pretty much everything (as we will soon see!). 

The curds I have made so far are lemon and kumquat curds, and today I decided to use my tried and true lemon curd recipe to make a raspberry curd. 

And.... it turned out deliciously!  The raspberry curd still had the delightful tang my lemon curd recipe has, but it was balanced by a delicious fresh raspberry flavor (though I do have to admit, I used frozen raspberries).  Also, the color of the raspberry curd was beautiful - an all natural deep raspberry color.


Apr 10, 2014

Dutch Baby

Ever since I was a kid, we have made these Dutch Babies.  I believe the recipe originally came from my grandma?  I will have to ask her. 

'Dutch Baby' is really nothing more than a puffed pancake, and I know there are many ways to make puffed pancakes.  I'd like to share with you this recipe.  Let me know what you think!


Apr 9, 2014

Breaded Fish Sandwich with Homemade Dressing

As I have said before, Charlie loves sandwiches, and consequently, I spend quite a bit of time trying new sandwiches - either by a new recipe or by making up my own recipe.  One day I decided to make a breaded fish sandwich, and it was a big hit.

Gently toasted bread, flaky delicious white fish, sliced fresh vegetables and a delicious homemade dressing.... tasty.  

The only problem was that it was a little hard to take a bite out of it! 


Apr 8, 2014

Of Wines and Meads (and just what is mead, anyways??)

Good day!  We have been organizing, racking and bottling a bunch of beers, wines and meads lately.  While we were going through these processes, I thought I would write down the wines and meads I/we have made (note: this will not include any beers we have made - I'll save that for another list!).  I have made all of the wines, and we have fun sharing the mead making. 

If you are interested in anything on these lists, just let me know and I will post some recipes!


Doesn't this pear wine look beautiful?  Charlie said it tastes just like eating a ripe pear!


Wines

  • 5 gallon Strawberry Wine (amazing strawberry essence, 1st place winner at county fair)
  • 3 gallon Kiwi Wine (quite acidic, waiting for it to hopefully mellow)
  • 1 gallon Wild Plum Wine (amazing, crisp and tart)
  • 3 gallon Mixed Fruit Wine (a taster pronounced it " a perfect dry Rosé ")
  • 5 gallon Crab Apple Wine (quite tart, waiting for it to mellow) 
  • 1 gallon Dandelion Wine (smooth and sweet - surprisingly tasty)
  • 3 gallon Pear Wine (tastes just like eating a ripe pear)
  • 5 gallon Riesling Wine (made from kit, absolutely a winner, perfect sweet Riesling flavor)
  • 5 gallon Australian Shiraz Wine (made from kit, a delightful dry red wine)
  • 5 gallon Italian Pinot Grigio Wine (made from kit, tasted just like a pinot grigio!)
  • 1 gallon Apple Champagne (still in secondary, but it smelled delicious!)
  • 2 gallon Mixed Fruit Wine #2 (still bubbling away in the primary)
  • 10 gallons Hard Cider (wasn't sure where to add this; tasted deliciously crisp, tart and appley!)


This photo shows a glass of pomegranate mead - our favorite of all the meads we have made. 


Meads 


Before we get started on this list, let us ask the question: what exactly is mead?   

Mead is an often misunderstood drink - when Charlie and I tell people we make mead, they wonder, is it a watery wine?  a type of beer?  or just something weird?  

To put it simply, mead is a wine-like beverage made from a water and honey fermentation - the key is the honey.  Mead must be made with honey.  Mead can be quite alcoholic, sometimes as high as 20% (I guess it can go higher than 20%, but I think it compromises the flavor).  

Meads can range from dry (tasting just like a fruity wine) to a sweet dessert wine with the perfect nose and essence of honey - and anywhere in between.  Mead is a very elegant, beautiful drink that is best sipped in small quantities.  

Technically, the word "mead" refers only to a beverage made from honey fermented with water - with no flavorings or additives.  

When you add fruit and other flavorings to mead, you get such names as blossomel (fermented or flavored with flower blossoms), cyser (made with apples, apple juice or apple cider), melomel (fermented or flavored with fruit or fruit juice), metheglin (fermented or flavored with herbs and/or spices), braggot (malted grain and hops added) and several others.  For ease of understanding, we generally call all of our honey-fermented beverages "mead" (it is hard enough to explain what a 'mead' is, let alone a 'blossomel' or a 'metheglin!').

Here are the meads we have made so far:

  • 5 gallons Traditional Mead (tasty, focusing on the essence of the honey)
  • 15 gallons Pomegranate (a sweet dessert wine, delicious beyond imagination)
  • 7 gallons Blueberry Melomel (fantastic blueberry flavor, honey nose, slightly dry)
  • 2 gallons Madagascar Vanilla Tropical Mead (a delicious pineapple-y, mango, vanilla flavor)
  • 5 gallons Black Cherry Mead (not good at first, but in one year it was amazing, fruity and dry)
  • 5 gallons Medium Show Traditional Mead (sweeter than the traditional mead)
  • 2 gallons Peach Ginger Nutmeg Mead (interesting flavor, waiting for it to 'ripen')
  • 1 gallon Cranberry Mead (tart, amazing, just right for that turkey dinner!)
  • 3 gallon Chokecherry Mead (still in the secondary, but it smells delicious)
  • 1 gallon Hop Braggot (mead meets beer? interesting flavor)
  • 1 gallon Cardamom Rose Hip Mead (delicate cardamom flavor, colored nicely by the rose hips)
  • 1 gallon Vanilla Saffron Mead (yes, yes, yes, such a delicious vanilla flavor, colored by saffron)
  • 1 gallon Juniper Berry Mead (great gin-like flavor, but sweeter (and less alcoholic) than gin)
  • 5 gallon Apple Cyser (amazing apple/honey smoothness and flavor, tasty beyond imagination)


The amazing Cyser on a snowy winter day.  


By the way, these are comprehensive lists of all of the wines and meads we have ever made since we started vinting over two years ago.  A lot of them are gone.  And if you are wondering what we do with all of these bottles; of course we drink some, but we also love to share with friends and family and give bottles away as gifts.  We also have quite a few bottles put away to try in 5 or 10 years or so (or 15 or 20 years!).  

We have found that vinting and brewing is a fun, creative hobby that also brings joy and inspiration to others!

Apr 6, 2014

Soba Noodle and Pork Steak with Fresh Asian Vegetables

Soba noodles are Japanese noodles made with buckwheat flour.  From what I have heard, people either really like soba noodles or they really don't like them.  I'd never tried them, but when at an ethnic market, I found a package and thought it would be an interesting experiment! 

That soba noodle package has been patiently resting on the pantry shelf for several months now, and I decided that it was time to try cooking them - no more waiting for the perfect recipe to come up!  As I was rummaging around the kitchen, I also found a package of pork steaks in the freezer that needed to be used up, and thought it would be interesting to combine the two to create a dish.  And then I needed a sauce or topping to bring it all together....

And so, 'Soba Noodle and Pork Steak with Fresh Asian Vegetables' was born.  It actually turned out really, really good (I was surprised that Charlie liked it so much!).  I cooked the soba noodles simply, brined the pork steak for a few hours, and created an Asian vegetable topping that tied everything together. 

By the way, the soba noodles were quite tasty.  They definitely had a whole-wheat-pasta-type-flavor, but I also thought they had a stronger, nuttier taste.  We loved them and I definitely plan to keep experimenting with soba noodles!  


Soba Noodle and Pork Steak with Fresh Asian Vegetables


for the pork steak

  • 1/4 cup kosher salt
  • 1/4 cup sugar
  • 2 cups water
  • sprinkling Old Bay seasoning
  • 2 pork steaks, thawed (I think pork chops might work fine as well, though I didn't try it)

for the Asian Vegetable Topping
  • 1 finely chopped carrot
  • 1/2 onion, finely chopped
  • 1/4 cup finely chopped red pepper
  • 2 - 4 tablespoons finely chopped cilantro (depending on taste)
  • squeeze of 1/2 tangerine (or 2 tablespoons orange juice)
  • squeeze of 1/2 lime (about 1 tablespoon)
  • 2 teaspoons sesame oil
  • 1 tablespoon mirin
  • 1 tablespoon seasoned roasted garlic rice vinegar
  • 1 to 2 teaspoons Thai sweet chili sauce (depending on hotness)

For the soba noodles
  • 1/2 package buckwheat soba noodles
  • 1 teaspoon kosher salt
  • 2 quarts boiling water

For the pork steak: Place salt, sugar, water and seasoning in a gallon bag.  Seal and swish around to dissolve salt and sugar.  Add pork steaks.  Place in refrigerator for about 4 hours. When you are ready to put the dish together, heat a skillet over medium to high heat.  Pan fry the pork steaks for about 8 minutes on each side, or until the internal temperature comes to 140 degrees F.  Remove to platter, cover with tin foil and let rest until you are ready to thinly slice and eat. 

For Asian Vegetable Topping: Stir all topping ingredients together in a bowl.  Let sit in the refrigerator for 2 to 4 hours to allow flavors to meld.

For soba noodles: Bring 2 quarts of water to a boil in a medium sized pot with the kosher salt.
When water reaches a rolling boil, add noodles and stir well.  As it begins to boil over, add one cup of cold water and stir.  As it begins to boil over again, turn off the heat.  This will take approximately 7 or 8 minutes.  Try a noodle - you want them to be firm-tender (or al dente) - not mushyIf they are still too firm, let them sit in the hot water for a minute until they are good.  Drain and rinse in cold water to stop the cooking process. I like to stir in a dash of olive oil while the noodles are in the sieve - it helps keep them from sticking together. 

To put it all together: You can serve this however you wish.  For presentation, I placed a pile of soba noodles at one end of a plate, thinly sliced the pork steak and arranged the topping over the whole thing.  However, when we went to eat it, we stirred it all together anyways.  If you would like, just stir together the soba noodles, the vegetables and the thinly sliced pork steak in a bowl and serve it that way. 

Apr 5, 2014

Steamed Shrimp Dumplings

Ahhh, Steamed Shrimp Dumplings, another favorite meal of ours.  We first tried shrimp dumplings at PF Changs, and I fell in love with them and wanted to try to duplicate the dumplings and sauce.  After a few tries, I came up with this recipe.  Charlie and I think that these dumplings are better than those at the restaurant!

It has been a long time I made these dumplings (probably over a year) and earlier this week we decided it was time to make them again. 

Steamed Shrimp Dumplings are actually part of a larger family of foods called "dim sum-" which is "a Chinese dish of small steamed or fried savory dumplings containing various fillings, served as a snack or main course."

All dim sum can be a bit time consuming to make, but we find the results well worth it.


To get started, you need thawed raw shrimp that has been roughly diced.


This is the shrimp dumpling filling ingredients - minced carrots, green onions, shrimp, fresh garlic, fresh ginger, and seasonings.


The bamboo steamer.  I do use a bamboo steamer to make these shrimp dumplings and other dim sum, but you don't have to have one - you could also use a well greased metal steaming basket.  Or, you could skip the steaming aspect and pan fry the dumplings like I do for my pot stickers


If you do use a bamboo steamer, make sure to place a piece of parchment steamer liners in the bottom of each basket.  I also lightly grease them with just a spray of non-stick cooking spray to ensure easy removal of the dumplings.  These steamer liners can be reused through all of the shrimp dumplings in this batch. 


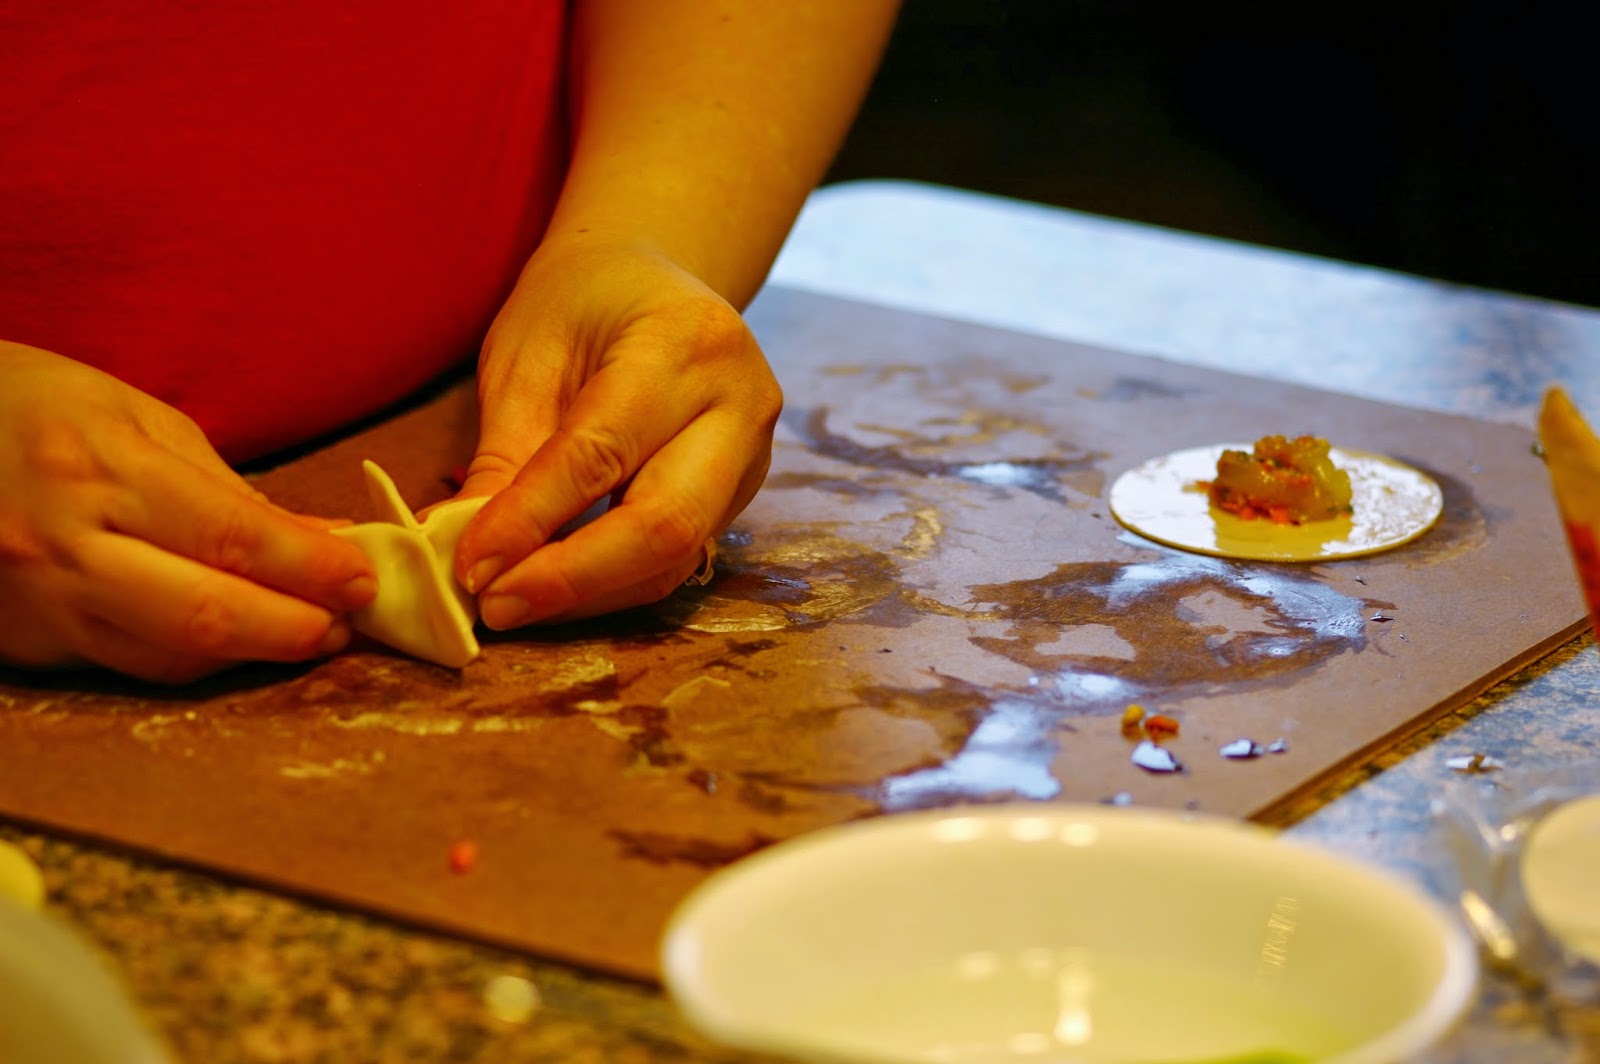
Now on to the filling.  You will notice I have a round wonton wrapper - it is actually a pot sticker wrapper.  I would recommend going with square wonton wrappers.  I usually use the square wrappers for shrimp dumplings, I just happened to have round wrappers on hand.  Anyhow, place about a teaspoon of filling in the middle of your wrapper.  (credit to: Photo Assistant Charlie who took these next few shots)


Spread a little water around the perimeter of each wrapper.


The dumpling, ready to fold.


Start the fold by bringing up to opposite sides of the wrapper.


Keep bringing the dough in toward the center of the dumpling - for your end result you want the fold to look like a 't.'


Hopefully you can see that I am pressing all the corners to the middle. 


Make sure the air is squeezed out of the dumpling.  (note: please don't mind my pregnant belly trying to get in on the action here!)


And give the seams a final good squeeze. 


Tada! 


This is what your dumplings should look like. 


Time to fill the bamboo steamer!  You will actually only be cooking one layer at a time, but it is nice to have the next layer filled and ready to go.


Aren't they beautiful?


To cook the dumplings, I use a large skillet that has 1 or 2 inches of water in the bottom.  Bring that to a simmer and place one layer of the steamer basket in it - yes, directly in the pan.  Steam the dumplings for 7 or 8 minutes.  And make sure that your skillet of water doesn't boil dry - I have found that with each new batch of dumplings I add another cup or two of water to the skillet. 


Now, it is time to eat!  See how beautiful and translucent steaming makes the shrimp dumplings?


We love the dumplings served with this delicious sauce - fresh ginger, garlic, and soy sauce mixture - I've included the recipe at the bottom of this post.


Doesn't this make your mouth water? 


Steamed Shrimp Dumplings


  • 1 - 12 ounce package wonton wrappers(square preferred)

filling
  • 1 pound raw peeled and deveined shrimp, thawed and roughly diced
  • 2 tablespoons minced fine carrots
  • 2 tablespoons minced fine green onions
  • 1 teaspoon minced fresh ginger
  • 1 teaspoon minced fresh garlic
  • 2 tablespoons sesame and garlic sauce
  • 1/4 teaspoon sesame oil
  • 1/4 teaspoon salt
  • 1/4 teaspoon sugar

sauce

  • 1/2 cup soy sauce
  • 1 tablespoon seasoned roasted garlic rice vinegar
  • 1 teaspoon Thai sweet chili sauce
  • 1 tablespoon sugar
  • 1 teaspoon minced fresh ginger
  • 1 tablespoon sesame oil
  • 1/2 cup water
  • 1 tablespoon minced fresh cilantro
  • 1 tablespoon finely chopped green onion

Combine shrimp filling ingredients.  Cover and refrigerate for an hour.  To make your dipping sauce, combine all the ingredients in a small saucepan - except the fresh cilantro and green onion.  Bring to a simmer and simmer about 5 minutes.  Let cool and refrigerate until ready to use. When ready to use, stir in cilantro and green onion, or sprinkle on top of the sauce.

When you are ready to start your dumplings, take a small spoon or small cookie scoop, and place about a teaspoon of shrimp mixture into wonton wrapper.  Moisten outside edge with water.  Fold corner to corner to form a cross or a 't' shape and seal.  The top should look like cross.  If you wish, forming the dumplings can be done a bit ahead of time.  Just place them in an airtight container in refrigerator until ready to cook and serve.  Or, just cook them right away.

Place about 2 inches of water in a large skillet.  Bring water to a boil, then lower heat to bring down to a slight boil.

Line bottom of Chinese steamer with a piece of parchment paper, then a light coat of vegetable oil or non-stick spray.  Place dumplings in steamer and cover with bamboo lid.   Place steamer in large skillet.  Steam 7 or 8 minutes, depending on how fast your water is simmering. Dumplings should be firm with internal temperature of 160 degrees. 

Serve in steamer or on plate, with dipping sauce. 

Apr 3, 2014

Proscuitto Wrapped Fresh Ginger Dates with Balsamic Reduction

My parents recently went on a short trip to southern California to visit my grandma.  One of the treats they brought back with them were some California dates.  I was so excited about them, and wanted to make something that really showcased the dates.

I had some prosciutto in the freezer, and decided I wanted to make prosciutto wrapped dates.  But what else could I do to make them a little more special?  Hmmmm...  I decided to make a little cream cheese filling.


Apr 1, 2014

Spring Salad with Parmesan Bowl

If you are looking for a fancy, beautiful springy salad, then this recipe is for you.  This recipe involves making a parmesan bowl (much easier than you might think); creating a beautiful green salad with fresh fruit and candied pecans, and is topped by a drizzle of raspberry balsamic vinaigrette.

Excited?  So am I.  Lets get started!


Spring Salad with Parmesan Bowl


for bowl
  • freshly grated parmesan cheese (1/4 cup for each basket you need to make)
for salad
  • Spring Mix greens
  • sliced fresh strawberries
  • sliced fresh blackberries
for nuts
  • 1/2 cup pecan halves
  • 2 tablespoon sugar
raspberry balsamic vinaigrette
  • 1/3 cup raspberry balsamic vinegar
  • 2 tablespoons olive oil
  • salt and pepper to taste
  • 1 teaspoon strawberry preserves
  • 1 teaspoon honey Dijon mustard

For parmesan bowl:
In a large nonstick skillet, spread 1/4 cup cheese thinly and evenly over the bottom to form a 7-inch circle. Put the pan over medium heat and cook until the cheese is bubbling and lightly browned, about 3 minutes. Remove the pan from the heat. Put a small bowl upside down on a cutting board. When the bubbling stops, after about one minute, carefully remove the disk with a thin metal spatula and drape it over the bowl. Press gently with the spatula or your fingers so it forms a bowl. Be careful, as it is very fragile and hot. Let cool.

For raspberry balsamic vinaigrette:
Combine ingredients in a jar or tightly sealed container. Shake vigorously until well combined.

For nuts:
In a small skillet, heat the pecans and sugar over low heat. Cook and stir until pecans are coated with golden brown sugar glaze; remove and cool.  If need be, break apart so the pecan halves are just by themselves.

To put it all together:
Place parmesan bowl on a salad plate.  Add a nice handful of spring greens to the bowl.  Top with sliced fresh strawberries, a few fresh blackberries, and candied pecan halves.  Just before serving, drizzle with raspberry balsamic vinaigrette.   

Mar 31, 2014

Perfect Granola Bars

I have made a lot of granola bars over the years.  It seems like I am constantly trying to make "the perfect granola bar."  What is that to me?  I want the granola bar to hold together and not be a crumbly mess, to be perfectly-not-too sweet, to be chock full of tasty, healthy ingredients and to be easy to make.

I believe I have finally accomplished all of these things, and I am so excited to share the recipe with you!

These granola bars are so much better than what you can buy at the store.  They are pretty easy to make, and since you can substitute for your favorite dried fruit, nuts or other ingredients, you can make the recipe wholly your own.


Perfect Granola Bars


  • 4 cups granola cereal (I used my homemade granola, but you could also buy some)
  • 1/2 cup honey
  • 1/4 cup unsalted butter
  • 1/3 cup brown sugar
  • 1 teaspoon vanilla extract
  • 1/2 teaspoon kosher salt
  • 2 tablespoons clear corn syrup
  • 1/3 cup peanut butter
  • optional ingredients: dried fruit, mini chocolate chips, toasted nuts, ect...

Heat oven to 350 degrees F.  Line bottom and sides of a 9x13 pan with aluminum foil, and grease lightly.

Combine honey, butter, brown sugar, vanilla extract, salt and corn syrup in a small saucepan over medium heat. Cook, stirring occasionally until butter melts and the sugar completely dissolves.  Bring to a gentle boil, and let boil one minute.  Remove from heat and stir in peanut butter.

Pour butter mixture in to bowl with granola cereal. Mix well. Let cool about five minutes then add desired optional ingredients.  Stir to combine. (If you added the chocolate chips, they will most likely melt a little. This is fine, they turn into glue that helps to hold the bars together).

Transfer oat mixture to the lined 9x13 pan and use a rubber spatula or damp finger tips to firmly press the mixture into the pan. Make sure to press very hard, this will help the granola bars to stay together once they are cut. 

Bake for 20 minutes, and remove pan to cool completely (you could also put these in the refrigerator to hasten the cooling process).  If you would like, at this time you could throw some additional mini chocolate chips on top of the cooling granola bars. 

Once cool, remove granola from pan and peel away aluminum foil.  Cut into bars. Store bars in an airtight container for up to one week. For the softest bars, keep at room temperature. For 'harder bars,' store in the fridge.

Mar 30, 2014

Panko, Parsley and Parmesan Crusted Chicken

For dinner one night this week, I found some chicken breasts in the freezer.  I decided I wanted to bake the chicken breasts, and to combine them with some panko crumbs and Italian bread crumbs I have been meaning to use up.  I also had some fresh parsley that I had accidentally bought - the flat leaf parsley sure looks like fresh cilantro, doesn't it??? 

Anyways, I brined the chicken for several hours, quickly and easily coated the breasts with this topping, baked them for about 30 minutes - and dinner was done!

Charlie said he thought this was the best piece of chicken he had ever had.  Moist and juicy from the brining.  Crusty and flavorful from the coating.  This chicken was a hit with us - but let me know what you think!


Panko, Parsley and Parmesan Crusted Chicken


  • 1/4 cup kosher salt
  • 3 tablespoons sugar
  • sprinkling Old Bay Seasoning
  • 4 cups water
  • 4 chicken breasts
  • 1/2 cup panko crumbs
  • 2 tablespoons Italian bread crumbs
  • 1 to 2 tablespoons fresh parsley, minced
  • 2 tablespoons Parmesan cheese
  • about 2 tablespoons Iron Chef Sesame and Ginger sauce (or something like it)

In a gallon bag, dissolve the salt, sugar and Old Bay seasoning in the water.  Add the chicken breasts.  Let sit in the refrigerator for 2 to 3 hours - you don't want them to be in longer because the breasts will get too salty.

Preheat oven to 400 degrees.  Combine the Panko crumbs, the bread crumbs, the fresh parsley and the Parmesan cheese in a bowl.  Pour about 1 tablespoon of the Sesame and Ginger sauce on each chicken breast, and rub it all over.  Bread chicken with the crumb mixture, gently patting each piece so the breading will stick better.  Place on a silpat or lightly greased baking sheet.  Sprinkle some of the extra crumbs on top of the chicken and pat in place. 

Bake chicken for about 30 minutes, or until chicken is firm, the breading is browned, and the chicken an internal temperature of 165 degrees.  Let rest for about 10 minutes before eating!

Mar 28, 2014

Use-What-You-Have-In-Your-Kitchen Ice Cream Parfait

What do you do when you want a fast, delicious, beautiful dessert?  As I was in this boat, I opened cupboard doors, the pantry doors, the refrigerator door, and the freezer door, trying to see what I had around.  I decided to make a kind of ice cream parfait in a wine glass.  It turned out beautiful and oh-so-tasty.

One of the things I really liked about this idea is that you can just make this with ingredients that you have on hand!  Plus, it was really quick and easy to put together. 


Use-What-You-Have-In-Your-Kitchen Ice Cream Parfait


  • a scoop or two of ice cream (I used vanilla)
  • fresh strawberries, sliced (you could probably use any fruit)
  • caramel topping (or chocolate, or fudge, or butterscotch .... you get the idea!)
  • toasted pecans (or any kind of nut)
  • whipped cream (if you want)
  • what else would you like?

Layer ingredients in a wine glass, bowl, or whatever you would like to use.  Enjoy immediately (or you could place the desserts in the freezer for a bit of time if you needed to make them early.  I wouldn't let them get too frozen though!).  

Mar 27, 2014

Easy Swirl Roses Tutorial

Hello!  It is time for that easy swirl rose tutorial I promised you a while back!

These roses are so easy to make (am I using the word "easy" too much?).  And the roses are so beautiful and romantic!  They can be used to decorate cupcakes, regular cakes, cookies - and whatever else you can think of. 


Ok, enough photo's already!  I think you get the idea.  

Let's get started!  I made just a basic cupcake to demonstrate how to make these roses.  Ideally your cupcakes should be a little less rounded than these; as you could probably see from the pictures when they are rounded it makes it harder to cover the entire top of the cupcake with this decorating technique. 


To pipe a rose, using a 1M Wilton tip in your frosting bag, hold the bag straight up from your cupcake.


Gently squeeze bag and move in a circular motion starting from the center and moving outward, around and around.


Finish by releasing pressure and gently bringing the tip kind of under your last loop.  I apologize for the confusing way of writing that; I can't think of an easier way to say it!  To try to put it simply: finish off the rose so it looks natural - no awkward points or anything. 


That is all you need to do to make a swirl rose on a cupcake!


If you are decorating a regular cake, pipe a rose onto the side of your cake, and continue to pipe roses all the way around cake.  I love to just sprinkle large and small roses here and there on a cake.  Experiment and have fun!  For the top of the cake, start by piping roses along the perimeter and move towards the center.  Fill in empty spots on the entire cake with dollops of stars, very easy to do!  Just gently squeeze and lift pastry bag.


You could also go with a very symmetrical look by just piping large roses in a circle around the cake, and filling in with little 'stars.'

Just as a demonstration, this is a cake I made last year using the swirl rose technique.  Not the greatest pictures, but hopefully you will get the idea.


That is it!  Swirl roses are so beautiful and easy to make.

Please leave a comment if you have any questions, and I will try to help!