Showing posts with label main dish. Show all posts

Apr 12, 2014

Sauerkraut and Kielbasa

One night last week, we decided to crack open a jar of homemade sauerkraut from last fall and add some chunks of kielbasa.  While we haven't eaten this in a while, it is a dish we've occasionally eaten since we got married.  This time though, I decided to change it up a little. 

I added a peeled diced apple and a sliced onion to the sauerkraut, and a few other little dabs of ingredients.  At first, Charlie wasn't too sure.  But after he tried it, he said he loved it.  I wrote the recipe down and will make sauerkraut and kielbasa this way all the time in the future!

One of the things I love about this dish is that it is so quick and easy, it is hearty and filling, and it is a "one pot" meal. 


Apr 9, 2014

Breaded Fish Sandwich with Homemade Dressing

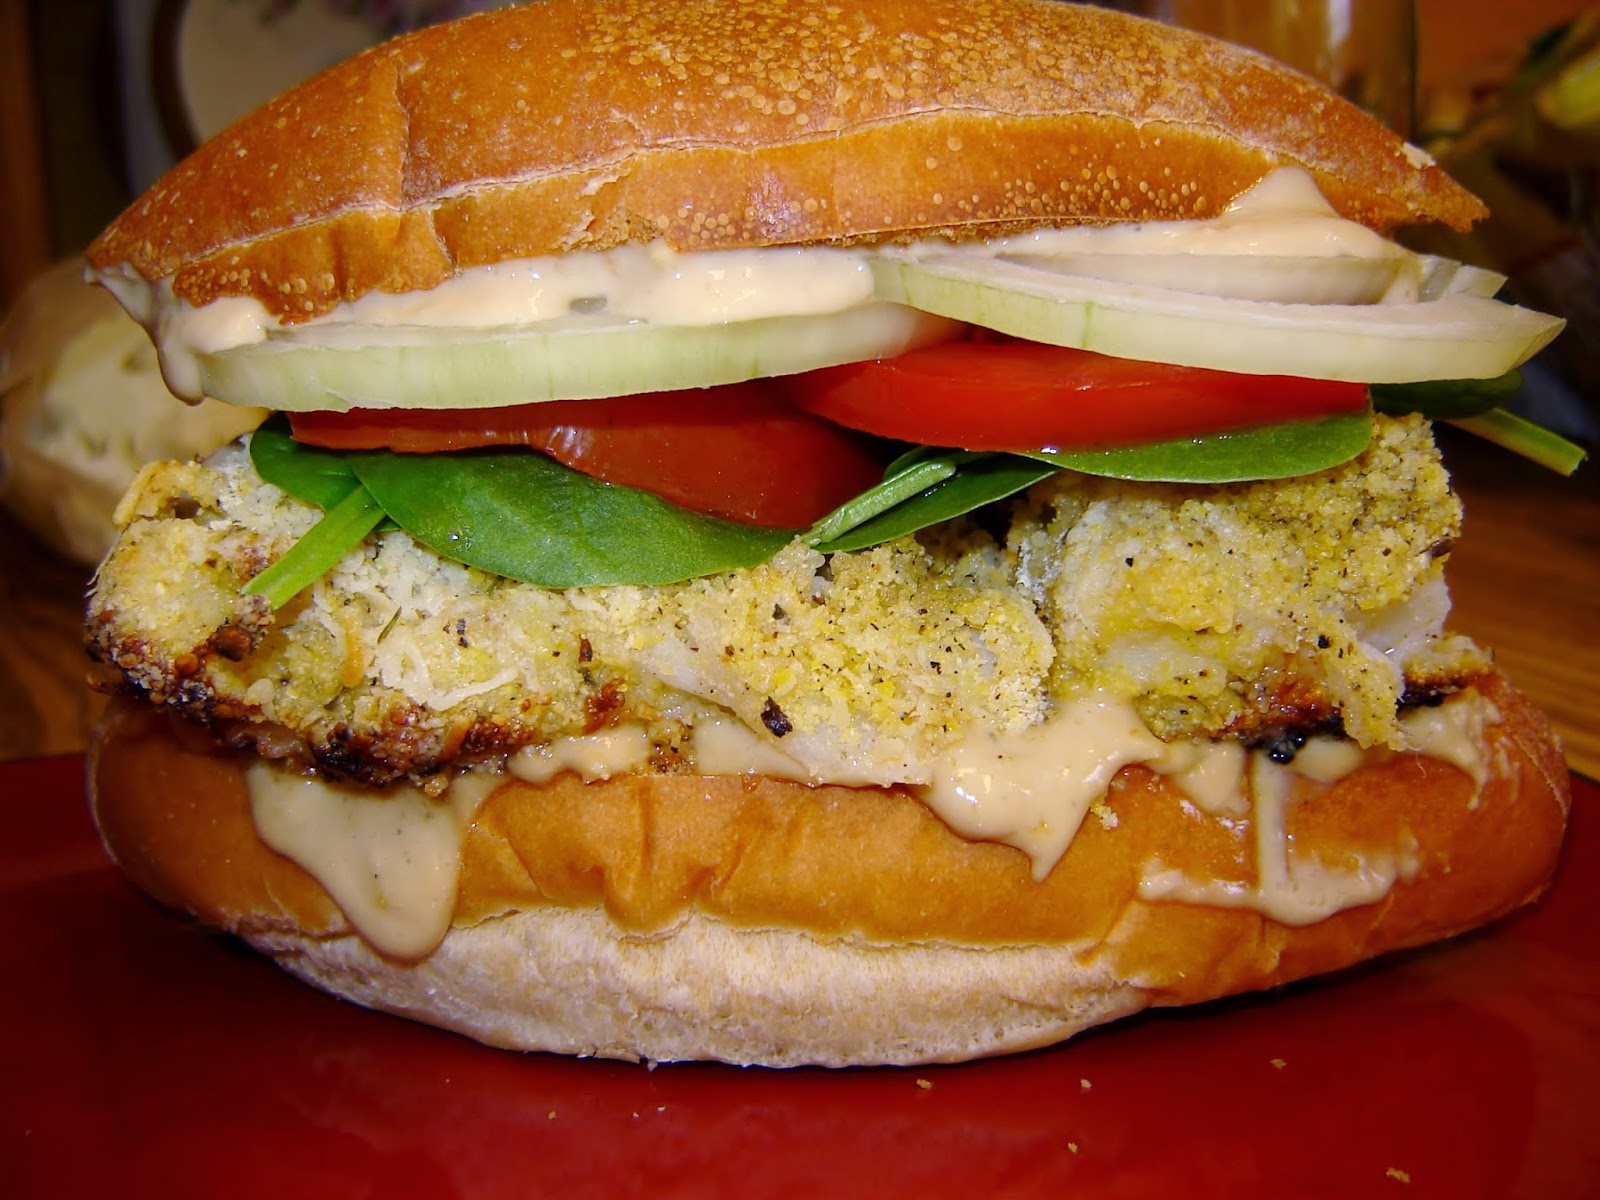
As I have said before, Charlie loves sandwiches, and consequently, I spend quite a bit of time trying new sandwiches - either by a new recipe or by making up my own recipe.  One day I decided to make a breaded fish sandwich, and it was a big hit.

Gently toasted bread, flaky delicious white fish, sliced fresh vegetables and a delicious homemade dressing.... tasty.  

The only problem was that it was a little hard to take a bite out of it! 


Apr 6, 2014

Soba Noodle and Pork Steak with Fresh Asian Vegetables

Soba noodles are Japanese noodles made with buckwheat flour.  From what I have heard, people either really like soba noodles or they really don't like them.  I'd never tried them, but when at an ethnic market, I found a package and thought it would be an interesting experiment! 

That soba noodle package has been patiently resting on the pantry shelf for several months now, and I decided that it was time to try cooking them - no more waiting for the perfect recipe to come up!  As I was rummaging around the kitchen, I also found a package of pork steaks in the freezer that needed to be used up, and thought it would be interesting to combine the two to create a dish.  And then I needed a sauce or topping to bring it all together....

And so, 'Soba Noodle and Pork Steak with Fresh Asian Vegetables' was born.  It actually turned out really, really good (I was surprised that Charlie liked it so much!).  I cooked the soba noodles simply, brined the pork steak for a few hours, and created an Asian vegetable topping that tied everything together. 

By the way, the soba noodles were quite tasty.  They definitely had a whole-wheat-pasta-type-flavor, but I also thought they had a stronger, nuttier taste.  We loved them and I definitely plan to keep experimenting with soba noodles!  


Soba Noodle and Pork Steak with Fresh Asian Vegetables


for the pork steak

  • 1/4 cup kosher salt
  • 1/4 cup sugar
  • 2 cups water
  • sprinkling Old Bay seasoning
  • 2 pork steaks, thawed (I think pork chops might work fine as well, though I didn't try it)

for the Asian Vegetable Topping
  • 1 finely chopped carrot
  • 1/2 onion, finely chopped
  • 1/4 cup finely chopped red pepper
  • 2 - 4 tablespoons finely chopped cilantro (depending on taste)
  • squeeze of 1/2 tangerine (or 2 tablespoons orange juice)
  • squeeze of 1/2 lime (about 1 tablespoon)
  • 2 teaspoons sesame oil
  • 1 tablespoon mirin
  • 1 tablespoon seasoned roasted garlic rice vinegar
  • 1 to 2 teaspoons Thai sweet chili sauce (depending on hotness)

For the soba noodles
  • 1/2 package buckwheat soba noodles
  • 1 teaspoon kosher salt
  • 2 quarts boiling water

For the pork steak: Place salt, sugar, water and seasoning in a gallon bag.  Seal and swish around to dissolve salt and sugar.  Add pork steaks.  Place in refrigerator for about 4 hours. When you are ready to put the dish together, heat a skillet over medium to high heat.  Pan fry the pork steaks for about 8 minutes on each side, or until the internal temperature comes to 140 degrees F.  Remove to platter, cover with tin foil and let rest until you are ready to thinly slice and eat. 

For Asian Vegetable Topping: Stir all topping ingredients together in a bowl.  Let sit in the refrigerator for 2 to 4 hours to allow flavors to meld.

For soba noodles: Bring 2 quarts of water to a boil in a medium sized pot with the kosher salt.
When water reaches a rolling boil, add noodles and stir well.  As it begins to boil over, add one cup of cold water and stir.  As it begins to boil over again, turn off the heat.  This will take approximately 7 or 8 minutes.  Try a noodle - you want them to be firm-tender (or al dente) - not mushy.  If they are still too firm, let them sit in the hot water for a minute until they are good.  Drain and rinse in cold water to stop the cooking process. I like to stir in a dash of olive oil while the noodles are in the sieve - it helps keep them from sticking together. 

To put it all together: You can serve this however you wish.  For presentation, I placed a pile of soba noodles at one end of a plate, thinly sliced the pork steak and arranged the topping over the whole thing.  However, when we went to eat it, we stirred it all together anyways.  If you would like, just stir together the soba noodles, the vegetables and the thinly sliced pork steak in a bowl and serve it that way. 

Apr 5, 2014

Steamed Shrimp Dumplings

Ahhh, Steamed Shrimp Dumplings, another favorite meal of ours.  We first tried shrimp dumplings at PF Changs, and I fell in love with them and wanted to try to duplicate the dumplings and sauce.  After a few tries, I came up with this recipe.  Charlie and I think that these dumplings are better than those at the restaurant!

It has been a long time I made these dumplings (probably over a year) and earlier this week we decided it was time to make them again. 

Steamed Shrimp Dumplings are actually part of a larger family of foods called "dim sum-" which is "a Chinese dish of small steamed or fried savory dumplings containing various fillings, served as a snack or main course."

All dim sum can be a bit time consuming to make, but we find the results well worth it.


To get started, you need thawed raw shrimp that has been roughly diced.


This is the shrimp dumpling filling ingredients - minced carrots, green onions, shrimp, fresh garlic, fresh ginger, and seasonings.


The bamboo steamer.  I do use a bamboo steamer to make these shrimp dumplings and other dim sum, but you don't have to have one - you could also use a well greased metal steaming basket.  Or, you could skip the steaming aspect and pan fry the dumplings like I do for my pot stickers. 


If you do use a bamboo steamer, make sure to place a piece of parchment steamer liners in the bottom of each basket.  I also lightly grease them with just a spray of non-stick cooking spray to ensure easy removal of the dumplings.  These steamer liners can be reused through all of the shrimp dumplings in this batch. 


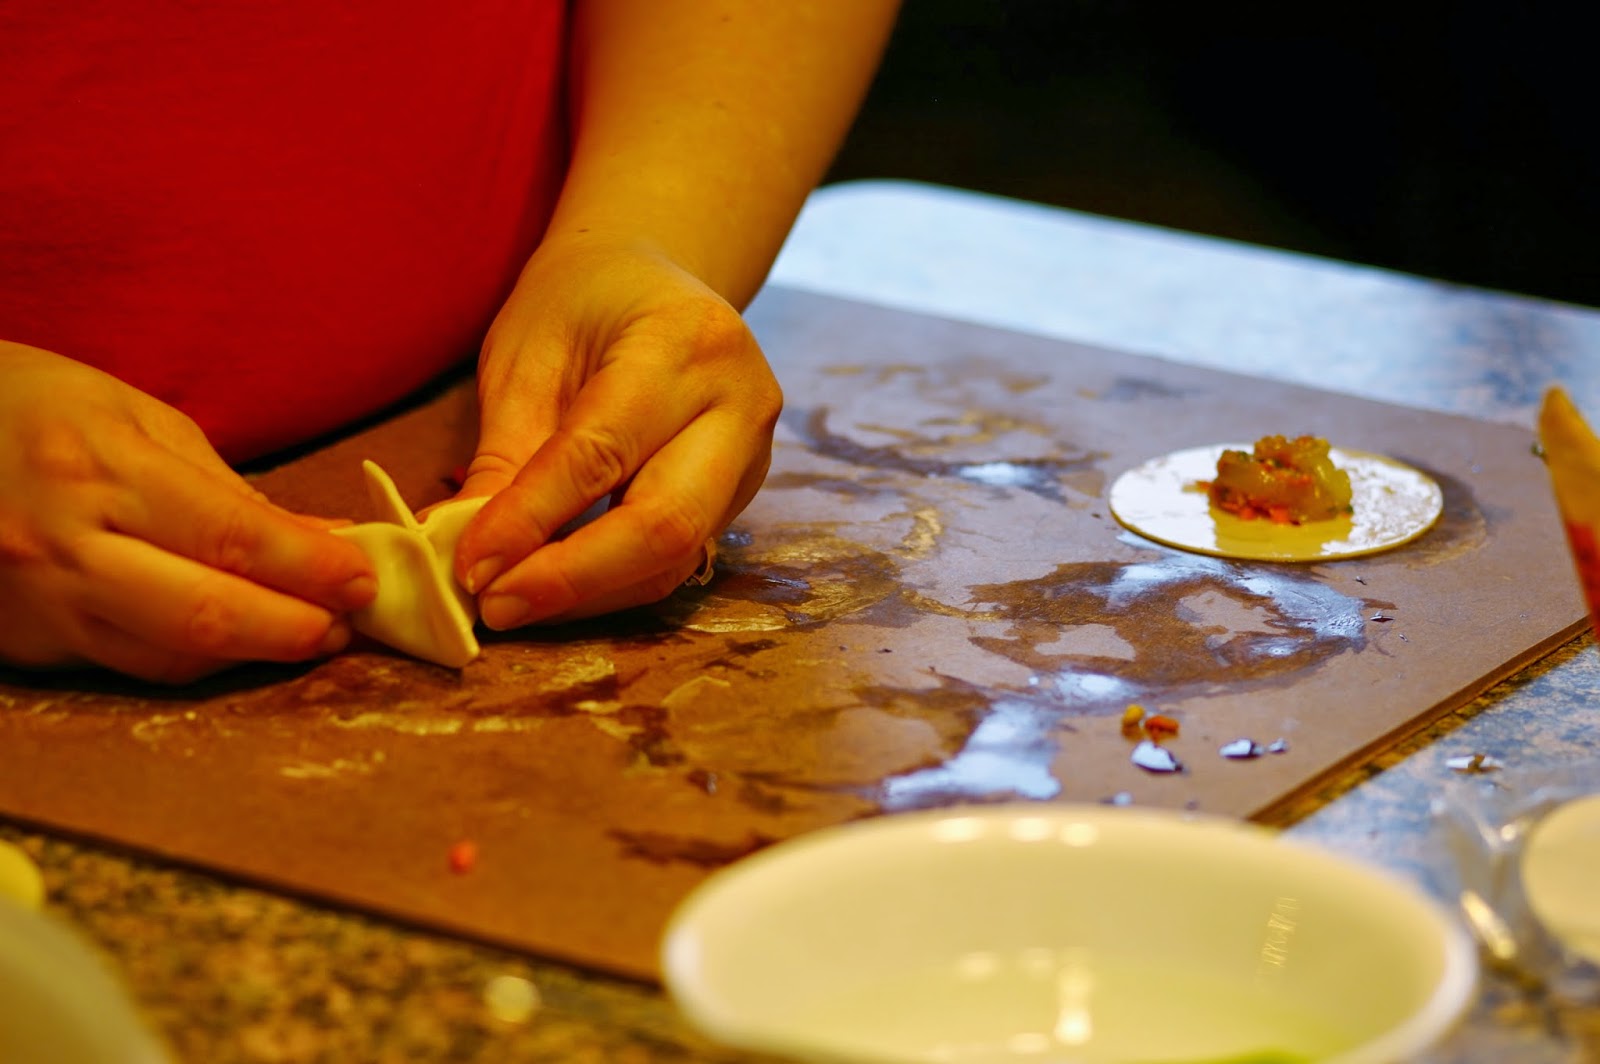
Now on to the filling.  You will notice I have a round wonton wrapper - it is actually a pot sticker wrapper.  I would recommend going with square wonton wrappers.  I usually use the square wrappers for shrimp dumplings, I just happened to have round wrappers on hand.  Anyhow, place about a teaspoon of filling in the middle of your wrapper.  (credit to: Photo Assistant Charlie who took these next few shots)


Spread a little water around the perimeter of each wrapper.


The dumpling, ready to fold.


Start the fold by bringing up to opposite sides of the wrapper.


Keep bringing the dough in toward the center of the dumpling - for your end result you want the fold to look like a 't.'


Hopefully you can see that I am pressing all the corners to the middle. 


Make sure the air is squeezed out of the dumpling.  (note: please don't mind my pregnant belly trying to get in on the action here!)


And give the seams a final good squeeze. 


Tada! 


This is what your dumplings should look like. 


Time to fill the bamboo steamer!  You will actually only be cooking one layer at a time, but it is nice to have the next layer filled and ready to go.


Aren't they beautiful?


To cook the dumplings, I use a large skillet that has 1 or 2 inches of water in the bottom.  Bring that to a simmer and place one layer of the steamer basket in it - yes, directly in the pan.  Steam the dumplings for 7 or 8 minutes.  And make sure that your skillet of water doesn't boil dry - I have found that with each new batch of dumplings I add another cup or two of water to the skillet. 


Now, it is time to eat!  See how beautiful and translucent steaming makes the shrimp dumplings?


We love the dumplings served with this delicious sauce - fresh ginger, garlic, and soy sauce mixture - I've included the recipe at the bottom of this post.


Doesn't this make your mouth water? 


Steamed Shrimp Dumplings


  • 1 - 12 ounce package wonton wrappers(square preferred)

filling
  • 1 pound raw peeled and deveined shrimp, thawed and roughly diced
  • 2 tablespoons minced fine carrots
  • 2 tablespoons minced fine green onions
  • 1 teaspoon minced fresh ginger
  • 1 teaspoon minced fresh garlic
  • 2 tablespoons sesame and garlic sauce
  • 1/4 teaspoon sesame oil
  • 1/4 teaspoon salt
  • 1/4 teaspoon sugar

sauce

  • 1/2 cup soy sauce
  • 1 tablespoon seasoned roasted garlic rice vinegar
  • 1 teaspoon Thai sweet chili sauce
  • 1 tablespoon sugar
  • 1 teaspoon minced fresh ginger
  • 1 tablespoon sesame oil
  • 1/2 cup water
  • 1 tablespoon minced fresh cilantro
  • 1 tablespoon finely chopped green onion

Combine shrimp filling ingredients.  Cover and refrigerate for an hour.  To make your dipping sauce, combine all the ingredients in a small saucepan - except the fresh cilantro and green onion.  Bring to a simmer and simmer about 5 minutes.  Let cool and refrigerate until ready to use. When ready to use, stir in cilantro and green onion, or sprinkle on top of the sauce.

When you are ready to start your dumplings, take a small spoon or small cookie scoop, and place about a teaspoon of shrimp mixture into wonton wrapper.  Moisten outside edge with water.  Fold corner to corner to form a cross or a 't' shape and seal.  The top should look like cross.  If you wish, forming the dumplings can be done a bit ahead of time.  Just place them in an airtight container in refrigerator until ready to cook and serve.  Or, just cook them right away.

Place about 2 inches of water in a large skillet.  Bring water to a boil, then lower heat to bring down to a slight boil.

Line bottom of Chinese steamer with a piece of parchment paper, then a light coat of vegetable oil or non-stick spray.  Place dumplings in steamer and cover with bamboo lid.   Place steamer in large skillet.  Steam 7 or 8 minutes, depending on how fast your water is simmering. Dumplings should be firm with internal temperature of 160 degrees. 

Serve in steamer or on plate, with dipping sauce. 

Mar 30, 2014

Panko, Parsley and Parmesan Crusted Chicken

For dinner one night this week, I found some chicken breasts in the freezer.  I decided I wanted to bake the chicken breasts, and to combine them with some panko crumbs and Italian bread crumbs I have been meaning to use up.  I also had some fresh parsley that I had accidentally bought - the flat leaf parsley sure looks like fresh cilantro, doesn't it??? 

Anyways, I brined the chicken for several hours, quickly and easily coated the breasts with this topping, baked them for about 30 minutes - and dinner was done!

Charlie said he thought this was the best piece of chicken he had ever had.  Moist and juicy from the brining.  Crusty and flavorful from the coating.  This chicken was a hit with us - but let me know what you think!


Panko, Parsley and Parmesan Crusted Chicken


  • 1/4 cup kosher salt
  • 3 tablespoons sugar
  • sprinkling Old Bay Seasoning
  • 4 cups water
  • 4 chicken breasts
  • 1/2 cup panko crumbs
  • 2 tablespoons Italian bread crumbs
  • 1 to 2 tablespoons fresh parsley, minced
  • 2 tablespoons Parmesan cheese
  • about 2 tablespoons Iron Chef Sesame and Ginger sauce (or something like it)

In a gallon bag, dissolve the salt, sugar and Old Bay seasoning in the water.  Add the chicken breasts.  Let sit in the refrigerator for 2 to 3 hours - you don't want them to be in longer because the breasts will get too salty.

Preheat oven to 400 degrees.  Combine the Panko crumbs, the bread crumbs, the fresh parsley and the Parmesan cheese in a bowl.  Pour about 1 tablespoon of the Sesame and Ginger sauce on each chicken breast, and rub it all over.  Bread chicken with the crumb mixture, gently patting each piece so the breading will stick better.  Place on a silpat or lightly greased baking sheet.  Sprinkle some of the extra crumbs on top of the chicken and pat in place. 

Bake chicken for about 30 minutes, or until chicken is firm, the breading is browned, and the chicken an internal temperature of 165 degrees.  Let rest for about 10 minutes before eating!

Mar 21, 2014

How to Make Fresh, Homemade Pasta

Ever since I read my first Amish cookbook when I was a young teenager, I have been fascinated with the idea of making my own pasta, and I've made several batches over the years that have been fairly - but not wildly - successful.

A couple of years ago, Charlie got me a beautiful pasta roller for Christmas.  The first batch I tried with the new pasta roller didn't turn out so well - but I figured if I practiced more the process would probably get easier.

When I made this latest batch of pasta a couple of days ago, it turned out beautifully - and the taste, flavor and texture was out of this world.  I am so excited to share what I've learned with you.


The wonderful thing about it is that pasta really is easy to make.  Unlike pastry, bread and other doughs, pasta dough isn't too fussy.  You can make good pasta with a rolling pin and a knife, though it is pretty handy to have a pasta roller.

The only ingredients you really need are flour and eggs.  I have tried making pasta with just all purpose flour, with whole wheat flour and with a mix of semolina and all purpose flours.  We seem to most enjoy the pasta made with the mix of semolina and AP flour - I thought it was easier to work with, and the cooked pasta has a great heartiness and texture.  

It wasn't hard to find the semolina flour; I just found it at a local grocery store in the baking aisle.  But you don't have to have the semolina flour - you can experiment with all purpose, whole wheat, spelt, durum, buckwheat or white wheat flour, ect... to find just the right pasta dough for you.


Lets get started!  You can make your pasta dough by hand on the table:


Or start with a stand mixer with a dough hook.  The basic object is to work the eggs into the flour and create a ball of dough.


The ball of dough before kneading - it is rough and lumpy looking.


Time to knead!  Knead for at least three minutes by hand;


until the dough forms a smooth ball.   If for some reason your dough feels a bit dry after you’ve been kneading it for a minute, wet your hands and add that small amount of water into it.  Or, if it is too wet, work in a tiny bit of flour. 


 A smooth ball of pasta dough. Cover with plastic wrap and let rest on the counter top for an hour.


 After the hour is up, remove the plastic wrap and flatten the dough into a disc. 


Using a knife or a dough cutter, cut the disc into 8 equal portions. 


Take one of the portions and flatten it into a rectangle-type shape (it doesn't have to be perfect).


Take that rectangularish piece of dough and run it through your pasta roller on the widest setting (on my pasta roller, it is setting #1).  Fold the dough in thirds, and run it through the roller, fold it into thirds, and repeat this process four or five times at this setting. 


Close the rollers a couple of clicks and continue running the piece of dough through the roller a couple of times (no folding now).  Close another click and repeat.


As you continue this process, you will see how the sheet of pasta gets longer and longer. 


This is about as long as I can handle without wrecking the sheet of pasta.  I also experimented by cutting this pasta sheet in half and rolling it through in half sections - it was a lot easier to handle.  Try it if you are having problems!  By the way, notice how you can see my fingers behind the dough at the top of the photo?  This is the perfect thickness: the dough isn't translucent but you can see outlines behind it.


A counter full of fresh pasta sheets.  I let them dry for 10 to 20 minutes before cutting them. 


To cut, you can either use a knife, or if you have a pasta roller with a cutter attachment, use that - it makes perfect pieces of pasta.  On the pasta roller, place handle in desired cutting attachment, and roll the pasta through.  This time I made fettuccine pasta. 


Lay the pasta out a wire rack.  Prepare pasta bringing a pot of salted water to a boil over high heat. Once the water is rapidly boiling, place the pasta into the water and cook for 3-5 minutes or until al dente.


Drain pasta and toss with your favorite sauce, or serve as desired.


Though it isn't a great picture, I fixed up this pasta by: sauteing 2 tablespoons butter, 2 tablespoons olive oil, three pieces of bacon, chopped, 3 cloves of fresh garlic, minced, salt and pepper and a dash of red pepper flakes.  After the garlic was fragrant, I added the pasta and stirred it all together.  Top with fresh minced parsley (not pictured because I came up with the parsley idea after I took this photo) and enjoy!  It tasted delicious and was a great hit with Charlie, too. 


Fresh, Homemade Pasta


  • 7 ounces (or about 1 to 1 1/2 cups) all purpose flour
  • 7 ounces (or about 1 to 1 1/2 cups) semolina flour
  • 4 large eggs, room temperature
Note: instead of the semolina flour, you could use 14 ounces all purpose flour, or half AP flour and half whole wheat, ect... my directions will be for AP and semolina flours.

First of all, decide if you are going to make the dough entirely by hand or if you will use a stand mixer to bring together the dough initially.

If using a stand mixer, mix together the AP flour and semolina flour in the bowl of a stand mixer.  Using a dough hook, stir on low speed until the dough is well mixed.  I ran the mixer on medium speed for a couple of minutes, or until all of the dough came together into a ball. 

If you are making the dough entirely by hand, on your counter top, place the flours in a mound shape, make a well in the center, and crack the eggs into the well.  Use your fingers to gradually draw the dry ingredients into the center, mixing them with the eggs.  Use a bowl scraper or dough scraper to help you draw it all together.  The dough will be hard to mix at first, but keep working with it and eventually it will come together and be relatively smooth.

Now, for both stand mixer and by hand directions; here they both come together into one set of directions.

Place your ball of dough on the counter.  Knead the dough with the heel of your hand for at least three minutes until the dough is very smooth. The dough should not feel sticky.  If it sticks to your fingers, knead in a small amount of flour, just enough so your fingers come away clean when you pull them away.  The dough should also not feel too dry; if it feels bit dry after you’ve been kneading it for a minute, wet your hands and add that small amount of water into it.  After the dough is kneaded into a smooth ball, wrap the dough in plastic wrap and let it sit at room temperature for an hour.  A handy thing to know is that you can keep the dough for several hours at room temperature if need be - but don't make it the night before or it will turn an icky gray color, even if refrigerated.

Now, it is time to roll out the pasta!  On a lightly floured surface, cut the dough into eight pieces.  Cover these pieces of dough with plastic wrap or a towel.  Working one piece at a time, fashion each piece into a rectangular shape, then pass it through your pasta machine on the widest setting (usually #1).  Fold the dough in thirds (do this by folding one side of the piece of dough toward the middle, then fold the other side over that to form three layers).  Press lightly on the top of the piece of dough to seal it.

Feed the dough through the roller, starting with one of the open sides.  Repeat the folding and rolling through the roller technique on the widest setting for four or five times.

Now it is time to start rolling the dough thinner.  Without folding now, continue passing the pasta through the machine, turning the dial of the rollers down a couple of notches with each pass (dust them very lightly with flour or semolina if the dough is sticking) until you’ve reached the desired thickness. As I said earlier, if the sheet of pasta gets too long, you can cut it in half with a knife or a dough scraper.

To roll out the pasta dough by hand, use a floured surface and a rolling pin and roll out to desired thickness.  This is tough, but keep with it!  The dough will eventually get thinner. 

Then, if you wish to make fettuccine or spaghetti, use the pasta cutter attachment to cut the sheets into the desired thickness (my pasta roller came with a fettuccine and spaghetti cutter attachment, there are a host of others available to purchase as well), or cut the pasta by hand on the counter top with a long sharp knife to whatever size strands or shapes you want. A trick I learned about cutting the pasta dough by hand is to roll the sheet of pasta into a tight tube, and cut it that way (think of rolling and making cinnamon rolls - this will give you pretty perfect strands of pasta). 

Once rolled and cut, fresh pasta can be laid it on a semolina- or flour-dusted baking sheet or linen kitchen towel, until ready to boil. Or drape it over something, such as a wire rack or pasta drying rack until ready to use.

Prepare pasta bringing a pot of salted water to a boil over high heat. Once the water is rapidly boiling, place the pasta into the water and cook for 3-5 minutes or until al dente.

The great thing about fresh homemade pasta is that you can experiment to your heart's delight. How about a flavored pasta dough?  Maybe some chopped fresh herbs, or fresh minced garlic, or freshly ground black pepper, or different flours, or some cooked spinach, or.....hmmm, what else?

What will you do with your fresh homemade pasta? And what will you top it with??

Feb 8, 2014

Beef Paillard

Continuing our "Flat" saga, after we made the turkey picatta, we decided to try Alton Brown's Beef Paillard.  It had several great things about it: it was quick and easy, didn't call for many ingredients and it was so-so-so delicious. 


We started by slicing beef tenderloin into thin slices.  I know, how can you go wrong with beef tenderloin?


Then flattened them with the bottom of a sauce pan, using the same technique of placing the meat slice in folded plastic wrap and spritzing the plastic wrap with water.


The flattened beef tenderloin is then brushed with olive oil and sprinkled with kosher salt and freshly ground black pepper.


The Paillard is cooked for a total of less than one minute, than dressed with a drizzle of olive oil, freshly grated Parmesan cheese and capers.  And trust me, it is finger-lickin' good (confession: we didn't use forks, just our fingers). 


P.S. I apologize for the bad pictures but it was dark so I had to experiment with the flash - as you can tell I have a lot to learn!

Beef Paillard (adapted from Alton's recipe)


  • 1 pound beef tenderloin, trimmed of fat and ickies, ect...
  • vegetable oil
  • Kosher salt
  • Freshly ground black pepper
  • olive oil
  • freshly grated Parmesan cheese
  • capers
Place thawed tenderloin in the freezer for 1 to 2 hours.  Using an electric knife (or a very sharp knife and steady hand), cut the beef into 3/8-inch thick slices.  Place slices of beef, one at a time, between two pieces of plastic wrap.  Squirt the top of the plastic wrap lightly with water.  Pound to no less than 1/8-inch thickness (we used the bottom of a saucepan).  Lightly brush each slice of beef on both sides with vegetable oil and season with salt and pepper on both sides.  Set aside.

Heat a large cast iron skillet over high heat for 3 to 4 minutes. Reduce heat to medium.  Brush the pan lightly with oil.  Place 2 to 3 slices of beef on the pan at a time and sear for 10 seconds on each side. Remove to a plate and dress with a light drizzle of olive oil, the Parmesan cheese and as many capers as you would like to eat.  Repeat until all of the beef has been cooked.  Serve immediately - or, if you are like us, eat each batch as it comes out of the pan.