
hi

Showing posts with label tutorial. Show all posts
Showing posts with label tutorial. Show all posts
Jul 22, 2018
Homemade Rock Candy
For our recent birthday party, we decided to do a science experiment for our party favors. Rock candy! It was pretty easy to make, tasted great and was fun to do with 'Lil Lass. It was a great exercise in patience, as well. We let ours sit for about two weeks. It was fun to watch the sugar crystals grow!

Mar 21, 2014
How to Make Fresh, Homemade Pasta
Ever since I read my first Amish cookbook when I was a young teenager, I have been fascinated with the idea of making my own pasta, and I've made several batches over the years that have been fairly - but not wildly - successful.
A couple of years ago, Charlie got me a beautiful pasta roller for Christmas. The first batch I tried with the new pasta roller didn't turn out so well - but I figured if I practiced more the process would probably get easier.
When I made this latest batch of pasta a couple of days ago, it turned out beautifully - and the taste, flavor and texture was out of this world. I am so excited to share what I've learned with you.

The wonderful thing about it is that pasta really is easy to make. Unlike pastry, bread and other doughs, pasta dough isn't too fussy. You can make good pasta with a rolling pin and a knife, though it is pretty handy to have a pasta roller.
The only ingredients you really need are flour and eggs. I have tried making pasta with just all purpose flour, with whole wheat flour and with a mix of semolina and all purpose flours. We seem to most enjoy the pasta made with the mix of semolina and AP flour - I thought it was easier to work with, and the cooked pasta has a great heartiness and texture.
It wasn't hard to find the semolina flour; I just found it at a local grocery store in the baking aisle. But you don't have to have the semolina flour - you can experiment with all purpose, whole wheat, spelt, durum, buckwheat or white wheat flour, ect... to find just the right pasta dough for you.
Lets get started! You can make your pasta dough by hand on the table:

Or start with a stand mixer with a dough hook. The basic object is to work the eggs into the flour and create a ball of dough.

The ball of dough before kneading - it is rough and lumpy looking.

Time to knead! Knead for at least three minutes by hand;

until the dough forms a smooth ball. If for some reason your dough feels a bit dry after you’ve been kneading it for a minute, wet your hands and add that small amount of water into it. Or, if it is too wet, work in a tiny bit of flour.

A smooth ball of pasta dough. Cover with plastic wrap and let rest on the counter top for an hour.

After the hour is up, remove the plastic wrap and flatten the dough into a disc.

Using a knife or a dough cutter, cut the disc into 8 equal portions.

Take one of the portions and flatten it into a rectangle-type shape (it doesn't have to be perfect).

Take that rectangularish piece of dough and run it through your pasta roller on the widest setting (on my pasta roller, it is setting #1). Fold the dough in thirds, and run it through the roller, fold it into thirds, and repeat this process four or five times at this setting.

Close the rollers a couple of clicks and continue running the piece of dough through the roller a couple of times (no folding now). Close another click and repeat.

As you continue this process, you will see how the sheet of pasta gets longer and longer.

This is about as long as I can handle without wrecking the sheet of pasta. I also experimented by cutting this pasta sheet in half and rolling it through in half sections - it was a lot easier to handle. Try it if you are having problems! By the way, notice how you can see my fingers behind the dough at the top of the photo? This is the perfect thickness: the dough isn't translucent but you can see outlines behind it.

A counter full of fresh pasta sheets. I let them dry for 10 to 20 minutes before cutting them.

To cut, you can either use a knife, or if you have a pasta roller with a cutter attachment, use that - it makes perfect pieces of pasta. On the pasta roller, place handle in desired cutting attachment, and roll the pasta through. This time I made fettuccine pasta.

Lay the pasta out a wire rack. Prepare pasta bringing a pot of salted water to a boil over high heat. Once the water is rapidly boiling, place the pasta into the water and cook for 3-5 minutes or until al dente.

Drain pasta and toss with your favorite sauce, or serve as desired.

Though it isn't a great picture, I fixed up this pasta by: sauteing 2 tablespoons butter, 2 tablespoons olive oil, three pieces of bacon, chopped, 3 cloves of fresh garlic, minced, salt and pepper and a dash of red pepper flakes. After the garlic was fragrant, I added the pasta and stirred it all together. Top with fresh minced parsley (not pictured because I came up with the parsley idea after I took this photo) and enjoy! It tasted delicious and was a great hit with Charlie, too.

First of all, decide if you are going to make the dough entirely by hand or if you will use a stand mixer to bring together the dough initially.
If using a stand mixer, mix together the AP flour and semolina flour in the bowl of a stand mixer. Using a dough hook, stir on low speed until the dough is well mixed. I ran the mixer on medium speed for a couple of minutes, or until all of the dough came together into a ball.
If you are making the dough entirely by hand, on your counter top, place the flours in a mound shape, make a well in the center, and crack the eggs into the well. Use your fingers to gradually draw the dry ingredients into the center, mixing them with the eggs. Use a bowl scraper or dough scraper to help you draw it all together. The dough will be hard to mix at first, but keep working with it and eventually it will come together and be relatively smooth.
Now, for both stand mixer and by hand directions; here they both come together into one set of directions.
Place your ball of dough on the counter. Knead the dough with the heel of your hand for at least three minutes until the dough is very smooth. The dough should not feel sticky. If it sticks to your fingers, knead in a small amount of flour, just enough so your fingers come away clean when you pull them away. The dough should also not feel too dry; if it feels bit dry after you’ve been kneading it for a minute, wet your hands and add that small amount of water into it. After the dough is kneaded into a smooth ball, wrap the dough in plastic wrap and let it sit at room temperature for an hour. A handy thing to know is that you can keep the dough for several hours at room temperature if need be - but don't make it the night before or it will turn an icky gray color, even if refrigerated.
Now, it is time to roll out the pasta! On a lightly floured surface, cut the dough into eight pieces. Cover these pieces of dough with plastic wrap or a towel. Working one piece at a time, fashion each piece into a rectangular shape, then pass it through your pasta machine on the widest setting (usually #1). Fold the dough in thirds (do this by folding one side of the piece of dough toward the middle, then fold the other side over that to form three layers). Press lightly on the top of the piece of dough to seal it.
Feed the dough through the roller, starting with one of the open sides. Repeat the folding and rolling through the roller technique on the widest setting for four or five times.
Now it is time to start rolling the dough thinner. Without folding now, continue passing the pasta through the machine, turning the dial of the rollers down a couple of notches with each pass (dust them very lightly with flour or semolina if the dough is sticking) until you’ve reached the desired thickness. As I said earlier, if the sheet of pasta gets too long, you can cut it in half with a knife or a dough scraper.
To roll out the pasta dough by hand, use a floured surface and a rolling pin and roll out to desired thickness. This is tough, but keep with it! The dough will eventually get thinner.
Then, if you wish to make fettuccine or spaghetti, use the pasta cutter attachment to cut the sheets into the desired thickness (my pasta roller came with a fettuccine and spaghetti cutter attachment, there are a host of others available to purchase as well), or cut the pasta by hand on the counter top with a long sharp knife to whatever size strands or shapes you want. A trick I learned about cutting the pasta dough by hand is to roll the sheet of pasta into a tight tube, and cut it that way (think of rolling and making cinnamon rolls - this will give you pretty perfect strands of pasta).
Once rolled and cut, fresh pasta can be laid it on a semolina- or flour-dusted baking sheet or linen kitchen towel, until ready to boil. Or drape it over something, such as a wire rack or pasta drying rack until ready to use.
Prepare pasta bringing a pot of salted water to a boil over high heat. Once the water is rapidly boiling, place the pasta into the water and cook for 3-5 minutes or until al dente.
The great thing about fresh homemade pasta is that you can experiment to your heart's delight. How about a flavored pasta dough? Maybe some chopped fresh herbs, or fresh minced garlic, or freshly ground black pepper, or different flours, or some cooked spinach, or.....hmmm, what else?
What will you do with your fresh homemade pasta? And what will you top it with??
A couple of years ago, Charlie got me a beautiful pasta roller for Christmas. The first batch I tried with the new pasta roller didn't turn out so well - but I figured if I practiced more the process would probably get easier.
When I made this latest batch of pasta a couple of days ago, it turned out beautifully - and the taste, flavor and texture was out of this world. I am so excited to share what I've learned with you.
The wonderful thing about it is that pasta really is easy to make. Unlike pastry, bread and other doughs, pasta dough isn't too fussy. You can make good pasta with a rolling pin and a knife, though it is pretty handy to have a pasta roller.
The only ingredients you really need are flour and eggs. I have tried making pasta with just all purpose flour, with whole wheat flour and with a mix of semolina and all purpose flours. We seem to most enjoy the pasta made with the mix of semolina and AP flour - I thought it was easier to work with, and the cooked pasta has a great heartiness and texture.
It wasn't hard to find the semolina flour; I just found it at a local grocery store in the baking aisle. But you don't have to have the semolina flour - you can experiment with all purpose, whole wheat, spelt, durum, buckwheat or white wheat flour, ect... to find just the right pasta dough for you.
Lets get started! You can make your pasta dough by hand on the table:
Or start with a stand mixer with a dough hook. The basic object is to work the eggs into the flour and create a ball of dough.
The ball of dough before kneading - it is rough and lumpy looking.
Time to knead! Knead for at least three minutes by hand;
until the dough forms a smooth ball. If for some reason your dough feels a bit dry after you’ve been kneading it for a minute, wet your hands and add that small amount of water into it. Or, if it is too wet, work in a tiny bit of flour.
A smooth ball of pasta dough. Cover with plastic wrap and let rest on the counter top for an hour.
After the hour is up, remove the plastic wrap and flatten the dough into a disc.
Using a knife or a dough cutter, cut the disc into 8 equal portions.
Take one of the portions and flatten it into a rectangle-type shape (it doesn't have to be perfect).
Take that rectangularish piece of dough and run it through your pasta roller on the widest setting (on my pasta roller, it is setting #1). Fold the dough in thirds, and run it through the roller, fold it into thirds, and repeat this process four or five times at this setting.
Close the rollers a couple of clicks and continue running the piece of dough through the roller a couple of times (no folding now). Close another click and repeat.
As you continue this process, you will see how the sheet of pasta gets longer and longer.
This is about as long as I can handle without wrecking the sheet of pasta. I also experimented by cutting this pasta sheet in half and rolling it through in half sections - it was a lot easier to handle. Try it if you are having problems! By the way, notice how you can see my fingers behind the dough at the top of the photo? This is the perfect thickness: the dough isn't translucent but you can see outlines behind it.
A counter full of fresh pasta sheets. I let them dry for 10 to 20 minutes before cutting them.
To cut, you can either use a knife, or if you have a pasta roller with a cutter attachment, use that - it makes perfect pieces of pasta. On the pasta roller, place handle in desired cutting attachment, and roll the pasta through. This time I made fettuccine pasta.
Lay the pasta out a wire rack. Prepare pasta bringing a pot of salted water to a boil over high heat. Once the water is rapidly boiling, place the pasta into the water and cook for 3-5 minutes or until al dente.
Drain pasta and toss with your favorite sauce, or serve as desired.
Fresh, Homemade Pasta
- 7 ounces (or about 1 to 1 1/2 cups) all purpose flour
- 7 ounces (or about 1 to 1 1/2 cups) semolina flour
- 4 large eggs, room temperature
First of all, decide if you are going to make the dough entirely by hand or if you will use a stand mixer to bring together the dough initially.
If using a stand mixer, mix together the AP flour and semolina flour in the bowl of a stand mixer. Using a dough hook, stir on low speed until the dough is well mixed. I ran the mixer on medium speed for a couple of minutes, or until all of the dough came together into a ball.
If you are making the dough entirely by hand, on your counter top, place the flours in a mound shape, make a well in the center, and crack the eggs into the well. Use your fingers to gradually draw the dry ingredients into the center, mixing them with the eggs. Use a bowl scraper or dough scraper to help you draw it all together. The dough will be hard to mix at first, but keep working with it and eventually it will come together and be relatively smooth.
Now, for both stand mixer and by hand directions; here they both come together into one set of directions.
Place your ball of dough on the counter. Knead the dough with the heel of your hand for at least three minutes until the dough is very smooth. The dough should not feel sticky. If it sticks to your fingers, knead in a small amount of flour, just enough so your fingers come away clean when you pull them away. The dough should also not feel too dry; if it feels bit dry after you’ve been kneading it for a minute, wet your hands and add that small amount of water into it. After the dough is kneaded into a smooth ball, wrap the dough in plastic wrap and let it sit at room temperature for an hour. A handy thing to know is that you can keep the dough for several hours at room temperature if need be - but don't make it the night before or it will turn an icky gray color, even if refrigerated.
Now, it is time to roll out the pasta! On a lightly floured surface, cut the dough into eight pieces. Cover these pieces of dough with plastic wrap or a towel. Working one piece at a time, fashion each piece into a rectangular shape, then pass it through your pasta machine on the widest setting (usually #1). Fold the dough in thirds (do this by folding one side of the piece of dough toward the middle, then fold the other side over that to form three layers). Press lightly on the top of the piece of dough to seal it.
Feed the dough through the roller, starting with one of the open sides. Repeat the folding and rolling through the roller technique on the widest setting for four or five times.
Now it is time to start rolling the dough thinner. Without folding now, continue passing the pasta through the machine, turning the dial of the rollers down a couple of notches with each pass (dust them very lightly with flour or semolina if the dough is sticking) until you’ve reached the desired thickness. As I said earlier, if the sheet of pasta gets too long, you can cut it in half with a knife or a dough scraper.
To roll out the pasta dough by hand, use a floured surface and a rolling pin and roll out to desired thickness. This is tough, but keep with it! The dough will eventually get thinner.
Then, if you wish to make fettuccine or spaghetti, use the pasta cutter attachment to cut the sheets into the desired thickness (my pasta roller came with a fettuccine and spaghetti cutter attachment, there are a host of others available to purchase as well), or cut the pasta by hand on the counter top with a long sharp knife to whatever size strands or shapes you want. A trick I learned about cutting the pasta dough by hand is to roll the sheet of pasta into a tight tube, and cut it that way (think of rolling and making cinnamon rolls - this will give you pretty perfect strands of pasta).
Once rolled and cut, fresh pasta can be laid it on a semolina- or flour-dusted baking sheet or linen kitchen towel, until ready to boil. Or drape it over something, such as a wire rack or pasta drying rack until ready to use.
Prepare pasta bringing a pot of salted water to a boil over high heat. Once the water is rapidly boiling, place the pasta into the water and cook for 3-5 minutes or until al dente.
The great thing about fresh homemade pasta is that you can experiment to your heart's delight. How about a flavored pasta dough? Maybe some chopped fresh herbs, or fresh minced garlic, or freshly ground black pepper, or different flours, or some cooked spinach, or.....hmmm, what else?
What will you do with your fresh homemade pasta? And what will you top it with??
Mar 17, 2014
Cherry Chip Birthday Cake
Hi! Today is a "share" post: I made this birthday cake for my Mom, and I just wanted to share it with you!
The cake was a [gasp: boxed] cherry chip cake with cherry pie filling, and frosted with cherry frosting. This has been Mom's favorite cake for as far back as I can remember.

I decorated the cake with super-easy-to-make frosting roses, however, I didn't have the right tip so the flowers aren't as 3-D as they should be (the correct tip is in the mail).

I also used frosting to "glue" on little hardened frosting flowers.

The cakes were a 9 inch, a 6 inch and a 3 inch cake.


If you are interested in learning how to make these super-easy frosting roses, I will be posting a how-to tutorial soon!
The cake was a [gasp: boxed] cherry chip cake with cherry pie filling, and frosted with cherry frosting. This has been Mom's favorite cake for as far back as I can remember.
I decorated the cake with super-easy-to-make frosting roses, however, I didn't have the right tip so the flowers aren't as 3-D as they should be (the correct tip is in the mail).
I also used frosting to "glue" on little hardened frosting flowers.
The cakes were a 9 inch, a 6 inch and a 3 inch cake.
If you are interested in learning how to make these super-easy frosting roses, I will be posting a how-to tutorial soon!
Mar 9, 2014
Home Made Root Beer
Have you ever thought about trying to make your own root beer? It really is a fun project and I think it would be great to do it with kids! The basic premise of the project is to use a closed system to set up a fermentation - that way, the closed system captures the generated carbon dioxide which naturally carbonates the root beer.
So why go to the trouble of making your own root beer? I make it because unlike store-bought root beer, making your own gives you a delicious, naturally carbonated beverage that has less fizz and a smoother, richer, creamier taste.


I had wanted to make root beer totally 'from scratch,' but when I looked up recipes I saw that I needed the roots of a sassafras tree. At this point, I have no idea where to find a sassafras tree (though I will be keeping my eyes open)!
I decided to use a root beer base. You can usually find root beer extract at your local supermarket or home brew supply store. Also, you can order it online if you can't find the extract anywhere else.

The next thing that is handy - but not totally necessary is a bottling bucket and wand. You can make the root beer in the bucket, and use the wand to easily fill your bottles (the end of the wand has a spring loaded tip that makes it easy to fill bottles - just press the tip to the bottom of the bottle for flow and release the tip and the flow stops). If you don't have this type of equipment - no problem. The directions at the bottom of this post will be to make a 2 liter bottle of root beer with the only needed equipment being: a clean 2 liter bottle and a funnel.

The next important thing is yeast: I have had good results with this Red Star Premier Cuvee yeast (found at my local brewing supply store), but you can also use regular baking yeast.

Next step: sanitize your bottles of choice. I like to use old swing-top beer bottles. You can probably tell from this picture, but this bottling tree is fantastic: at the top is a spring loaded shooter that sanitizes the inside of the bottles quickly and easily, then they can drip drain on each of the pegs. The tray at the bottom catches all of the drips! Again, just in case you don't have this equipment, the directions at the bottom of the post will be for using a 2 liter bottle.

The bottling tree is filling up! By the way, I should make mention when using glass bottles, there is always a risk of the bottles exploding (yes, I speak from experience). If you are worried about it, a safer option would be to use clean 2 liter bottles.

Now, to begin; into the bottling bucket (or 2 liter bottle): water, yeast, sugar and the root beer extract.

Doesn't the root beer extract look neat?

Then, start stirring!

I also like to use this stirring wand that attaches to a drill - as you can tell, it really gets the mixture moving! It is important to get all of the sugar dissolved.

And now, time to fill! Make sure the end of your bottling wand is sanitized. Grab your sanitized bottles and start filling! If you have a bottling wand, just press the tip to the bottom of the bottle for flow and release the tip and the flow stops. Release the flow just as the root beer gets to the top of the bottle - this way, when you remove the wand you will have the perfect amount of head space. If you went with the 2 liter bottle option, don't worry about this step!

Look at all those bottles of deliciousness!

Assemble your equipment: a clean 2 liter bottle with cap and funnel. Place the funnel in the plastic bottle. Add the sugar, the yeast, and the root beer extract. Add fresh, cool (filtered if you have soft water) water to the bottle, making sure to leave about 1 inch of head space. Remove funnel and cap. Shake the bottle thoroughly to dissolve the sugar and yeast.
Place the bottle at room temperature for three to four days. Check the bottle every day - you are looking for it to feel quite hard (think grocery store pop bottles). After the bottle feels quite hard to you, move it to a cool place that is below 65 degrees, or, if you feel nervous about an explosion, just move the bottle to the refrigerator - there is no danger of this root beer exploding in the refrigerator (again, I am speaking from experience!).
Note #1: Before you drink it, make sure to thoroughly chill the root beer - overnight in the refrigerator is a good idea. Open the cap slowly to release the pressure, and enjoy!
Note #2: When pouring the root beer, take note that there is a bit of sediment of yeast at the bottom of the bottle. It will look a bit cloudy. It certainly won't hurt a person, but I prefer to decant the root beer carefully to avoid the sentiment getting into my glass.
Note #3: Home made root beer makes great root beer floats, especially if you use your own home made vanilla ice cream.
In a 'closed' fermentation system (such as this home made
root beer), the carbon dioxide dissolves in the liquid, since it has no other
place to go. This gives the drink its
fizz, and stops the fermentation process - this leaves most of the sugar intact, which is why the resulting beverage still so delightfully sweet.
So why go to the trouble of making your own root beer? I make it because unlike store-bought root beer, making your own gives you a delicious, naturally carbonated beverage that has less fizz and a smoother, richer, creamier taste.
I had wanted to make root beer totally 'from scratch,' but when I looked up recipes I saw that I needed the roots of a sassafras tree. At this point, I have no idea where to find a sassafras tree (though I will be keeping my eyes open)!
I decided to use a root beer base. You can usually find root beer extract at your local supermarket or home brew supply store. Also, you can order it online if you can't find the extract anywhere else.
The next thing that is handy - but not totally necessary is a bottling bucket and wand. You can make the root beer in the bucket, and use the wand to easily fill your bottles (the end of the wand has a spring loaded tip that makes it easy to fill bottles - just press the tip to the bottom of the bottle for flow and release the tip and the flow stops). If you don't have this type of equipment - no problem. The directions at the bottom of this post will be to make a 2 liter bottle of root beer with the only needed equipment being: a clean 2 liter bottle and a funnel.
The next important thing is yeast: I have had good results with this Red Star Premier Cuvee yeast (found at my local brewing supply store), but you can also use regular baking yeast.
Next step: sanitize your bottles of choice. I like to use old swing-top beer bottles. You can probably tell from this picture, but this bottling tree is fantastic: at the top is a spring loaded shooter that sanitizes the inside of the bottles quickly and easily, then they can drip drain on each of the pegs. The tray at the bottom catches all of the drips! Again, just in case you don't have this equipment, the directions at the bottom of the post will be for using a 2 liter bottle.
The bottling tree is filling up! By the way, I should make mention when using glass bottles, there is always a risk of the bottles exploding (yes, I speak from experience). If you are worried about it, a safer option would be to use clean 2 liter bottles.
Now, to begin; into the bottling bucket (or 2 liter bottle): water, yeast, sugar and the root beer extract.
Doesn't the root beer extract look neat?
Then, start stirring!
I also like to use this stirring wand that attaches to a drill - as you can tell, it really gets the mixture moving! It is important to get all of the sugar dissolved.
And now, time to fill! Make sure the end of your bottling wand is sanitized. Grab your sanitized bottles and start filling! If you have a bottling wand, just press the tip to the bottom of the bottle for flow and release the tip and the flow stops. Release the flow just as the root beer gets to the top of the bottle - this way, when you remove the wand you will have the perfect amount of head space. If you went with the 2 liter bottle option, don't worry about this step!
Look at all those bottles of deliciousness!
Homemade Root Beer (To Fill A 2 Liter Bottle)
(note: if you have the brewing equipment and would like to make the root beer as I did in the pictures, please feel free to! I used the whole bottle of extract which made about 4 gallons of root beer)- 1 tablespoon root beer extract (more or less to taste)
- 1 cup white table sugar
- 1/4 teaspoon yeast
- water to fill 2 liter bottle
Assemble your equipment: a clean 2 liter bottle with cap and funnel. Place the funnel in the plastic bottle. Add the sugar, the yeast, and the root beer extract. Add fresh, cool (filtered if you have soft water) water to the bottle, making sure to leave about 1 inch of head space. Remove funnel and cap. Shake the bottle thoroughly to dissolve the sugar and yeast.
Place the bottle at room temperature for three to four days. Check the bottle every day - you are looking for it to feel quite hard (think grocery store pop bottles). After the bottle feels quite hard to you, move it to a cool place that is below 65 degrees, or, if you feel nervous about an explosion, just move the bottle to the refrigerator - there is no danger of this root beer exploding in the refrigerator (again, I am speaking from experience!).
Note #1: Before you drink it, make sure to thoroughly chill the root beer - overnight in the refrigerator is a good idea. Open the cap slowly to release the pressure, and enjoy!
Note #2: When pouring the root beer, take note that there is a bit of sediment of yeast at the bottom of the bottle. It will look a bit cloudy. It certainly won't hurt a person, but I prefer to decant the root beer carefully to avoid the sentiment getting into my glass.
Note #3: Home made root beer makes great root beer floats, especially if you use your own home made vanilla ice cream.
Mar 6, 2014
Make Your Own Earth Oven!
What is an earth oven, you might ask? Charlie first heard about it on a radio cooking show called "The Splendid Table." Lynn Rossetto Kasper was interviewing this man named Kiko Denzer, who wrote a book called, "Build Your Own Earth Oven." If you are at all interested in building your own earth oven, I highly recommend this book, which costs just $12.84 on Amazon (see link).
Simply put, an earth oven is a cooking structure made from earth. Even though it is quite a bit of work, one of the nice things about this oven is that it was almost free to make. The only expense we had were the fire bricks and the cement mix. Everything else we scavenged - from digging the clay out of our backyard, to digging the retaining wall bricks out of an old pile of stuff, to finding a perfect (free!) roof!
Now, before we begin - I just wanted to make mention that even though you won't see me in any of these photos, I was right alongside helping all the way - I was elected as 'photographer' to document the process!
And now, to begin: we decided to put the earth oven right outside our front door. That way, we thought, it will be easy to bring the food out and back in.
As you can see from the below picture, by the time I decided to start photographing the process, we had already begun. Better late than never, right?
This picture shows the form dug into the ground, ready for the concrete slab.


Here, Charlie is beginning to place the rebar which will reinforce the concrete.

The rebar is placed.

Time to mix the concrete!

I guess we need a few more batches.

There we go!

Time to smooth the concrete pad.


Beautiful!

After the concrete pad was well dried, it was time to build the "plinth" - a structure that brings the floor of the actual oven to a good working height. You could build the earth oven on the ground, but we decided it would be a pain to be cooking on our knees! As we built the plinth with the retaining blocks, we added "fill" to the center - pea rock, gravel and even old concrete chunks - anything we could find to fill it up.

We are getting there!

Here is Charlie and my Dad holding up a great find - an aluminum satellite dish that Charlie found. This will end up being the roof.

It is important for the earth oven to have a roof, otherwise, rain could wash away the cob mixture.

Now, it is time to make the bottom insulating layer. Charlie built another form, and inside this form are empty glass bottles for extra insulation.


Getting as many bottles as we can in there.

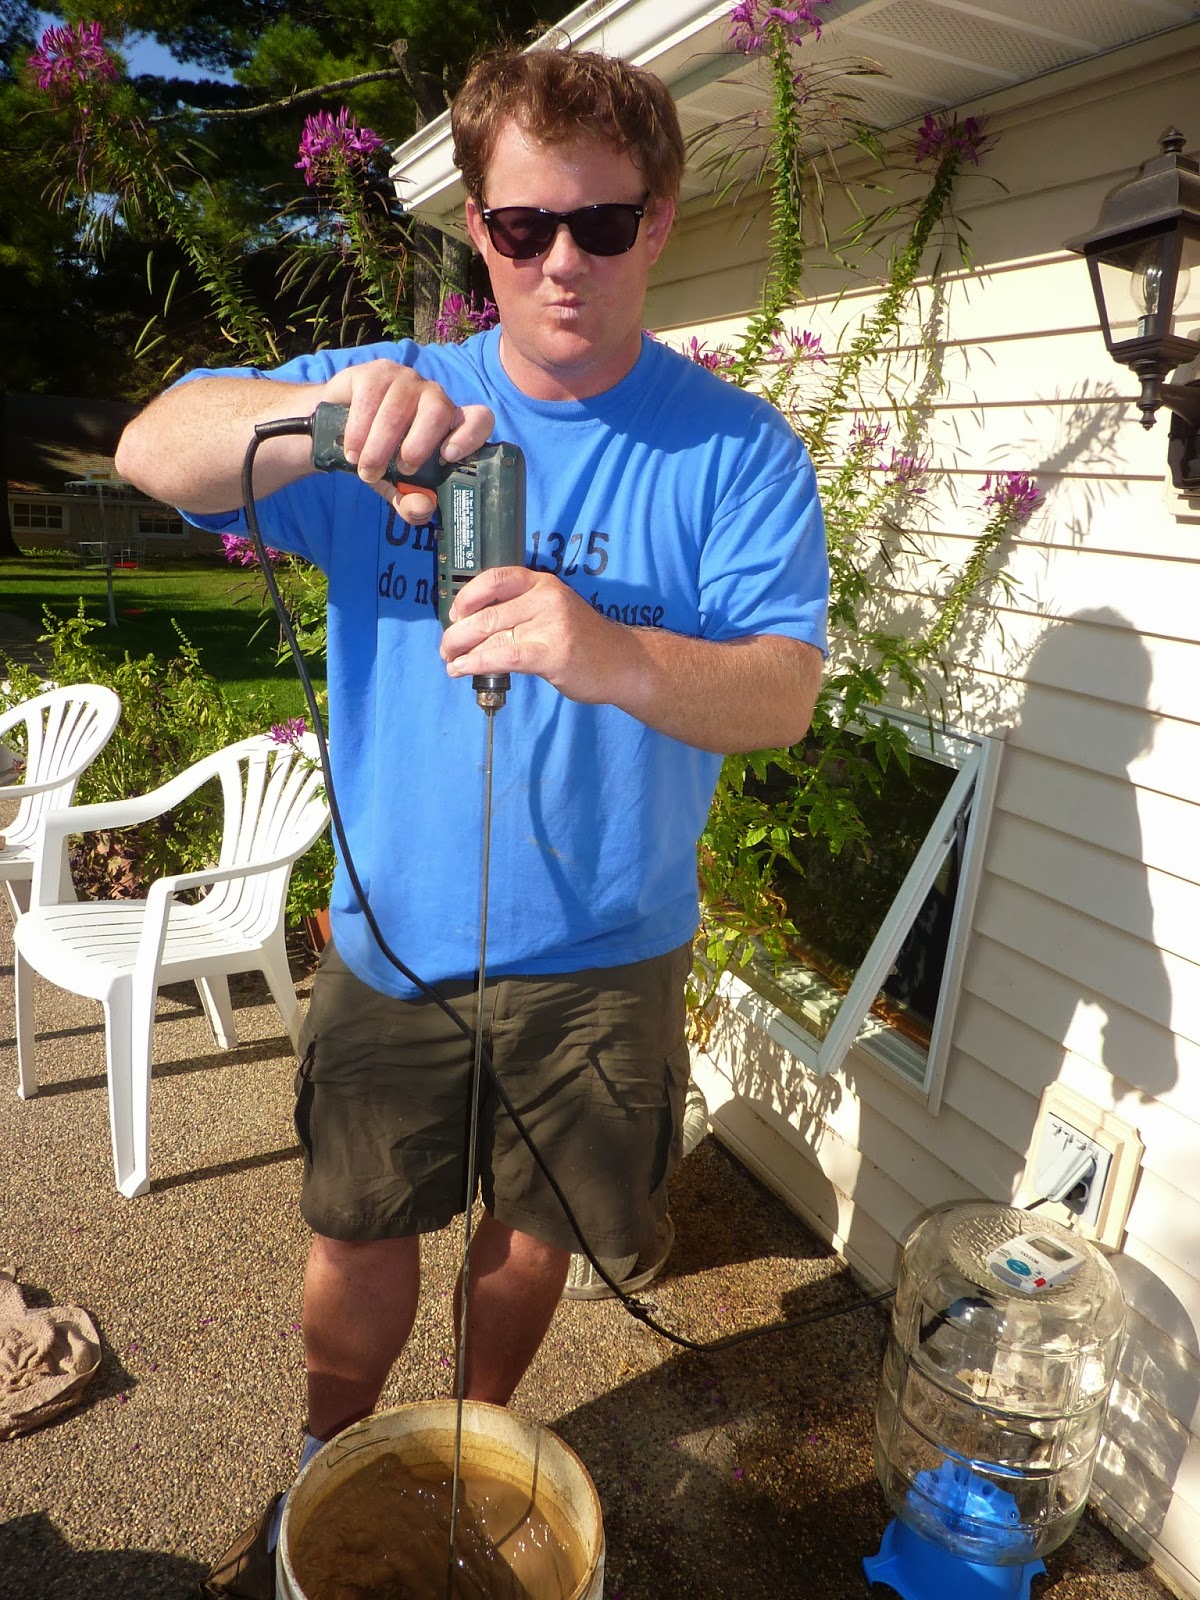
Now, time to make the 'slip' - a very loose clay mixture (we dug the clay off our land - yay for free!). Charlie is using a drill with his homemade mixer to thoroughly mix the slip.

Isn't that cleome plant behind Charlie amazing??
Next, wood planer shavings to add to the slip. This will create the insulation layer.

Pouring the slip into the planer shavings.

Mix, mix, mix!!

Need a bit more slip to get the right consistency.

Working the planer shavings/slip insulation mixture inside the form and around all the bottles.
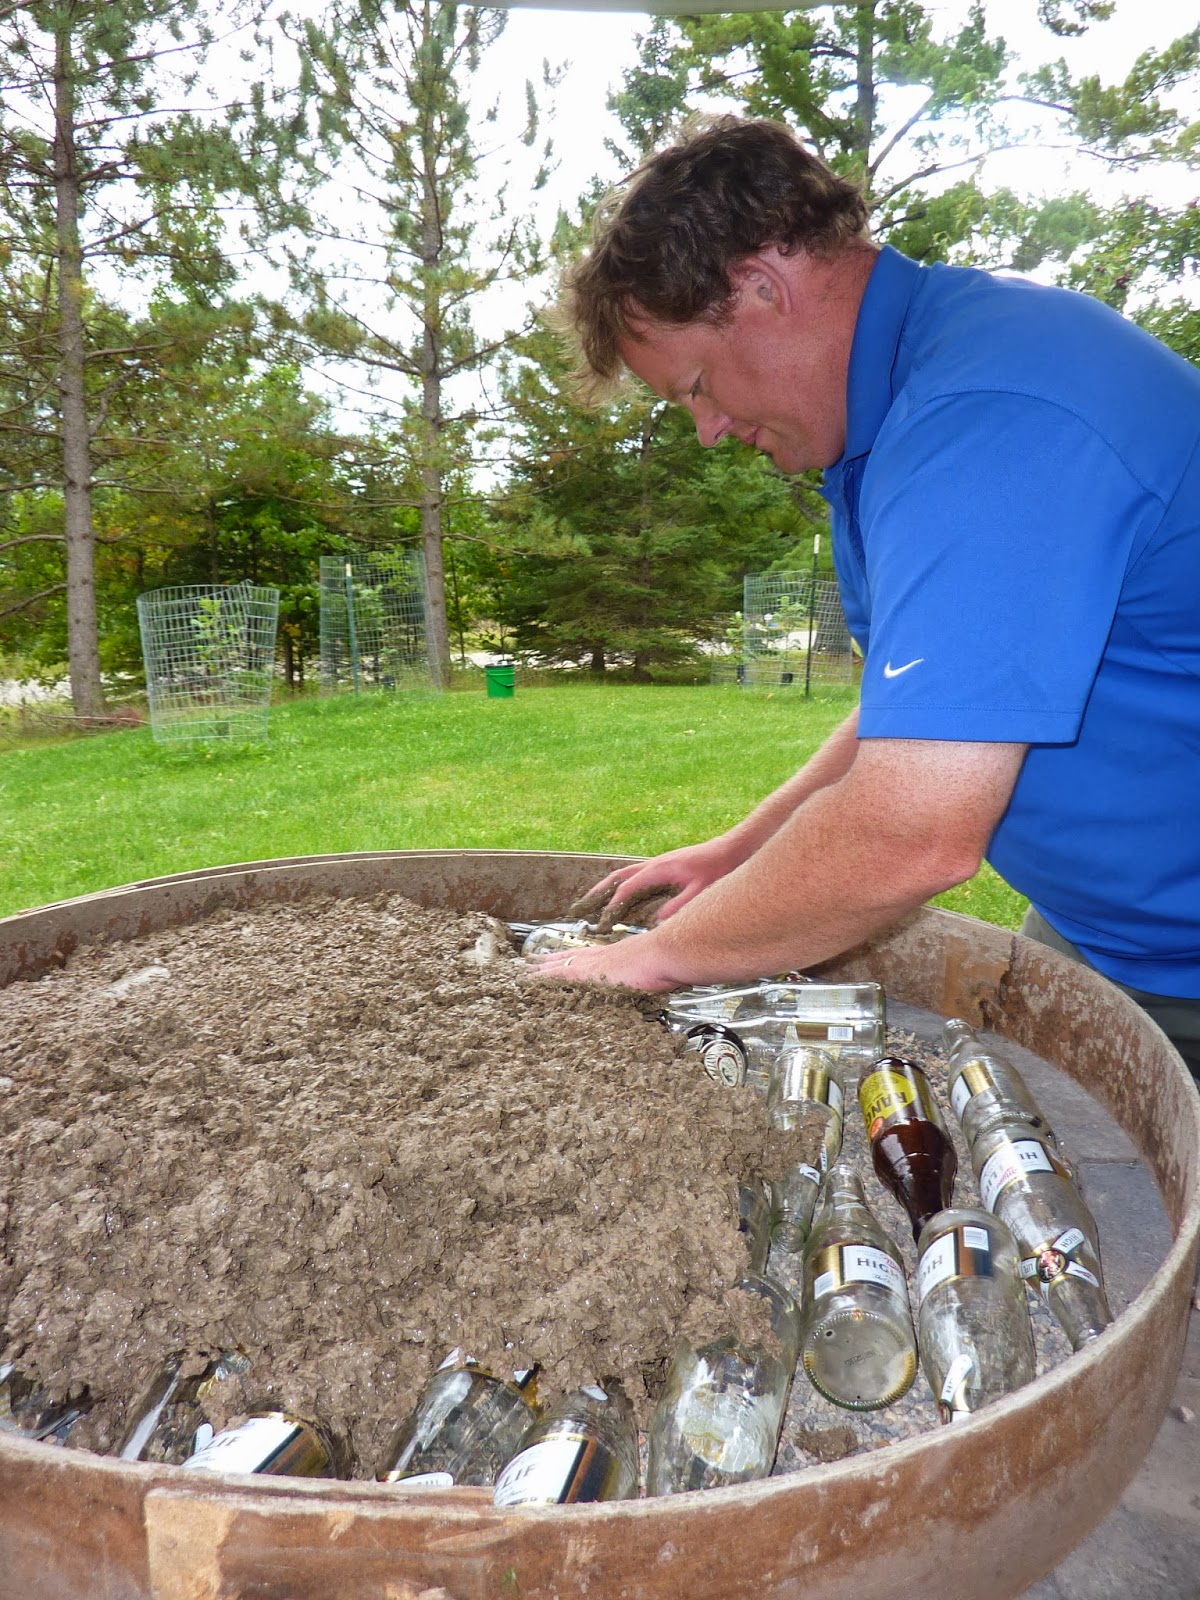
Now, the bottom insulation layer is dry and the form removed.

Now, time to start building the floor! Here Charlie is mixing up "cob" a clay mixture made with clay, sand, cat tail fluff and water. Cat tail fluff, you ask? The object is to add strength to the cob mixture, and cat tails are free and plentiful!

Mixing up the cob the easiest way; grinding and mixing with our feet. Using rubber boots was great - we were able to easily rinse them off!

As the mixture gets too spread out, we were able to use the corners of the tarp to pull the mixture back to the center.

Need to add a bit more water to get the right cob consistency.

Time to start troweling the floor in place.

Many batches of cob to mix up! I lost track of how many batches it took to make the whole earth oven.

This floor won't cover the whole insulation layer, because the dome will fill in the edges later. As you can see, we worked into the night on several occasions!

Now, it is time to design the arch. The arch is made out of firebrick. Charlie set these bricks out on paper to draw the curve and make the arch mold.

Building the "screed" area:

to make sure the floor of the oven will be perfectly flat and smooth.

As you can see, the actual floor of the oven will be made out of firebrick.

Checking to make sure the screed forms are level and square (the firebricks here are just setting there for now).

Adding a bit more cob to the back.

Next, the floor is covered with straight sand. After using the screeding technique, this sand will be a perfectly flat place to arrange the fire bricks.

Beginning to place the fire bricks out on the perfectly flat sand.


Now, time to build the arch! Note: you don't have to have an arch for your door, you could also make a square opening.

Charlie built the wooden form to place the arch bricks around. For the time being, we are using little rocks to hold each fire brick in place.

Tada! The arch.

Charlie's clever idea - place a light bulb under a fire proof bowl to help dry the cob later on!

Next, using straight sand to form the shape of the inside of the oven. After the shell is made, this sand will be removed.

Looks nice and smooth - and what a great shape!


Also, at this time, you can see we are bringing out the floor near the arch a bit.


Now, time to let it dry thoroughly. We'll turn on that light bulb to create some inside heat! This layer must dry thoroughly before we remove the sand from the inside - we don't want a collapse!

A couple of days later, when the cob layer was mostly dry, we removed all the sand from the inside of oven.
We decided to build a small fire inside the oven part to help dry the cob layer the rest of the way. It was really fun to see the fire on the oven for the first time! In this photo, you can see the newspaper burning away.


Next, time to build the insulation layer. This consisted of wood planer shavings mixed with more slip. We placed more empty glass bottles around the base of the earth oven, to give it just a bit more insulation.

As you can see, this insulation layer is quite thick -a good 4 inches over the whole cob layer.


Higher and higher the insulation layer goes!

Almost there!


Well, since we have a fire, why not cook our very first pizza??!! Time to get out the pizza peel!

As you can see from this photo, the hot coals are brushed to the side and the pizza is cooked directly on the firebrick floor.


Are you done yet, little pizza?? We are so excited to eat you!

Um, yes! It looks perfect!

Next pizza: tomato sauce, fresh mozzarella, sun dried tomatoes and fresh basil leaves.

Yum!

Mmmmm time to eat!

Now, as time went on, we continued to work on the earth oven. In this picture below, you can see that we are starting to form the final layer of cob.

Mmmm, time to have more pizza. I know it is kind of hard to see, but if you look inside the earth oven, you can see a piece of angle iron. This was Charlie's idea to keep the coals and ashes away from the pizza cooking area.

There, this is a better picture of the inside of the earth oven and the two pieces of angle iron holding the coals away from the pizza.

After a late night of building, the final coat of cob is on the whole oven!


The finished earth oven! It was sure a long project, but so worth it.

Now, a brief tutorial on how to run the earth oven:
Prepare wood and kindling. The unfortunate thing about the earth oven is that it requires quite a bit of small wood pieces. Note: I wanted to point out one thing about this picture: notice how the arch is black but the inside of the oven is sand colored? This is because the oven gets so hot on the inside that the soot is burned off - this happens at around 700 degrees F.

Light the wood! You want to have a nice fire going in the earth oven for about two hours before you want to cook pizzas. All the layers need time to warm up and get really hot - i.e. 700 degrees F.

Then, place the pieces of angle iron inside to move the coals away from the cooking surface. Clean the area with a scuffle (strips of rags tied to a stick). The scuffle is soaked with water and does a pretty good job of cleaning the floor. Then, time to cook the pizzas!

As you cook the pizzas, the oven will very slowly loose heat. After a couple of hours of cooking pizzas, when the oven temp gets down to about 450 to 400 degrees F., you can bake some loaves of bread. Here we are baking some sourdough bread.

Next, as the temperature declines further, you can bake cookies in the oven. We cooked a batch of sugar cookies and they turned out great. I was afraid they might taste smoky, but they didn't at all, just crisp, delicate and sweet!

Since I didn't have a small enough pan, I placed two layers of tin foil over a small wire rack and baked the cookies on that.

Then, as the temperature declines further, you can cook a pot of beans or a pot of stew for a few hours.


Then, by this time night is probably falling and the fire has died out in the oven (keep in mind you haven't put any wood in since many, many hours earlier). Now it is time to load the inside of the oven with wood. The wood will be kiln-dried and perfect for feeding your earth oven next time you fire it up.
Isn't that a great timeline of events? And a great way to use all of the heat from the earth oven? We are looking forward to this next summer when we can experiment with cooking other things in the earth oven.
But now, it is time to make pizzas! This was last summer. In this following picture you can see my dad, Scott (in the 'red cross' tee shirt) and his brother Mark at the pizza "counter." Dad is rolling out home made pizza crusts, and Uncle Mark is making a pizza. A few things to note; the pizza peel is thoroughly sprinkled with corn meal - a must for removing the raw pizza from the peel to the earth oven. Next, note Charlie in the background, pulling out a cooked pizza - he made two pizza peels; one out of wood so people can be making a pizza on it, and another one out of stainless steel to remove the very hot pizzas from the earth oven when they are done cooking.

Now, finally, after all that work, it is time to eat! This looks like a good pizza - home made garlic Alfredo sauce, roasted red peppers, onions, bacon, mozzarella and Parmesan cheese!

P.S. I hope you learned something from this gigantic post - and maybe, we even inspired you to make your own earth oven!
P.S.S. Next, I will work on a post featuring our home made pizza dough, home made sauces and all of our favorite topping combinations!
Subscribe to:
Posts (Atom)