
hi

Showing posts with label baking. Show all posts
Showing posts with label baking. Show all posts
Jun 11, 2018
Vegetable Garden Birthday Cake and Creamy Orange Filling
For 'Lil Lass' fourth birthday recently, she chose a "Pansy and Garden" cake theme, complete with rows of veggies, fruits, real pansy flowers and baby gummy worms. I think she chose this theme due to the pansies she's been caring for that she started from seed in February, and because she has enjoyed helping to plant our veggie garden. And who doesn't like gummy worms?

Apr 14, 2014
Homemade Self Rising Flour
How many times have you been baking, and realized you need self
rising flour? This has happened to me more times than I can count. Of
course, you can buy pre-made self rising flour, but did you know it is
also very easy to make on your own?
All you have to do is stir three basic ingredients together - flour, baking powder and salt. Easy peasy!

All you have to do is stir three basic ingredients together - flour, baking powder and salt. Easy peasy!
Apr 13, 2014
German Chocolate Cake Cookies
The other day I wanted to make a batch of cookies, but I didn't know what kind to make. So I asked Charlie what kind of cookies he was in the mood for. He didn't really have anything in mind either.
Where to find inspiration?? I grabbed my Taste of Home cookie cookbook. As I was paging through the book, Charlie randomly suggested to make the cookies on page 38, in the top left corner (such a fun idea!).
I hurriedly turned to the correct page, and found a recipe for German Chocolate Toffee Cookies. Mmmm, they sounded delicious! But, as I read through the recipe, I realized I didn't have all of the ingredients. I ended up creating these German Chocolate Cake Cookies, chock full of sweet German Chocolate, coconut and toasted pecans.
They were a hit!

Where to find inspiration?? I grabbed my Taste of Home cookie cookbook. As I was paging through the book, Charlie randomly suggested to make the cookies on page 38, in the top left corner (such a fun idea!).
I hurriedly turned to the correct page, and found a recipe for German Chocolate Toffee Cookies. Mmmm, they sounded delicious! But, as I read through the recipe, I realized I didn't have all of the ingredients. I ended up creating these German Chocolate Cake Cookies, chock full of sweet German Chocolate, coconut and toasted pecans.
They were a hit!
Mar 27, 2014
Easy Swirl Roses Tutorial
Hello! It is time for that easy swirl rose tutorial I promised you a while back!
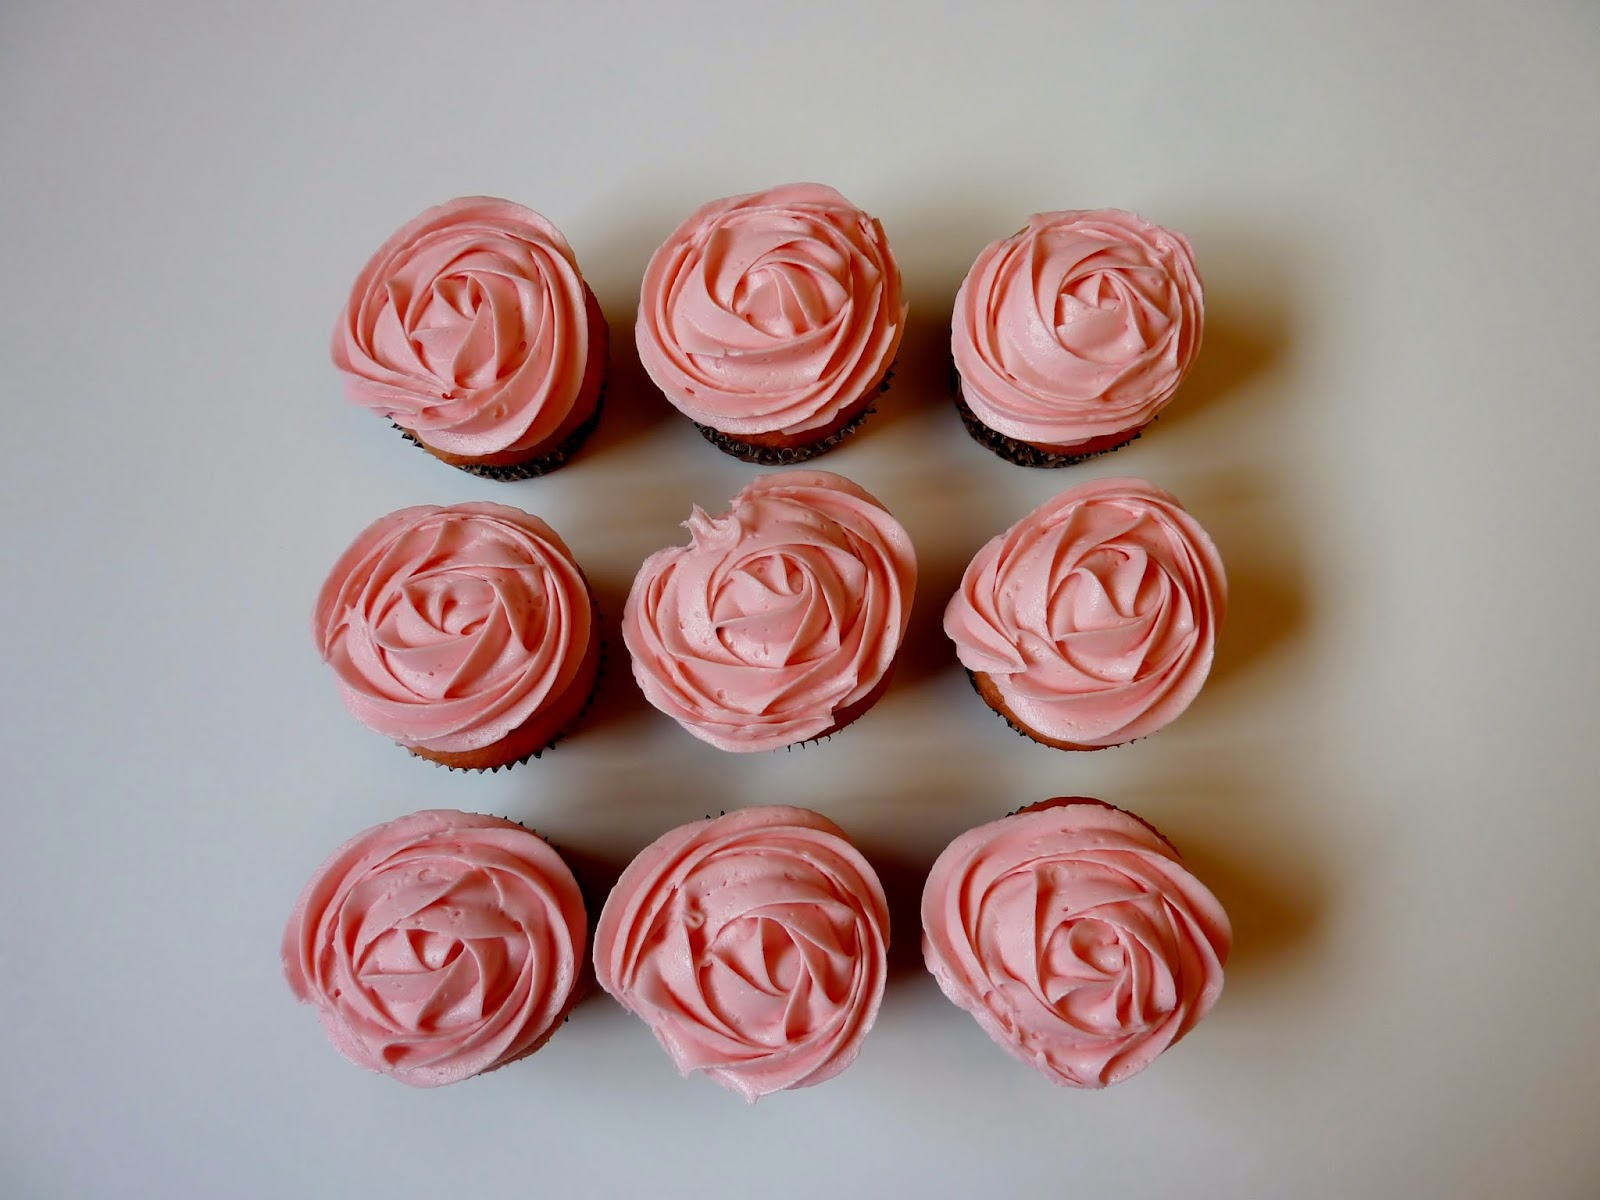
These roses are so easy to make (am I using the word "easy" too much?). And the roses are so beautiful and romantic! They can be used to decorate cupcakes, regular cakes, cookies - and whatever else you can think of.


Ok, enough photo's already! I think you get the idea.
Let's get started! I made just a basic cupcake to demonstrate how to make these roses. Ideally your cupcakes should be a little less rounded than these; as you could probably see from the pictures when they are rounded it makes it harder to cover the entire top of the cupcake with this decorating technique.

To pipe a rose, using a 1M Wilton tip in your frosting bag, hold the bag straight up from your cupcake.

Gently squeeze bag and move in a circular motion starting from the center and moving outward, around and around.

Finish by releasing pressure and gently bringing the tip kind of under your last loop. I apologize for the confusing way of writing that; I can't think of an easier way to say it! To try to put it simply: finish off the rose so it looks natural - no awkward points or anything.

That is all you need to do to make a swirl rose on a cupcake!
If you are decorating a regular cake, pipe a rose onto the side of your cake, and continue to pipe roses all the way around cake. I love to just sprinkle large and small roses here and there on a cake. Experiment and have fun! For the top of the cake, start by piping roses along the perimeter and move towards the center. Fill in empty spots on the entire cake with dollops of stars, very easy to do! Just gently squeeze and lift pastry bag.

You could also go with a very symmetrical look by just piping large roses in a circle around the cake, and filling in with little 'stars.'
Just as a demonstration, this is a cake I made last year using the swirl rose technique. Not the greatest pictures, but hopefully you will get the idea.


That is it! Swirl roses are so beautiful and easy to make.
Please leave a comment if you have any questions, and I will try to help!
These roses are so easy to make (am I using the word "easy" too much?). And the roses are so beautiful and romantic! They can be used to decorate cupcakes, regular cakes, cookies - and whatever else you can think of.
Ok, enough photo's already! I think you get the idea.
Let's get started! I made just a basic cupcake to demonstrate how to make these roses. Ideally your cupcakes should be a little less rounded than these; as you could probably see from the pictures when they are rounded it makes it harder to cover the entire top of the cupcake with this decorating technique.
To pipe a rose, using a 1M Wilton tip in your frosting bag, hold the bag straight up from your cupcake.
Gently squeeze bag and move in a circular motion starting from the center and moving outward, around and around.
Finish by releasing pressure and gently bringing the tip kind of under your last loop. I apologize for the confusing way of writing that; I can't think of an easier way to say it! To try to put it simply: finish off the rose so it looks natural - no awkward points or anything.
That is all you need to do to make a swirl rose on a cupcake!
If you are decorating a regular cake, pipe a rose onto the side of your cake, and continue to pipe roses all the way around cake. I love to just sprinkle large and small roses here and there on a cake. Experiment and have fun! For the top of the cake, start by piping roses along the perimeter and move towards the center. Fill in empty spots on the entire cake with dollops of stars, very easy to do! Just gently squeeze and lift pastry bag.
You could also go with a very symmetrical look by just piping large roses in a circle around the cake, and filling in with little 'stars.'
Just as a demonstration, this is a cake I made last year using the swirl rose technique. Not the greatest pictures, but hopefully you will get the idea.
That is it! Swirl roses are so beautiful and easy to make.
Please leave a comment if you have any questions, and I will try to help!
Mar 24, 2014
Fudgy Brownies
Would you be interested in my go-to fudgy brownie recipe? This recipe has become a favorite of family and friends alike. I made these a few days ago (mainly) for my brothers, though Charlie and I appreciated some of them as well!
Please note, you have two sizing options: you could make this recipe in a cookie sheet (with 1 inch sides) for thin brownies, or you could make this recipe and put it in a 9x13 pan for extra thick, fudgy brownies. I like to do both. This time I made them in a cookie sheet.
This recipe uses an interesting technique. You bake the brownies for 15 minutes, remove them from the oven for 15 minutes to sit on the counter, then put back in the oven! The result is a wonderfully fudgy, box-like-brownie, that is made from scratch.
Warning: these brownies are very, very fudgy. If you are a cake-like brownie fan, you will not enjoy these brownies.

Heat the oven to 325°F and make sure there is an oven rack in the middle position. Lightly grease or butter either a 10 by 15 inch cookie sheet, or a 9x13 pan.
Melt the chocolate with the butter in a large saucepan, stirring occasionally, until smooth. Remove the pan from the heat and whisk in the sugar. Add the eggs, one at a time, whisking well after each addition, and whisk the mixture vigorously until it is smooth and cohesive. Whisk in the vanilla and salt. Sprinkle the cocoa over the batter and stir with a whisk until the batter is smooth. Sprinkle the flour over the batter and stir with the whisk in the same manner until the batter is smooth.
Spread the batter evenly in the pan. Bake the cookie sheet for 15 minutes, and the 9x13 pan for 25 minutes. Now, here comes the strange part: remove the pan from the oven and let the brownies rest 15 minutes at room temperature. After 15 minutes, return the brownies to the oven and continue to bake them until a wooden tooth pick comes out clean, about 25 minutes for the cookie sheet and about 40 minutes for the 9x13.
Cool the brownies completely in the pan on a rack. Frost if desired - I like to frost them with chocolate fudge frosting (interested? I will post the recipe!). Cut the brownies into serving pieces.
Please note, you have two sizing options: you could make this recipe in a cookie sheet (with 1 inch sides) for thin brownies, or you could make this recipe and put it in a 9x13 pan for extra thick, fudgy brownies. I like to do both. This time I made them in a cookie sheet.
This recipe uses an interesting technique. You bake the brownies for 15 minutes, remove them from the oven for 15 minutes to sit on the counter, then put back in the oven! The result is a wonderfully fudgy, box-like-brownie, that is made from scratch.
Warning: these brownies are very, very fudgy. If you are a cake-like brownie fan, you will not enjoy these brownies.
Fudgy Brownies
- 6 ounces unsweetened chocolate (100% cacao), chopped roughly
- 1 1/2 cups unsalted butter, cut into pieces
- 3 cups sugar
- 6 large eggs
- 1 tablespoon pure vanilla extract
- 1 teaspoon salt
- 1/2 cup unsweetened cocoa powder
- 1 cup all-purpose flour
Melt the chocolate with the butter in a large saucepan, stirring occasionally, until smooth. Remove the pan from the heat and whisk in the sugar. Add the eggs, one at a time, whisking well after each addition, and whisk the mixture vigorously until it is smooth and cohesive. Whisk in the vanilla and salt. Sprinkle the cocoa over the batter and stir with a whisk until the batter is smooth. Sprinkle the flour over the batter and stir with the whisk in the same manner until the batter is smooth.
Spread the batter evenly in the pan. Bake the cookie sheet for 15 minutes, and the 9x13 pan for 25 minutes. Now, here comes the strange part: remove the pan from the oven and let the brownies rest 15 minutes at room temperature. After 15 minutes, return the brownies to the oven and continue to bake them until a wooden tooth pick comes out clean, about 25 minutes for the cookie sheet and about 40 minutes for the 9x13.
Cool the brownies completely in the pan on a rack. Frost if desired - I like to frost them with chocolate fudge frosting (interested? I will post the recipe!). Cut the brownies into serving pieces.
Mar 23, 2014
Pain de Mie
I am so excited about this new pan I just got! It is called a Pullman Loaf Pan, and I found it on Amazon for $25 (normally $45). The pan is an "commercial grade, heavy gauge loaf pan with cover; 13 x 4 x 4 inches." The point of it is that it makes perfectly square loaves of bread - obviously making it ideal for baking squared bread loaves, such as the French loaf pain de mie, and brioche.
I used the pain de mie recipe that accompanied the loaf pan, which is a King Arthur Flour recipe. But what is pain de mie, you might ask?
Let us look to Wikepedia:
"Pain de mie is a type of sliced, packaged bread "Le pain" in French means "bread" or "loaf of bread", and "la mie" refers specifically to the soft part of bread, called the crumb. In English, pain de mie is most similar to pullman loaf or regular sandwich bread. This bread has sugar in it, which makes it sweeter than most French breads, though even with the sugar, pain de mie is still not as sweet as most American breads. This bread is usually used for making sandwiches or for toasting. It can be baked in a sealed pan, which prevent crust from forming. If not baked in a sealed pan, the crust can be cut off (as done in factories before packaging). Pain de mie is sold in rounded or rectangular shapes. http://en.wikipedia.org/wiki/Pain_de_mie"
Isn't it beautiful?

So here I am with the pain de mie dough made, getting ready to put it into the Pullman pan.

The dough is rolled and the edges crimped, and now it is time to rise.

I cover the pan with plastic wrap, and set it in a warm spot to rise until it is just below the top edge of the pan (don't put the lid on it yet).

Now, about 50 minutes later (though this number will vary depending on the conditions in your kitchen), I am ready to gently slide the lid in place. I spray a little spray grease on the bottom side of the lid.

and gently slide it in place. You can see it is just barely brushing the top of the loaf - try to work very carefully so you don't cause your dough to fall.

Now, let the pain sit in a warm place again for about 10 minutes, while you preheat your oven. During this time, you want your dough to continue to rise, so it fills the corners of the top of the pan. After about 10 minutes, bake at 350 degrees F. for 25 minutes. At this time, carefully remove the lid and bake an additional 20 minutes.

Enjoy your square pain de mie! Hint: it is great for sandwiches, toast, bread puddings, and makes incredible french toast.
(adapted from a King Arthur Flour recipe; the original recipe made a loaf of bread that was a bit too dry, so I have adapted it to suit our tastes. )
I used the pain de mie recipe that accompanied the loaf pan, which is a King Arthur Flour recipe. But what is pain de mie, you might ask?
Let us look to Wikepedia:
"Pain de mie is a type of sliced, packaged bread "Le pain" in French means "bread" or "loaf of bread", and "la mie" refers specifically to the soft part of bread, called the crumb. In English, pain de mie is most similar to pullman loaf or regular sandwich bread. This bread has sugar in it, which makes it sweeter than most French breads, though even with the sugar, pain de mie is still not as sweet as most American breads. This bread is usually used for making sandwiches or for toasting. It can be baked in a sealed pan, which prevent crust from forming. If not baked in a sealed pan, the crust can be cut off (as done in factories before packaging). Pain de mie is sold in rounded or rectangular shapes. http://en.wikipedia.org/wiki/Pain_de_mie"
Isn't it beautiful?
So here I am with the pain de mie dough made, getting ready to put it into the Pullman pan.
The dough is rolled and the edges crimped, and now it is time to rise.
I cover the pan with plastic wrap, and set it in a warm spot to rise until it is just below the top edge of the pan (don't put the lid on it yet).
Now, about 50 minutes later (though this number will vary depending on the conditions in your kitchen), I am ready to gently slide the lid in place. I spray a little spray grease on the bottom side of the lid.
and gently slide it in place. You can see it is just barely brushing the top of the loaf - try to work very carefully so you don't cause your dough to fall.
Now, let the pain sit in a warm place again for about 10 minutes, while you preheat your oven. During this time, you want your dough to continue to rise, so it fills the corners of the top of the pan. After about 10 minutes, bake at 350 degrees F. for 25 minutes. At this time, carefully remove the lid and bake an additional 20 minutes.
Enjoy your square pain de mie! Hint: it is great for sandwiches, toast, bread puddings, and makes incredible french toast.
Pain de Mie
(adapted from a King Arthur Flour recipe; the original recipe made a loaf of bread that was a bit too dry, so I have adapted it to suit our tastes. )
- 1 cup milk
- 2/3 cup water
- 8 tablespoons butter, softened
- 2 teaspoons salt
- 3 tablespoons sugar
- 1/4 cup nonfat dry milk
- 3 tablespoons potato flour starch
- 4 1/2 cups all purpose flour
- 2 teaspoons instant yeast
Manual Method: In a large bowl, combine the milk, water, butter, salt and sugar. Add the dried milk, flours and yeast, stirring till the dough starts to leave the sides of the bowl. Transfer the dough to a lightly greased surface, oil your hands, and knead it for 5 to 8 minutes, or until it's smooth and supple. Because of the relatively high fat content of this dough, it's a real pleasure to work with. Transfer the dough to a lightly greased bowl or dough-rising bucket, cover the bowl or bucket, and allow the dough to rise till puffy though not necessarily doubled in bulk, about 1 1/2 hours, depending on the warmth of your kitchen.
Mixer Method: Combine the ingredients as above, using a flat beater paddle or beaters, then switch to the dough hook(s) and knead for 5 to 8 minutes. Transfer the dough to a lightly greased bowl or dough-rising bucket, cover the bowl or bucket, and allow the dough to rise till doubled in bulk, 1 to 2 hours.
Bread Machine Method: Place all of the ingredients into the pan of your machine, program the machine for Manual or Dough, and press Start. When the cycle is finished, remove the dough and proceed as follows.
Lightly grease a 13 x 4-inch pain de mie or pullman pan. Transfer the risen dough to a lightly greased work surface, shape it into a 13-inch log, and fit it into the pan. Cover the pan with lightly greased plastic wrap, and allow the dough to rise until it's just below the lip of the pan, 45 minutes to 1 hour, depending on the warmth of your kitchen (it may rise even more slowly in a cool kitchen; don't worry, this long rise will give it great flavor).
Remove the plastic, and carefully place the cover on the pan, let it rest an additional 10 minutes while you preheat your oven to 350°F. Bake the bread for 25 minutes. Remove the pan from the oven, carefully remove the lid, and return the bread to the oven to bake for an additional 20 minutes, or until it tests done; an instant-read thermometer inserted into the center will register 190°F. Remove the bread from the oven, and turn it out of the pan onto a rack to cool completely. Yield: 1 loaf.
Mixer Method: Combine the ingredients as above, using a flat beater paddle or beaters, then switch to the dough hook(s) and knead for 5 to 8 minutes. Transfer the dough to a lightly greased bowl or dough-rising bucket, cover the bowl or bucket, and allow the dough to rise till doubled in bulk, 1 to 2 hours.
Bread Machine Method: Place all of the ingredients into the pan of your machine, program the machine for Manual or Dough, and press Start. When the cycle is finished, remove the dough and proceed as follows.
Lightly grease a 13 x 4-inch pain de mie or pullman pan. Transfer the risen dough to a lightly greased work surface, shape it into a 13-inch log, and fit it into the pan. Cover the pan with lightly greased plastic wrap, and allow the dough to rise until it's just below the lip of the pan, 45 minutes to 1 hour, depending on the warmth of your kitchen (it may rise even more slowly in a cool kitchen; don't worry, this long rise will give it great flavor).
Remove the plastic, and carefully place the cover on the pan, let it rest an additional 10 minutes while you preheat your oven to 350°F. Bake the bread for 25 minutes. Remove the pan from the oven, carefully remove the lid, and return the bread to the oven to bake for an additional 20 minutes, or until it tests done; an instant-read thermometer inserted into the center will register 190°F. Remove the bread from the oven, and turn it out of the pan onto a rack to cool completely. Yield: 1 loaf.
Mar 19, 2014
Hazelnut Torte with Vanilla Pastry Cream and Whipped Frosting
A few days ago, I made this Hazelnut Torte with Vanilla Pastry Cream and Whipped Frosting - the good news is that the cake really turned out delicious and a bonus was that it wasn't a ton of work!

The torte consisted of hazelnut chiffon cake, was filled with vanilla pastry cream and strawberry filling (I actually used strawberry freezer jam - it was perfect). The entire cake was then frosted with a very light whipped cream frosting.


A perfectly light spring dessert!

Hazelnut Chiffon Cake
Pastry Cream
Frosting
For the cake: Preheat oven to 375° F. Grease and flour two 9-inch cake pans (or use my slick grease recipe!). Beat egg yolks and sugar in large mixer bowl until pale and creamy. Fold in hazelnuts, flour, and almond flavoring. Beat egg whites until stiff and fold into egg yolk mixture. Spread batter gently in prepared pans. Bake about 30 minutes, or until wooden pick inserted in center comes out clean. Cool thoroughly, even overnight, on a wire rack.
For the pastry cream: In a medium bowl, whisk together the egg yolks and egg. Stir together the remaining sugar and cornstarch; then stir them into the egg until smooth. When the milk comes to a boil, drizzle it into the bowl in a thin stream while mixing so that you do not cook the eggs. Return the mixture to the saucepan, and slowly bring to a boil, stirring constantly so the eggs don' t curdle or scorch on the bottom. When the mixture comes to a boil and thickens, remove from the heat. Stir in the butter and vanilla, mixing until the butter is completely blended in. Pour into a heat-proof container and place a piece of plastic wrap directly on the surface. Refrigerate until chilled before using.
To put it all together: Cut each cake in half into two layers. Place the top of one of the cakes upside down on your platter. Spread with pastry cream filling. Top with second layer (bottom of of the cake you used). Spread with strawberry filling. Top with top of next cake, and spread with pastry cream. Finally, top with bottom of last cake (you want to end with the bottom of a cake - this will give you nice, crisp edges). Frost with whipped cream frosting. I patted finely chopped hazelnuts around the edges of the cake for a little decorative touch - you can do this if you wish. Decorate as desired - I put some whipped cream frosting into a piping bag with a star tip and did little bloops around the edge of the cake, then placed a piece hazelnut on each bloop.
Note: In case you were wondering, "bloop" isn't the technical term - I just wasn't sure of the correct technical term.
What we really liked about it is that the whole cake wasn't too sweet - just light and nutty with a little hint of fruitiness.

The torte consisted of hazelnut chiffon cake, was filled with vanilla pastry cream and strawberry filling (I actually used strawberry freezer jam - it was perfect). The entire cake was then frosted with a very light whipped cream frosting.
A perfectly light spring dessert!
Hazelnut Torte with Vanilla Pastry Cream and Whipped Frosting
Hazelnut Chiffon Cake
- 5 eggs, separated
- 1/2 cup sugar
- 1 cup ground hazelnuts
- 3 tbsp flour, all-purpose
- 1/4 tsp almond flavoring
Pastry Cream
- 1 3/4 cup milk
- 1/4 cup heavy whipping cream
- 1/4 cup sugar
- 2 egg yolks
- 1 egg
- 1/4 cup cornstarch
- 1/3 cup white sugar
- 2 tablespoons butter
- 1 teaspoon vanilla
Frosting
- 1 tablespoon vanilla extract
- 6 tablespoons granulated sugar
- 3 cups heavy cream
- strawberry filling or jam
For the cake: Preheat oven to 375° F. Grease and flour two 9-inch cake pans (or use my slick grease recipe!). Beat egg yolks and sugar in large mixer bowl until pale and creamy. Fold in hazelnuts, flour, and almond flavoring. Beat egg whites until stiff and fold into egg yolk mixture. Spread batter gently in prepared pans. Bake about 30 minutes, or until wooden pick inserted in center comes out clean. Cool thoroughly, even overnight, on a wire rack.
For the pastry cream: In a medium bowl, whisk together the egg yolks and egg. Stir together the remaining sugar and cornstarch; then stir them into the egg until smooth. When the milk comes to a boil, drizzle it into the bowl in a thin stream while mixing so that you do not cook the eggs. Return the mixture to the saucepan, and slowly bring to a boil, stirring constantly so the eggs don' t curdle or scorch on the bottom. When the mixture comes to a boil and thickens, remove from the heat. Stir in the butter and vanilla, mixing until the butter is completely blended in. Pour into a heat-proof container and place a piece of plastic wrap directly on the surface. Refrigerate until chilled before using.
To put it all together: Cut each cake in half into two layers. Place the top of one of the cakes upside down on your platter. Spread with pastry cream filling. Top with second layer (bottom of of the cake you used). Spread with strawberry filling. Top with top of next cake, and spread with pastry cream. Finally, top with bottom of last cake (you want to end with the bottom of a cake - this will give you nice, crisp edges). Frost with whipped cream frosting. I patted finely chopped hazelnuts around the edges of the cake for a little decorative touch - you can do this if you wish. Decorate as desired - I put some whipped cream frosting into a piping bag with a star tip and did little bloops around the edge of the cake, then placed a piece hazelnut on each bloop.
Note: In case you were wondering, "bloop" isn't the technical term - I just wasn't sure of the correct technical term.
Mar 17, 2014
Cherry Chip Birthday Cake
Hi! Today is a "share" post: I made this birthday cake for my Mom, and I just wanted to share it with you!
The cake was a [gasp: boxed] cherry chip cake with cherry pie filling, and frosted with cherry frosting. This has been Mom's favorite cake for as far back as I can remember.

I decorated the cake with super-easy-to-make frosting roses, however, I didn't have the right tip so the flowers aren't as 3-D as they should be (the correct tip is in the mail).

I also used frosting to "glue" on little hardened frosting flowers.

The cakes were a 9 inch, a 6 inch and a 3 inch cake.


If you are interested in learning how to make these super-easy frosting roses, I will be posting a how-to tutorial soon!
The cake was a [gasp: boxed] cherry chip cake with cherry pie filling, and frosted with cherry frosting. This has been Mom's favorite cake for as far back as I can remember.
I decorated the cake with super-easy-to-make frosting roses, however, I didn't have the right tip so the flowers aren't as 3-D as they should be (the correct tip is in the mail).
I also used frosting to "glue" on little hardened frosting flowers.
The cakes were a 9 inch, a 6 inch and a 3 inch cake.
If you are interested in learning how to make these super-easy frosting roses, I will be posting a how-to tutorial soon!
Mar 15, 2014
Easy Drop Biscuits
Sometimes it is nice to have a quick and easy biscuit recipe for those days when you just don't have a lot of extra time but need something else for your table.
These biscuits are fluffy and tender, with just a gentle tang from the buttermilk. Plus, they are super easy because you have no rolling out dough or trying to find your biscuit cutter.
I hope you will enjoy them!


Preheat oven to 475 degrees F. and adjust oven rack to middle position. Whisk flour, baking powder, baking soda, sugar and salt in medium sized bowl. Melt butter in a 2 cup liquid measuring cup, and stir buttermilk into melted butter. Add buttermilk mixture to flour mixture and stir until just incorporated. Drop by 1/4 cup spoonfuls or a large cookie scoop onto baking sheets that have been lined with either a silpat or parchment paper. Bake until tops are golden brown, 12 to 14 minutes. Transfer biscuits to a wire rack and let cool for 5 minutes before serving.
These biscuits are fluffy and tender, with just a gentle tang from the buttermilk. Plus, they are super easy because you have no rolling out dough or trying to find your biscuit cutter.
I hope you will enjoy them!
Easy Drop Biscuits
- 2 cups flour
- 2 teaspoons baking powder
- 1/2 teaspoon baking soda
- 1 teaspoon sugar
- 1/2 teaspoon salt
- 1 cup chilled buttermilk
- 8 tablespoons butter
Preheat oven to 475 degrees F. and adjust oven rack to middle position. Whisk flour, baking powder, baking soda, sugar and salt in medium sized bowl. Melt butter in a 2 cup liquid measuring cup, and stir buttermilk into melted butter. Add buttermilk mixture to flour mixture and stir until just incorporated. Drop by 1/4 cup spoonfuls or a large cookie scoop onto baking sheets that have been lined with either a silpat or parchment paper. Bake until tops are golden brown, 12 to 14 minutes. Transfer biscuits to a wire rack and let cool for 5 minutes before serving.
Mar 14, 2014
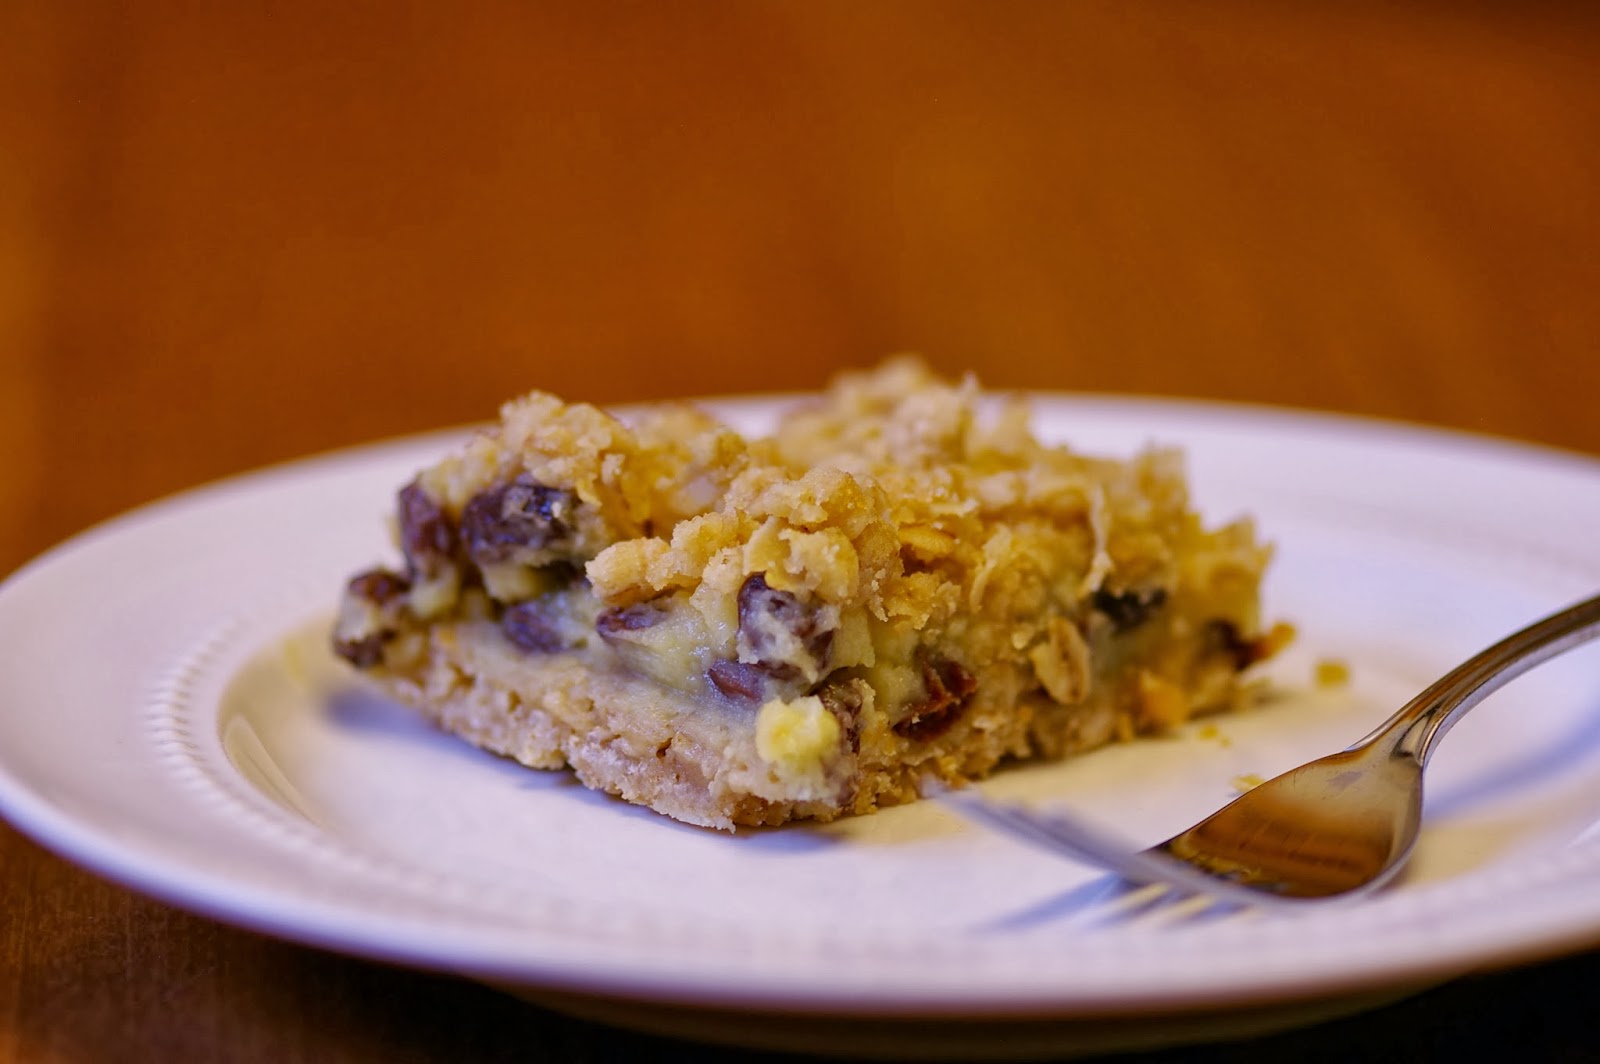
Old Fashioned Sour Cream Raisin Bars
I've loved these old fashioned sour cream raisin bars ever since my
mom made them when I was a kid. You start with an oatmeal crust, then
add a delicious sour cream custard that is studded with plump, juicy
raisins, and top it all off with a crumbly buttery topping.
Three beautiful layers of irresistible goodness.


The oatmeal crust.

The plumped raisins, draining from their hot water bath.

Custard raisin filling - check!

Finally, the topping in place and the bars are ready to go in the oven.

And, time to eat!

Mix the oatmeal, flour, baking soda, brown sugar and melted butter together. Pat 2/3 of the mixture into a 9x13 pan. Bake at 350 degrees F. for 10 minutes. Meanwhile, mix and boil on low til thick: egg yolks, sugar, cornstarch, sour cream and drained raisins. Pour on top of baked mixture. Sprinkle the rest of the mixture on top. Bake in oven for 20 minutes. Serve the bars warm or cooled.
Three beautiful layers of irresistible goodness.


The oatmeal crust.

The plumped raisins, draining from their hot water bath.

Custard raisin filling - check!

Finally, the topping in place and the bars are ready to go in the oven.

And, time to eat!
Old Fashioned Sour Cream Raisin Bars
- 1 3/4 cup oatmeal
- 1 2/4 cup flour
- 1 teaspoon baking soda
- 1 cup brown sugar
- 1 cup butter, melted
- 4 egg yolks
- 1 1/2 cups sugar
- 3 tablespoons
- 2 cups sour cream
- 2 cups raisins (soak raisins in hot water for 10 or 15 minutes)
Mix the oatmeal, flour, baking soda, brown sugar and melted butter together. Pat 2/3 of the mixture into a 9x13 pan. Bake at 350 degrees F. for 10 minutes. Meanwhile, mix and boil on low til thick: egg yolks, sugar, cornstarch, sour cream and drained raisins. Pour on top of baked mixture. Sprinkle the rest of the mixture on top. Bake in oven for 20 minutes. Serve the bars warm or cooled.
Subscribe to:
Posts (Atom)