
hi

Showing posts with label dessert. Show all posts
Showing posts with label dessert. Show all posts
Jun 11, 2018
Vegetable Garden Birthday Cake and Creamy Orange Filling
For 'Lil Lass' fourth birthday recently, she chose a "Pansy and Garden" cake theme, complete with rows of veggies, fruits, real pansy flowers and baby gummy worms. I think she chose this theme due to the pansies she's been caring for that she started from seed in February, and because she has enjoyed helping to plant our veggie garden. And who doesn't like gummy worms?

Apr 22, 2014
Raspberry Tartlets
Ah, the temperature has finally risen to the 60's, and even the 70's on some days! The sun is shining and the snow is pretty much gone. I think spring is finally on its way!
To celebrate I made these Raspberry Tartlets. I love making pastries, and I love making mini pastries even more!
These raspberry tarts begin with crisp-but-not-too-sweet almond crust.

To celebrate I made these Raspberry Tartlets. I love making pastries, and I love making mini pastries even more!
These raspberry tarts begin with crisp-but-not-too-sweet almond crust.
Apr 11, 2014
Raspberry Curd
Since I was a teenager, I have been known (at least in tiny circles)
for my lemon curd - particularly lemon curd that I make into lemon
tartlets. I first became interested in making fruit curds when I was a
late teenager. Fruit curds are luscious and bursting with flavor, and
able to go on pretty much everything (as we will soon see!).
The curds I have made so far are lemon and kumquat curds, and today I decided to use my tried and true lemon curd recipe to make a raspberry curd.
And.... it turned out deliciously! The raspberry curd still had the delightful tang my lemon curd recipe has, but it was balanced by a delicious fresh raspberry flavor (though I do have to admit, I used frozen raspberries). Also, the color of the raspberry curd was beautiful - an all natural deep raspberry color.

The curds I have made so far are lemon and kumquat curds, and today I decided to use my tried and true lemon curd recipe to make a raspberry curd.
And.... it turned out deliciously! The raspberry curd still had the delightful tang my lemon curd recipe has, but it was balanced by a delicious fresh raspberry flavor (though I do have to admit, I used frozen raspberries). Also, the color of the raspberry curd was beautiful - an all natural deep raspberry color.
Mar 28, 2014
Use-What-You-Have-In-Your-Kitchen Ice Cream Parfait
What do you do when you want a fast, delicious, beautiful dessert? As I was in this boat, I opened cupboard doors, the pantry doors, the refrigerator door, and the freezer door, trying to see what I had around. I decided to make a kind of ice cream parfait in a wine glass. It turned out beautiful and oh-so-tasty.
One of the things I really liked about this idea is that you can just make this with ingredients that you have on hand! Plus, it was really quick and easy to put together.

Layer ingredients in a wine glass, bowl, or whatever you would like to use. Enjoy immediately (or you could place the desserts in the freezer for a bit of time if you needed to make them early. I wouldn't let them get too frozen though!).
One of the things I really liked about this idea is that you can just make this with ingredients that you have on hand! Plus, it was really quick and easy to put together.
Use-What-You-Have-In-Your-Kitchen Ice Cream Parfait
- a scoop or two of ice cream (I used vanilla)
- fresh strawberries, sliced (you could probably use any fruit)
- caramel topping (or chocolate, or fudge, or butterscotch .... you get the idea!)
- toasted pecans (or any kind of nut)
- whipped cream (if you want)
- what else would you like?
Layer ingredients in a wine glass, bowl, or whatever you would like to use. Enjoy immediately (or you could place the desserts in the freezer for a bit of time if you needed to make them early. I wouldn't let them get too frozen though!).
Mar 27, 2014
Easy Swirl Roses Tutorial
Hello! It is time for that easy swirl rose tutorial I promised you a while back!
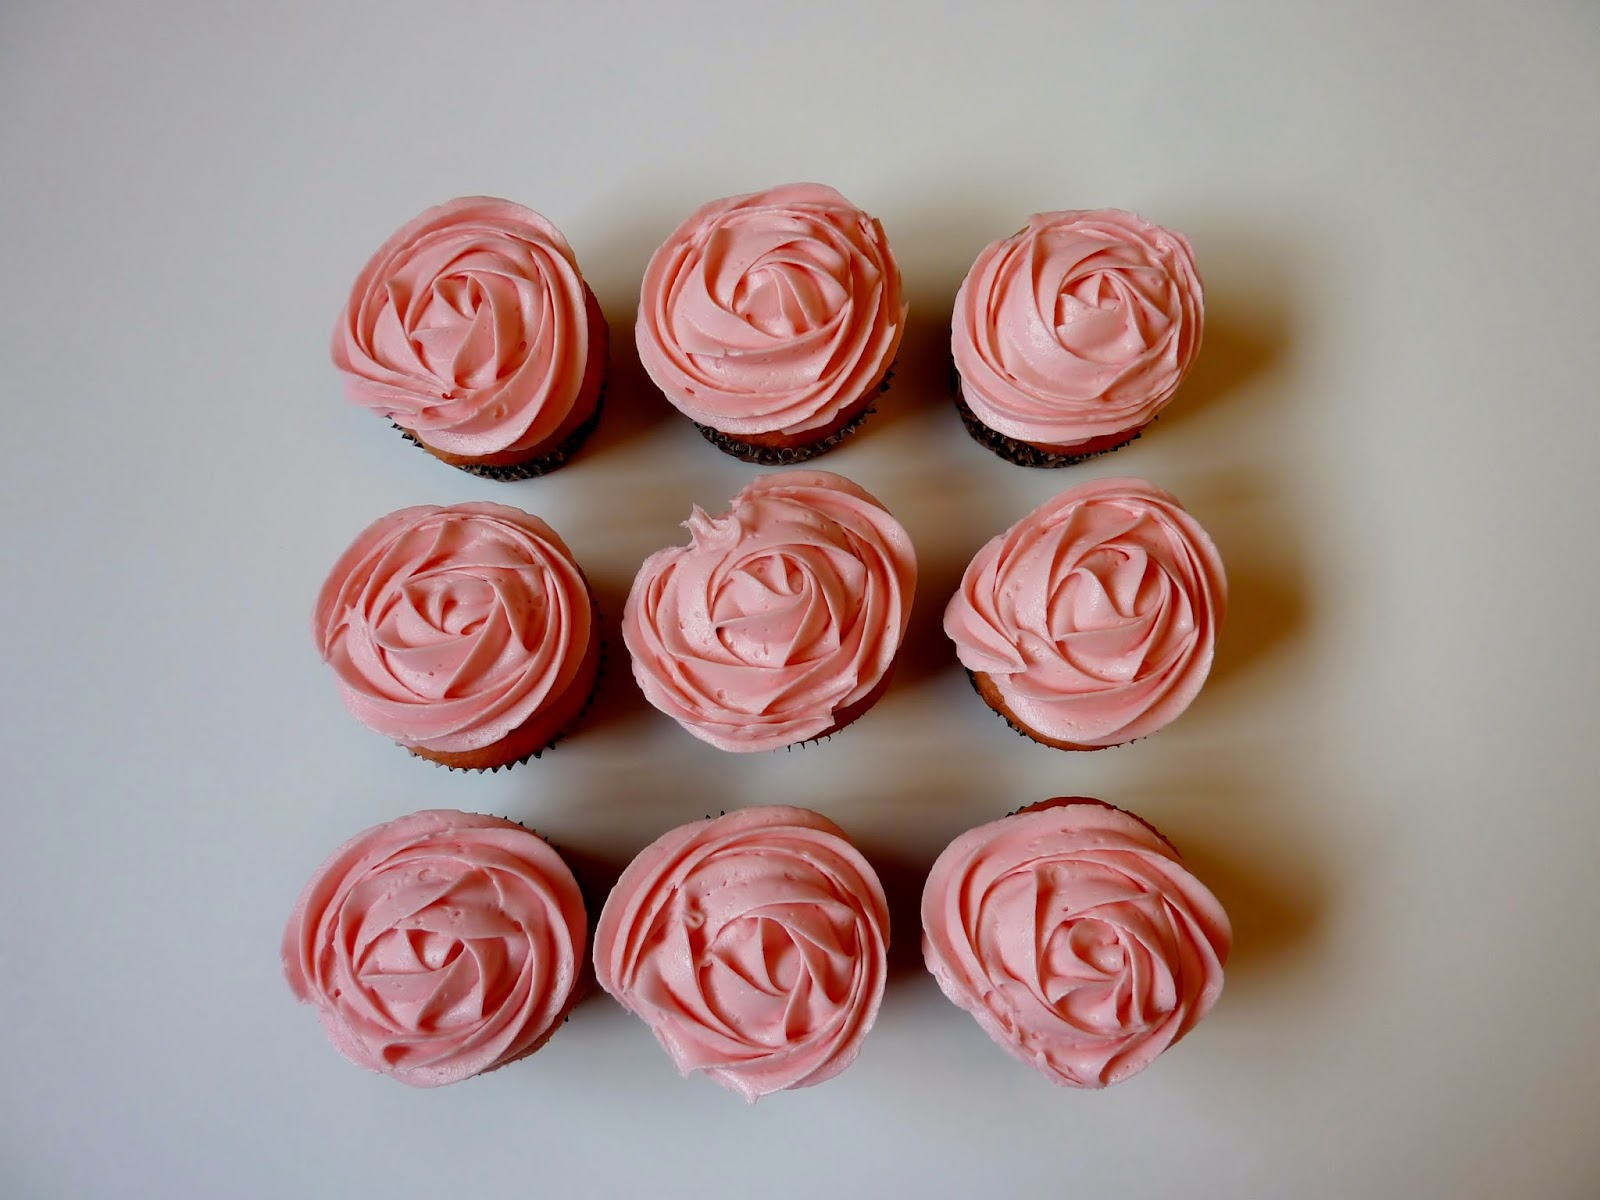
These roses are so easy to make (am I using the word "easy" too much?). And the roses are so beautiful and romantic! They can be used to decorate cupcakes, regular cakes, cookies - and whatever else you can think of.


Ok, enough photo's already! I think you get the idea.
Let's get started! I made just a basic cupcake to demonstrate how to make these roses. Ideally your cupcakes should be a little less rounded than these; as you could probably see from the pictures when they are rounded it makes it harder to cover the entire top of the cupcake with this decorating technique.

To pipe a rose, using a 1M Wilton tip in your frosting bag, hold the bag straight up from your cupcake.

Gently squeeze bag and move in a circular motion starting from the center and moving outward, around and around.

Finish by releasing pressure and gently bringing the tip kind of under your last loop. I apologize for the confusing way of writing that; I can't think of an easier way to say it! To try to put it simply: finish off the rose so it looks natural - no awkward points or anything.

That is all you need to do to make a swirl rose on a cupcake!
If you are decorating a regular cake, pipe a rose onto the side of your cake, and continue to pipe roses all the way around cake. I love to just sprinkle large and small roses here and there on a cake. Experiment and have fun! For the top of the cake, start by piping roses along the perimeter and move towards the center. Fill in empty spots on the entire cake with dollops of stars, very easy to do! Just gently squeeze and lift pastry bag.

You could also go with a very symmetrical look by just piping large roses in a circle around the cake, and filling in with little 'stars.'
Just as a demonstration, this is a cake I made last year using the swirl rose technique. Not the greatest pictures, but hopefully you will get the idea.


That is it! Swirl roses are so beautiful and easy to make.
Please leave a comment if you have any questions, and I will try to help!
These roses are so easy to make (am I using the word "easy" too much?). And the roses are so beautiful and romantic! They can be used to decorate cupcakes, regular cakes, cookies - and whatever else you can think of.
Ok, enough photo's already! I think you get the idea.
Let's get started! I made just a basic cupcake to demonstrate how to make these roses. Ideally your cupcakes should be a little less rounded than these; as you could probably see from the pictures when they are rounded it makes it harder to cover the entire top of the cupcake with this decorating technique.
To pipe a rose, using a 1M Wilton tip in your frosting bag, hold the bag straight up from your cupcake.
Gently squeeze bag and move in a circular motion starting from the center and moving outward, around and around.
Finish by releasing pressure and gently bringing the tip kind of under your last loop. I apologize for the confusing way of writing that; I can't think of an easier way to say it! To try to put it simply: finish off the rose so it looks natural - no awkward points or anything.
That is all you need to do to make a swirl rose on a cupcake!
If you are decorating a regular cake, pipe a rose onto the side of your cake, and continue to pipe roses all the way around cake. I love to just sprinkle large and small roses here and there on a cake. Experiment and have fun! For the top of the cake, start by piping roses along the perimeter and move towards the center. Fill in empty spots on the entire cake with dollops of stars, very easy to do! Just gently squeeze and lift pastry bag.
You could also go with a very symmetrical look by just piping large roses in a circle around the cake, and filling in with little 'stars.'
Just as a demonstration, this is a cake I made last year using the swirl rose technique. Not the greatest pictures, but hopefully you will get the idea.
That is it! Swirl roses are so beautiful and easy to make.
Please leave a comment if you have any questions, and I will try to help!
Mar 19, 2014
Hazelnut Torte with Vanilla Pastry Cream and Whipped Frosting
A few days ago, I made this Hazelnut Torte with Vanilla Pastry Cream and Whipped Frosting - the good news is that the cake really turned out delicious and a bonus was that it wasn't a ton of work!

The torte consisted of hazelnut chiffon cake, was filled with vanilla pastry cream and strawberry filling (I actually used strawberry freezer jam - it was perfect). The entire cake was then frosted with a very light whipped cream frosting.


A perfectly light spring dessert!

Hazelnut Chiffon Cake
Pastry Cream
Frosting
For the cake: Preheat oven to 375° F. Grease and flour two 9-inch cake pans (or use my slick grease recipe!). Beat egg yolks and sugar in large mixer bowl until pale and creamy. Fold in hazelnuts, flour, and almond flavoring. Beat egg whites until stiff and fold into egg yolk mixture. Spread batter gently in prepared pans. Bake about 30 minutes, or until wooden pick inserted in center comes out clean. Cool thoroughly, even overnight, on a wire rack.
For the pastry cream: In a medium bowl, whisk together the egg yolks and egg. Stir together the remaining sugar and cornstarch; then stir them into the egg until smooth. When the milk comes to a boil, drizzle it into the bowl in a thin stream while mixing so that you do not cook the eggs. Return the mixture to the saucepan, and slowly bring to a boil, stirring constantly so the eggs don' t curdle or scorch on the bottom. When the mixture comes to a boil and thickens, remove from the heat. Stir in the butter and vanilla, mixing until the butter is completely blended in. Pour into a heat-proof container and place a piece of plastic wrap directly on the surface. Refrigerate until chilled before using.
To put it all together: Cut each cake in half into two layers. Place the top of one of the cakes upside down on your platter. Spread with pastry cream filling. Top with second layer (bottom of of the cake you used). Spread with strawberry filling. Top with top of next cake, and spread with pastry cream. Finally, top with bottom of last cake (you want to end with the bottom of a cake - this will give you nice, crisp edges). Frost with whipped cream frosting. I patted finely chopped hazelnuts around the edges of the cake for a little decorative touch - you can do this if you wish. Decorate as desired - I put some whipped cream frosting into a piping bag with a star tip and did little bloops around the edge of the cake, then placed a piece hazelnut on each bloop.
Note: In case you were wondering, "bloop" isn't the technical term - I just wasn't sure of the correct technical term.
What we really liked about it is that the whole cake wasn't too sweet - just light and nutty with a little hint of fruitiness.

The torte consisted of hazelnut chiffon cake, was filled with vanilla pastry cream and strawberry filling (I actually used strawberry freezer jam - it was perfect). The entire cake was then frosted with a very light whipped cream frosting.
A perfectly light spring dessert!
Hazelnut Torte with Vanilla Pastry Cream and Whipped Frosting
Hazelnut Chiffon Cake
- 5 eggs, separated
- 1/2 cup sugar
- 1 cup ground hazelnuts
- 3 tbsp flour, all-purpose
- 1/4 tsp almond flavoring
Pastry Cream
- 1 3/4 cup milk
- 1/4 cup heavy whipping cream
- 1/4 cup sugar
- 2 egg yolks
- 1 egg
- 1/4 cup cornstarch
- 1/3 cup white sugar
- 2 tablespoons butter
- 1 teaspoon vanilla
Frosting
- 1 tablespoon vanilla extract
- 6 tablespoons granulated sugar
- 3 cups heavy cream
- strawberry filling or jam
For the cake: Preheat oven to 375° F. Grease and flour two 9-inch cake pans (or use my slick grease recipe!). Beat egg yolks and sugar in large mixer bowl until pale and creamy. Fold in hazelnuts, flour, and almond flavoring. Beat egg whites until stiff and fold into egg yolk mixture. Spread batter gently in prepared pans. Bake about 30 minutes, or until wooden pick inserted in center comes out clean. Cool thoroughly, even overnight, on a wire rack.
For the pastry cream: In a medium bowl, whisk together the egg yolks and egg. Stir together the remaining sugar and cornstarch; then stir them into the egg until smooth. When the milk comes to a boil, drizzle it into the bowl in a thin stream while mixing so that you do not cook the eggs. Return the mixture to the saucepan, and slowly bring to a boil, stirring constantly so the eggs don' t curdle or scorch on the bottom. When the mixture comes to a boil and thickens, remove from the heat. Stir in the butter and vanilla, mixing until the butter is completely blended in. Pour into a heat-proof container and place a piece of plastic wrap directly on the surface. Refrigerate until chilled before using.
To put it all together: Cut each cake in half into two layers. Place the top of one of the cakes upside down on your platter. Spread with pastry cream filling. Top with second layer (bottom of of the cake you used). Spread with strawberry filling. Top with top of next cake, and spread with pastry cream. Finally, top with bottom of last cake (you want to end with the bottom of a cake - this will give you nice, crisp edges). Frost with whipped cream frosting. I patted finely chopped hazelnuts around the edges of the cake for a little decorative touch - you can do this if you wish. Decorate as desired - I put some whipped cream frosting into a piping bag with a star tip and did little bloops around the edge of the cake, then placed a piece hazelnut on each bloop.
Note: In case you were wondering, "bloop" isn't the technical term - I just wasn't sure of the correct technical term.
Mar 17, 2014
Cherry Chip Birthday Cake
Hi! Today is a "share" post: I made this birthday cake for my Mom, and I just wanted to share it with you!
The cake was a [gasp: boxed] cherry chip cake with cherry pie filling, and frosted with cherry frosting. This has been Mom's favorite cake for as far back as I can remember.

I decorated the cake with super-easy-to-make frosting roses, however, I didn't have the right tip so the flowers aren't as 3-D as they should be (the correct tip is in the mail).

I also used frosting to "glue" on little hardened frosting flowers.

The cakes were a 9 inch, a 6 inch and a 3 inch cake.


If you are interested in learning how to make these super-easy frosting roses, I will be posting a how-to tutorial soon!
The cake was a [gasp: boxed] cherry chip cake with cherry pie filling, and frosted with cherry frosting. This has been Mom's favorite cake for as far back as I can remember.
I decorated the cake with super-easy-to-make frosting roses, however, I didn't have the right tip so the flowers aren't as 3-D as they should be (the correct tip is in the mail).
I also used frosting to "glue" on little hardened frosting flowers.
The cakes were a 9 inch, a 6 inch and a 3 inch cake.
If you are interested in learning how to make these super-easy frosting roses, I will be posting a how-to tutorial soon!
Mar 14, 2014
Old Fashioned Sour Cream Raisin Bars
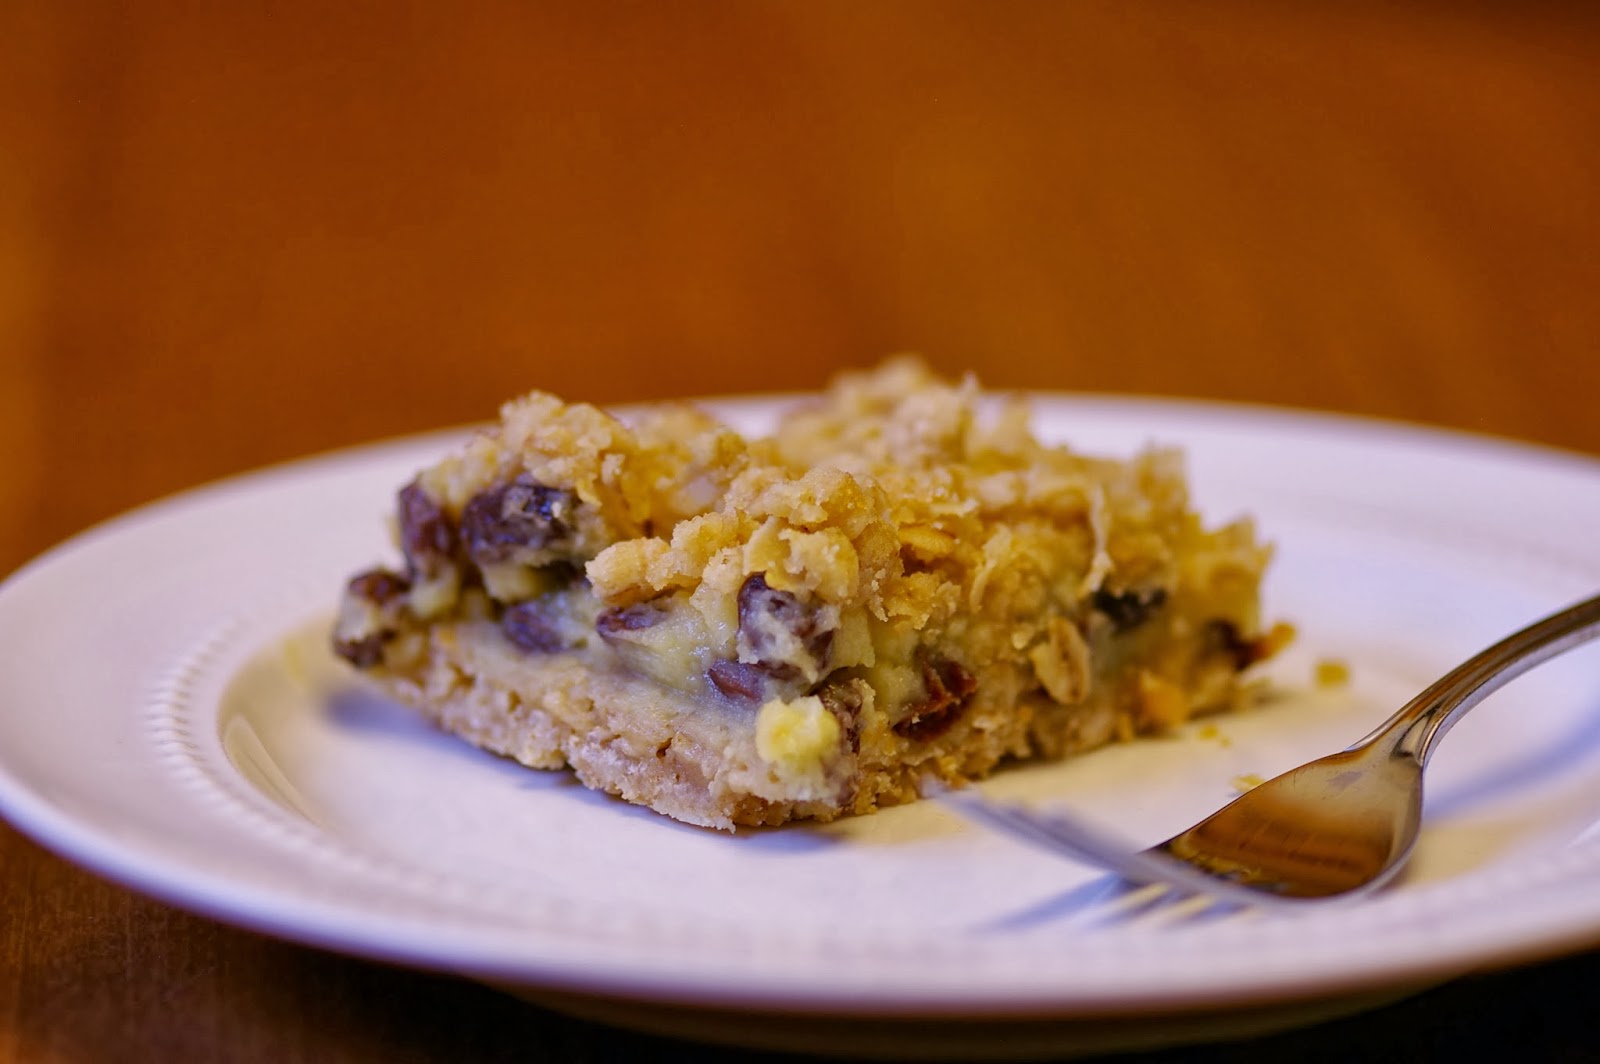
I've loved these old fashioned sour cream raisin bars ever since my
mom made them when I was a kid. You start with an oatmeal crust, then
add a delicious sour cream custard that is studded with plump, juicy
raisins, and top it all off with a crumbly buttery topping.
Three beautiful layers of irresistible goodness.


The oatmeal crust.

The plumped raisins, draining from their hot water bath.

Custard raisin filling - check!

Finally, the topping in place and the bars are ready to go in the oven.

And, time to eat!

Mix the oatmeal, flour, baking soda, brown sugar and melted butter together. Pat 2/3 of the mixture into a 9x13 pan. Bake at 350 degrees F. for 10 minutes. Meanwhile, mix and boil on low til thick: egg yolks, sugar, cornstarch, sour cream and drained raisins. Pour on top of baked mixture. Sprinkle the rest of the mixture on top. Bake in oven for 20 minutes. Serve the bars warm or cooled.
Three beautiful layers of irresistible goodness.


The oatmeal crust.

The plumped raisins, draining from their hot water bath.

Custard raisin filling - check!

Finally, the topping in place and the bars are ready to go in the oven.

And, time to eat!
Old Fashioned Sour Cream Raisin Bars
- 1 3/4 cup oatmeal
- 1 2/4 cup flour
- 1 teaspoon baking soda
- 1 cup brown sugar
- 1 cup butter, melted
- 4 egg yolks
- 1 1/2 cups sugar
- 3 tablespoons
- 2 cups sour cream
- 2 cups raisins (soak raisins in hot water for 10 or 15 minutes)
Mix the oatmeal, flour, baking soda, brown sugar and melted butter together. Pat 2/3 of the mixture into a 9x13 pan. Bake at 350 degrees F. for 10 minutes. Meanwhile, mix and boil on low til thick: egg yolks, sugar, cornstarch, sour cream and drained raisins. Pour on top of baked mixture. Sprinkle the rest of the mixture on top. Bake in oven for 20 minutes. Serve the bars warm or cooled.
Mar 7, 2014
Pecan Pie
I believe I can safely say that Charlie's 'most favorite' pie is pecan pie. Hence, I have been working on developing the "perfect pecan pie" recipe for years. After this last Thanksgiving, I believe I am there!
This pecan pie had that wonderful toasted-pecan-nuttiness, was sticky but not too sweet, with a buttery, flaky crust to hold it all in.


Heat oven to 325 degrees F. In a medium bowl, whisk together sugar, melted butter, corn syrup, vanilla, and salt; add eggs and whisk until smooth. Stir in chopped pecans, then pour filling into the prepared pie crust. If desired, line the top of the filling with extra pecans - I really think this adds a beautiful, elegant touch to your pie.
Place a pie shield or strips of tin foil around the edge of your pan. Bake for 50-60 minutes, or until the filling is set (I check "set" by inserting a butter knife in the center of the pie, and if there isn't too much gooeyness clinging to the knife, I call it done). Once the filling is set, remove the pie and let cool completely on cooling rack, at least 3 to 4 hours, before slicing.
This pecan pie had that wonderful toasted-pecan-nuttiness, was sticky but not too sweet, with a buttery, flaky crust to hold it all in.
Pecan Pie
- 1 raw 9 inch pie crust, in pie plate
- 1/2 cup granulated sugar
- 1 cup light corn syrup
- 1 teaspoon vanilla extract
- 1 teaspoon salt
- 4 eggs, beaten
- 1/2 cup salted butter, melted
- 2 cups toasted chopped pecans (plus extras halves to line the top, if you want a pretty design on top)
Heat oven to 325 degrees F. In a medium bowl, whisk together sugar, melted butter, corn syrup, vanilla, and salt; add eggs and whisk until smooth. Stir in chopped pecans, then pour filling into the prepared pie crust. If desired, line the top of the filling with extra pecans - I really think this adds a beautiful, elegant touch to your pie.
Place a pie shield or strips of tin foil around the edge of your pan. Bake for 50-60 minutes, or until the filling is set (I check "set" by inserting a butter knife in the center of the pie, and if there isn't too much gooeyness clinging to the knife, I call it done). Once the filling is set, remove the pie and let cool completely on cooling rack, at least 3 to 4 hours, before slicing.
Mar 4, 2014
Dreamy Rhubarb Custard Bars
I was cleaning out my freezer over the weekend and found the last of the precious rhubarb I had frozen last spring. Hmmmm, what to make, I wondered? When I asked Charlie what he would like, he mentioned those "creamy rhubarb bars" that I make every year. I had all the supplies on hand, and I was off rolling.
The base of the bars is a shortbread crust - crisp and sweet.

The center is a layer of rhubarb-studded custard.

The topping is surprisingly light and rich with a whipped cream and cream cheese frosting.

The bars are pleasingly messy, so use a fork and plate - or have a napkin close at hand!

Crust
Preheat oven to 350 degrees F. In bowl or in food processor bowl, combine flour and sugar. Cut in butter until the mixture resembles course crumbs. Press into lightly greased 9x13 dish. Set aside.
For filling, combine sugar, salt and flour in a medium bowl. Whisk in cream, vanilla and eggs. Stir in rhubarb. Pour mixture over crust and bake for 45 - 55 minutes, or until rhubarb custard is set. Remove from oven and place on a cooling rack.
In a medium bowl, beat cream cheese, sugar and vanilla until smooth. Fold in whipped cream. Spread over the top of the cooled rhubarb custard, cover and chill for at least 2 hours. Cut into bars and serve.
The base of the bars is a shortbread crust - crisp and sweet.
The center is a layer of rhubarb-studded custard.
The topping is surprisingly light and rich with a whipped cream and cream cheese frosting.
The bars are pleasingly messy, so use a fork and plate - or have a napkin close at hand!
Dreamy Rhubarb Custard Bars
Crust
- 2 cups flour
- 1 cup cold butter
- 3/4 cup powdered sugar
- 1/2 cup flour
- 1 cup whipping cream
- 3 eggs
- 5 cups finely chopped rhubarb, fresh or frozen, thawed and drained
- 1/2 teaspoon salt
- 1 teaspoon vanilla
- 1 package cream cheese, room temp
- 1/2 cup sugar
- 1 teaspoon clear vanilla
- 1 cup whipping cream, whipped
Preheat oven to 350 degrees F. In bowl or in food processor bowl, combine flour and sugar. Cut in butter until the mixture resembles course crumbs. Press into lightly greased 9x13 dish. Set aside.
For filling, combine sugar, salt and flour in a medium bowl. Whisk in cream, vanilla and eggs. Stir in rhubarb. Pour mixture over crust and bake for 45 - 55 minutes, or until rhubarb custard is set. Remove from oven and place on a cooling rack.
In a medium bowl, beat cream cheese, sugar and vanilla until smooth. Fold in whipped cream. Spread over the top of the cooled rhubarb custard, cover and chill for at least 2 hours. Cut into bars and serve.
Mar 2, 2014
Peanut Butter Rice Crispy Bars
Rice crispy bars are such a great, easy thing to make. The other day, I wanted to make rice crispy bars but with some peanut butter and chocolate. As I thought, I wondered if I could combine a rice crispy bar recipe and a special k bar recipe and have a tasty-meet-in-the-middle bar.
As it turns out, the answer is yes. These rice crispy bars had the perfect amount of peanut-buttery goodness and texture. The only thing I would do differently next time is add more chocolate topping.


Place dark and light corn syrups, sugar and butter in large heavy bottomed pot. Cook and stir over medium heat until the sugar is dissolved. Boil for one minute. Stir in peanut butter until thoroughly combined. Add mini marshmallows, and stir until thoroughly combined. Add rice crispies and stir thoroughly. Pour into 9x13 pan. I like to use a disposable glove that I have placed some grease (butter, shortening, ect...) on to press the mixture evenly into the pan.
For the topping, melt the chocolates in pan. Stir in corn syrup and peanut butter. Spread evenly over bars. Let cool and they are ready to eat!
As it turns out, the answer is yes. These rice crispy bars had the perfect amount of peanut-buttery goodness and texture. The only thing I would do differently next time is add more chocolate topping.
Peanut Butter Rice Crispy Bars
- 1/3 cup dark corn syrup
- 1 cup light corn syrup
- 1 cup sugar
- 1/4 cup butter
- 1 cup peanut butter
- 3 cups mini marshmallows
- 8 cups rice crispies
- 1 1/2 cups semi sweet chocolate chips
- 3 ounces unsweetened chocolate
- 3 tablespoons peanut butter
- 1 teaspoon dark corn syrup
Place dark and light corn syrups, sugar and butter in large heavy bottomed pot. Cook and stir over medium heat until the sugar is dissolved. Boil for one minute. Stir in peanut butter until thoroughly combined. Add mini marshmallows, and stir until thoroughly combined. Add rice crispies and stir thoroughly. Pour into 9x13 pan. I like to use a disposable glove that I have placed some grease (butter, shortening, ect...) on to press the mixture evenly into the pan.
For the topping, melt the chocolates in pan. Stir in corn syrup and peanut butter. Spread evenly over bars. Let cool and they are ready to eat!
Subscribe to:
Posts (Atom)