Aug 31, 2013

Tasty New Mashed Potatoes

Good day!  Lately, I have found myself with a plethora of little potatoes around, and have been looking for creative ways to use them.  One of the ways I came up with was these mashed potatoes. They were a big hit with us!


The boiled little potatoes.  I like to leave the skins on for a little extra nutrition (plus it saves a lot of time!). 


Using the potato masher to start breaking up the potatoes.  I love my old, old potato masher.  I think it came from my great-grandma?


Adding fresh ground pepper and stirring in the other ingredients. 


I like to leave my mashed potatoes a little bit chunky - just enough to give the dish some texture.  But you can mash them as much or as little as you want!


A perfect accompaniment to grilled lamb rib chops and massaged kale salad!


Tasty New Mashed Potatoes


  • 2 pounds baby red potatoes
  • 1/4 cup butter
  • 2 ounces cream cheese
  • 1/2 cup sour cream
  • 2 egg yolks
  • 3/4 teaspoon salt
  • 3 cloves garlic, minced
  • freshly ground black pepper to taste
  • dash nutmeg

Wash potatoes, and boil for about 20 minutes until tender.  Drain.  Put butter and cream cheese in a medium size bowl, and top with hot potatoes.  Using a potato masher, mash the potatoes until they are your desired consistency.  By this time the butter and cream cheese should be pretty much melted into the potatoes.  Stir in remaining ingredients.  Place in a greased 1 quart baking dish.  Bake at 350 degrees F for 30 minutes, or until top is slightly golden brown and potatoes are nice and hot.

Aug 30, 2013

Quick and Easy Veggie Soup

I might have mentioned this in earlier posts, but I am trying to get healthier - both in weight and overall health.  Doesn't getting healthier seem like a constant goal?  Or at least it is for me.

One of the ways I've been trying to get healthier has been by eating more vegetables.  I've found I enjoy eating most vegetables more when they are slightly cooked - a nice balance of not mushy and not totally raw.

Something my sister Sarah and I used to do for lunch when we were younger was make a simple vegetable soup in chicken broth.  I have started making this type of soup again, just using whatever I have around.  Here's the soup I made for lunch this time.  It was pretty tasty.  Very carrot-y, but I was in the mood for carrots.


Quick Vegetable Soup

  • Some chicken stock, about 1 1/2 cups (use low sodium if possible)
  • dash soy sauce (to taste)
  • some grinds of fresh pepper
  • pinch of salt to taste (if desired)
  • 1  clove garlic, minced (or garlic powder to taste)
  • fresh herbs to taste, minced (I like parsley, basil and thyme)
  • Assorted veggies: for this batch, I used onions, carrots, celery, red, yellow and orange sweet peppers
Put all ingredients together and simmer for about 15 minutes, or until vegetables are as cooked as much or as little as you like them.  I like mine crisp-cooked (or al dente)  Enjoy for a quick, healthy lunch or supper!

Aug 29, 2013

Homemade Soft Pretzels

Charlie and I have a fun little annual tradition which consists of me making a batch of big soft pretzels and homemade mustard, then, dropping them off where Charlie works for him and his coworkers to enjoy.  Soft pretzels are fun to make and are a big hit with both Charlie and the rest of the employees!


Making the dough (I cheated and use my kitchen aid mixer).


A toasty little spot on the oven is a perfect place to let the dough rise.


After the dough has doubled in size, cut it into eight equal sized pieces (I use my handy kitchen scale to weigh each piece - they were about 5 ounces each).  By the way, notice the sheen on the counter?  I use my hands to brush vegetable oil all over my work surface.  I don't want to use flour because it will cause the dough to dry out.


Then, using your oiled hands, smoosh out one piece of dough into a squarish-rectaugularish-somethingish shape.


Roll it into a tube and pinch the seam.


Then, making sure both hands are moving in unison, start rolling out the piece of dough until you have a 24-inch rope (notice my ruler in the background?).  If you notice a break in your dough, your hands probably aren't moving in unison.  Just repair the dough as best you can, and try not to re-roll it out - I found that it makes for a very tough pretzel!


Then, for the fun part: make a U-shape with the rope.  Then, holding the ends of the rope, cross them over each other and press onto the bottom of the U in order to form the shape of a pretzel. Place onto the parchment-lined half sheet pan.


Then, you dip each pretzel in a boiling water/baking soda bath for 30 seconds.


The brush with egg wash, sprinkle with salt and bake for 15 minutes!


Homemade Soft Pretzels (courtesy Alton Brown)


  • 1 1/2 cups warm (110 to 115 degrees F) water
  • 1 tablespoon sugar
  • 2 teaspoons kosher salt
  • 1 package active dry yeast
  • 22 ounces all-purpose flour, approximately 4 1/2 cups
  • 2 ounces unsalted butter, melted
  • Vegetable oil, for pan
  • 10 cups water
  • 2/3 cup baking soda
  • 1 large egg yolk beaten with 1 tablespoon water
  • Pretzel salt (I used course sea salt)
Combine the water, sugar and kosher salt in the bowl of a stand mixer and sprinkle the yeast on top. Allow to sit for five minutes or until the mixture begins to foam. Add the flour and butter and, using the dough hook attachment, mix on low speed until well combined. Change to medium speed and knead until the dough is smooth and pulls away from the side of the bowl, approximately 4 to 5 minutes. Remove the dough from the bowl, clean the bowl and then oil it well with vegetable oil. Return the dough to the bowl, cover with plastic wrap and sit in a warm place for approximately 50 to 55 minutes or until the dough has doubled in size.

Preheat the oven to 450 degrees F. Line 2 half-sheet pans with parchment paper and lightly brush with the vegetable oil (I used my silpat). Set aside.

Bring the 10 cups of water and the baking soda to a rolling boil in an 8-quart saucepan or roasting pan.  I don't have an 8-quart saucepan, so I ended up with about 8 cups of water to 2/3 cup baking soda.

In the meantime, turn the dough out onto a slightly oiled work surface and divide into 8 equal pieces. Roll out each piece of dough into a 24-inch rope. Make a U-shape with the rope, holding the ends of the rope, cross them over each other and press onto the bottom of the U in order to form the shape of a pretzel. Place onto the parchment-lined half sheet pan.

Place the pretzels into the boiling water, one by one, for 30 seconds. Remove them from the water using a large flat spatula or large flat spoon with holes in it. Return to the half sheet pan, brush the top of each pretzel with the beaten egg yolk and water mixture and sprinkle with the pretzel salt. Bake until dark golden brown in color, approximately 12 to 14 minutes. Transfer to a cooling rack for at least five minutes before serving.  Serve with homemade mustard (recipe coming soon)!

Aug 27, 2013

Massaged Kale Salad

When Charlie and I went to his cousin's graduation party, one of the items on the amazing menu was a delicious fresh kale salad.  Charlie and I both loved it.  When I inquired after the recipe, Charlie's aunt told me that she bought the salad at a local deli.  Oh dear!  I didn't let that stop me, however, and when we got home, I experimented until I thought my kale salad tasted just about the same.


To start, make the vinaigrette in a blender and let it rest on the counter for 30 to 60 minutes.


Aug 26, 2013

Canning Carrots - A Step-By-Step Guide

When I went out to the garden a couple of days ago, to my delight I found a bunch of carrots ready to pick!  Since it was too much to eat all at once, I decided to can most of them.  This post is going to be a step-by-step guide to canning carrots!

Picking the carrots (I found a few other items as you can see!). 


My copy of the "Balls Blue Book of Canning" is dog-eared and worn, but I use it every year and love it.


We will be raw packing the carrots today.


I "top" the carrots with a pair if scissors (or you could use a knife).  Then I washed them (not pictured).


Slicing off each end of each freshly-scrubbed carrot.  Aren't they beautiful?


Since these carrots were a bit bigger, I peeled them.  When I can small carrots I usually don't bother to peel them.


Then, I use my mandolin to slice them uniformly.


Then, I used my handy-dandy canning funnel to pack them into hot, clean, sanitized jars (easy to do by running the jars through a cycle in the dishwasher or having them waiting in boiling water).  When packing the carrots, I make sure to leave one inch of headspace (headspace is the distance from the food to the bottom of the lid, and allows the food to expand slightly as it cooks.  The proper amount of headspace allows a vacuum to form, which seals the jar - too much or too little headspace causes problems).


Some filled jars.


I use canning and pickling salt because regular table salt can cause cloudiness at the bottom of the jar.


At this time, get your lids in a pan of hot-but-not-quite boiling water. The rubber needs to soften to help ensure proper sealing.  


Pour boiling water over the carrots, making sure to leave about one inch of head space.  Sometimes you have to use a butter knife or squeegee to run along the inside of each jar to remove air bubbles.


Then, add 1/2 teaspoon salt to each pint (1 teaspoon to each quart) and wipe the rim of each jar (very important to make sure there aren't any impurities on the rim which could cause the jars to not seal).


Then, take your hot lids and "adjust the two-piece caps."  This just means to put the lid on, and finger-tighten each ring. 


Set them in your pressure canner - as you can see, they are close, but try not to let the jars touch. Since carrots are a food low in acid, they must be pressure canned rather than canned in a water bath.


I use my great-grandma's old pressure canner, which is such a gift for me to have.  This is the pressure canner I have been using since I was a young teenager.  I tend to have great respect when I am pressure canning and make sure to stay fully concentrated on monitoring the canning process, as I don't want the canner to explode!  Anyhow, the lid is locked in place and we are ready to apply the heat.  Let steam come out for about 10 minutes (this purges the air from the inside of the canner). 


After 10 minutes, close the valve and bring the pressure up to 10 pounds.  Watching carefully (!) hold the pressure at 10 pounds for 25 minutes.  When she was first teaching me how to use the pressure canner, my Grandma Lois handed me a deck of cards and said I needed to play a game of solitaire and watch the canner very closely!  I never have forgotten that lesson. 


Let the canner rest until the pressure starts to drop.  Then, let the steam out (on my canner I twist that little stopcock to open).  I open it just a little bit at first, and gradually open more.  After there is no steam coming out, I remove the canner from the heat and let it sit for about 10 minutes.


The finished carrots!  Canned, ready for the shelf and ready to enjoy in the cold of winter!  Thanks for stopping by today - and go can some carrots!  Please feel free to ask questions, and I will try to help!
 

Aug 22, 2013

Tasty Rice Dish

This was one of those dishes that just kind of "fell" together.  But we loved it so much I wanted to try to write it down. 

I started out with some miscellaneous vegetables I had around - snow peas, red and yellow onions, mushrooms, red and yellow sweet peppers and cucumbers.


I sauteed the vegetables lightly in a pan with low-fat honey mustard dressing (what can I say, I was feeling adventurous).


Then, I put some leftover cooked jasmine rice in a bowl and added a couple of gloops of horseradish sauce (yay!  finished off that container from the fridge!)


Unfortunately I don't have a picture of the finished product because I forgot to take one!  And by the time I remembered the rice was gone. 

Tasty Rice Dish

3 - 4 cups leftover jasmine rice
1 tablespoon-ish horseradish sauce

Stir together.

Lightly saute about 1/2 cup of each chopped vegetables: snow peas, onions, mushrooms, mixed sweet peppers, and cucumbers in about 1/4 cup honey mustard dressing (you can certainly change the vegetables as you please!).

Add sauteed vegetables to rice, along with 1 or 2 tablespoons soy sauce and 1-3 teaspoons sesame oil.  Then, add the rice to the pan and cook, stirring very often, just until heated through.  That is it!

Aug 20, 2013

Antipasto Platter

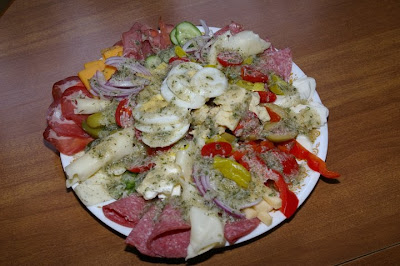
Antipasto platters are a great idea to add to your recipe box.  Technically an appetizer that is great to share with a group, Charlie and I also love antipasto platters for a casual, relaxed dinner-for-two.  The ingredients are flexible, can be based on what you have on hand and your personal food preferences.  In this post, I'll share our favorite ingredients.

This was the most recent antipasto platter I made (from left to right: Dubliner cheese, prosciutto, garlic olives, fresh red pepper slices, fresh mozzarella cheese, fresh asparagus tips, Genoa salami, fresh sweet onions, kalamata olives, capicola, and feta cheese slices).


Over the last couple of years, we have made quite a few antipasto platters with varying ingredients.  And we love to try new things!  For some ideas to get started, our favorite ingredients are:

Cheeses: Served on the platter, rolled, layered, sliced, or cubed. Choose two to four (note: these suggested amounts of each group can be adjusted based on your number of guests).
  • Fresh mozzarella
  • Feta slices
  • Dubliner
  • Chevre (goat cheese)
  • Blue cheese
Meats: Served on the platter, rolled, sliced, or cubed. Choose two to four.
  • Genoa salami
  • Various hard salami's
  • Prosciutto
  • Capicola
  • Smoked ham
  • Other favorite cured meats
Salty: Served on the platter or in small bowls arranged in the platter. Choose two or three.
  • Garlic stuffed olives
  • Kalamata olives
  • Misc. other olives
Vegetables: Served on the platter or in small bowls arranged on or near the platter. Choose two to four (though I have to admit we usually have more vegetables on the platter because we enjoy them so much!).
  • Artichoke hearts
  • Fresh red sweet pepper, sliced
  • Fresh onions, sliced (yellow usually)
  • Cherry or grape tomatoes
  • Roasted red peppers
  • Sliced peperoncini peppers
  • Raw asparagus tips
  • Mushrooms
  • Green onions
Others: Served alongside the platter or in small bowls arranged on the platter.
  • Hard boiled egg slices
  • Toasted walnuts
Breads: Served aside the antipasto platter. Choose one or two (or three if you want!).
  • Various cracker varieties
  • Water crackers
  • Rustic bread slices or loaves
Dressing: I don't always dress the antipasto platter.  We've decided we like it both 'naked' and dressed.  Options are to finish the antipasto platter with a drizzle of good olive oil or balsamic vinegar, or to use the following dressing recipe.   As far as serving,  you can drizzle your topping choice over the whole antipasto platter, or another option is to put the dressing in a small bowl or dispenser on the side of the antipasto platter for guests to add to their plates as they please.

Antipasto Dressing


  • 1/4 cup olive oil
  • 2 tablespoons Parmesan cheese
  • 1 teaspoon minced fresh oregano
  • 1/8 teaspoon salt
  • 1/8 teaspoon pepper
  • Mix all ingredients together and drizzle over antipasto platter.  Double or triple recipe as desired or needed. 

    Presentation:  Start with a large decorative tray or platter or go for a rustic look with a large wooden cutting board.  For just the two of us, I will often use just a dinner plate.  Fill the plate with desired rolled or layered meats, wedges of cheese, and sliced vegetables, alternating in groups and lines for color and balance (see pictures for ideas).  Place small forks on the platter for serving.  Set out appetizer plates and small forks for guests (I also like to have toothpicks).  See below for a couple more photos of our favorite antipasto platters.  Be creative and enjoy! 


    A "dressed" antipasto platter.  This antipasto platter had celery, which we found wasn't a favorite antipasto platter vegetable.


    This antipasto platter was a little too heavily dressed - still tasty though.  We had some Swiss cheese and cucumbers on this antipasto platter which also weren't favorites.


    What do you like to put on your antipasto platters?

    Aug 18, 2013

    Coffee Concentrate for Ice Coffee

    Iced coffee in the summer is awesome.  I know it is simple to go to your favorite local coffee shop for an iced coffee treat, but did you know it is quite easy to make your own special iced coffee drink at home - and a lot less expensive? 

    First, place some ground coffee in a container.  As you can see, I have 1 1/4 cups of coffee grounds here. You can do as much or as little ground coffee as you'd like - depending on how much concentrate you want.


    Then, add an equal amount of water.  Cover with saran wrap and let sit on the counter for about 24 hours.


    Then, drain the coffee.  I use our Aeropress to extract the coffee, but you could easily place a few layers of cheesecloth in a strainer, stir it around and press the grounds with a spoon.


    The finished product.  As you can see, 1 1/4 cups of ground coffee with an equal part water ended up to be just under two cups of concentrate.  This will keep in the refrigerator (tightly covered) for at least a month.   You can make as much or as little concentrate at a time as you would like!  Now, time for an iced coffee drink - recipes coming soon!


    Aug 16, 2013

    Bread and Butter Pickles

    Canning season has officially started!  I went out to the garden to weed and tidy up again, and ended up finding a nice amount of cucumbers - perfect for bread and butter pickles!  We love bread and butter pickles for their sweet crispness - by the way, just so you know before you make these - bread and butter pickles are very sweet.  If you aren't fond of sweet pickles, this wouldn't be the recipe for you.  For Charlie and I, we like these little beauties on sandwiches, hot dogs, hamburgers, and just straight from the jar.


    The cucumbers.


     As a side note, I have never been able to harvest enough cucumbers at one time to make a batch of pickles.  I will post more about it later, but this was the first year I trained my cucumbers up on a fence - and they are growing so much better than they do on the ground.


    I use my mandolin (and safety glove, of course!) to slice the cucumbers.  I used to use a pretty ripple-cut cutter, but I had difficulty getting the slices even, so I just use my mandolin. 


    I always discard both ends of the cucumbers.  Into the compost pile with you!


    I also slice the onions on the mandolin.  We love pickled onions, so I put a bunch of onions in.


    The cucumber slices and onions then get mixed with some whole garlic cloves and picking salt and covered with ice cubes to rest for three hours.


    The cucumbers drained and packed into hot jars.


    Adding the hot brining liquid.


    Ready for the two piece caps.


    Boiling water bath for 10 minutes, and that is it!


    Bread and Butter Pickles

    • about 6 pounds small cucumbers, thinly sliced (about 1/4")
    • 3 onions, thinly sliced
    • 6 cloves garlic, peeled and left whole
    • 1/3 cup pickling salt
    • 2 trays of ice cubes
    Brine:
    • 4 1/2 cups sugar
    • 1 1/2 teaspoon turmeric
    • 1 1/2 teaspoon celery seed
    • 2 TB mustard seed
    • 3 cups vinegar (I used half white vinegar and half cider vinegar)
    Wash cucumbers thoroughly, drain, cut unpeeled cucumbers into 1/4 inch slices (discard both end pieces).  In a large bowl, place cuke slices, onions, garlic and salt.  Mix.  Cover with ice cubes, let stand for 3 hours.  Drain of liquid and remove garlic if desired (I leave it in because we like to nibble on the pickled garlic too).  For brine, combine sugar, spices and vinegar and heat just to a boil.  Pack cucumbers loosely into clean hot pint jars, and ladle brine into each jar, leaving 1/2 inch head space.  Adjust two piece lids, process in a boiling water bath for 10 minutes.  Remove and let cool on kitchen towel.  Makes 7 pints.

    Note: Regarding the spices in the brine.  I have tried leaving the mustard and celery seed in, but I have found I don't like it as well - too seedy.  I usually just put a little strainer over my canning funnel and catch the spices before they get into the jars.