
hi

Jan 23, 2014
Spiced Pecans
Have you ever tried or made spiced pecans? I did for the first time during the holiday season, and we really liked them. They were quite easy, and had a lovely sweet/spicy nuttiness. I got this recipe from Alton Brown. The only change I would make for next time would be to slightly toast the nuts before spicing them - bake them in a 350 degree F oven for 5 to 10 minutes - as I thought the finished nuts needed just a bit more bite.
Jan 22, 2014
Pumpkin Bars
Of course, pumpkin bars would be great in the fall, filling the house with their sweet, spicy scent. But sometimes I like them at other times of the year, as well. These pumpkin bars were a hit with my family recently. The cake was moist and spicy, and the frosting was pronounced "not-too-sweet" and "the best cream cheese frosting ever."
If you would like, give them a try. What do you think?


Bars:
Frosting:
Preheat oven to 375 degrees F. Grease and flour 15 x 10-inch jelly-roll pan. Combine flour, baking powder, baking soda, cinnamon, cloves and salt in small bowl. Beat eggs and granulated sugar in large mixer bowl until thick. Beat in pumpkin. Stir in flour mixture. Spread evenly into prepared pan. Bake for about 15 minutes or until top of bars spring back when touched. Cool. For frosting, beat cream cheese, powdered sugar, butter and vanilla extract in small mixer bowl until smooth. Frost bars.
If you would like, give them a try. What do you think?


Pumpkin Bars
Bars:
- 1 cup all-purpose flour
- 1/2 teaspoon baking powder
- 1/2 teaspoon baking soda
- 1 teaspoon ground cinnamon
- 1/2 teaspoon ground cloves
- 1/4 teaspoon salt
- 3 large eggs
- 1 cup granulated sugar
- 1 can pumpkin
Frosting:
- 2 packages (8 ounces each) cream cheese, at room temperature
- 2 cups powdered sugar, sifted
- 2 sticks butter, softened
- 2 teaspoons vanilla extract
Preheat oven to 375 degrees F. Grease and flour 15 x 10-inch jelly-roll pan. Combine flour, baking powder, baking soda, cinnamon, cloves and salt in small bowl. Beat eggs and granulated sugar in large mixer bowl until thick. Beat in pumpkin. Stir in flour mixture. Spread evenly into prepared pan. Bake for about 15 minutes or until top of bars spring back when touched. Cool. For frosting, beat cream cheese, powdered sugar, butter and vanilla extract in small mixer bowl until smooth. Frost bars.
Jan 21, 2014
Cranberry Bread Pudding with Vanilla Custard Sauce
One of the dishes I made for Thanksgiving was a Cranberry Bread Pudding. Now, this recipe is going to look rather strange because the reason I decided to make the bread pudding was because I had a lot of odds and ends of sweet-type breads around. You can just as easily use a loaf of cinnamon bread or even a loaf of brioche would be delicious.
I would like to add one other thing: this recipe has a lot (a lot) of calories. Please don't panic - just make it once a year and have a small piece. It it is rich and delicious and a wonderful treat. :)
The bread pudding with the vanilla custard sauce.

The cubed bread and cranberries, ready for the custard.

Next: bring on the custard!

A rather poor picture of the finished bread pudding and vanilla custard sauce (this was on the dessert table at Thanksgiving).

Heat the milk and cream in a medium saucepan until boiling. Remove from heat and stir in the vanilla. In a medium bowl, whisk together the sugar and egg yolks until combined and a light yellow color. Temper the egg yolks by whisking in a few tablespoons of the hot cream mixture, until you've added about half of the cream mixture. Pour the egg yolk mixture into the pan with the remaining cream mixture and stir over medium heat with a wooden spoon until the custard thickens, I think it took maybe 15 or 20 minutes? Remove from the heat and let cool a bit before topping the bread pudding. That's it! Enjoy!
I would like to add one other thing: this recipe has a lot (a lot) of calories. Please don't panic - just make it once a year and have a small piece. It it is rich and delicious and a wonderful treat. :)
The bread pudding with the vanilla custard sauce.

The cubed bread and cranberries, ready for the custard.

Next: bring on the custard!

A rather poor picture of the finished bread pudding and vanilla custard sauce (this was on the dessert table at Thanksgiving).

Cranberry Bread Pudding with Vanilla Custard Sauce
Bread Pudding
- 9 slices cinnabun cinnamon burst bread, diced
- 4 slices cottage white bread, crusts removed and diced
- 1 finely diced French toast bagel
- 1/2 cup dried cranberries
- 1 1/2 cups fresh cranberries
The Filling/Custard:
- 1 cup sugar
- 1 cup milk
- 1 cup egg nog
- 2 cups half and half
- 2 TB vanilla
- 4 eggs
- 4 egg yolks
- ½ tsp salt
- 1cup heavy cream
- ½ teaspoon cinnamon
- Dash cloves
- Dash cardamom
- Dash ginger
- Dash freshly grated nutmeg
- Dash allspice
Place cubed bread in a slightly greased 9X13 pan. Sprinkle the fresh and dried cranberries over the bread and gently mix them through the bread. Mix all filling ingredients thoroughly and pour over bread. I used a 1/2 cup to slowly drizzle over each spot so the bread was thoroughly saturated (I have noticed that when you just pour the filling over the top (usually over the middle area), the edges tend to stay a little dry). Bake in a 325 degree oven. I placed the pan of bread pudding on a cookie sheet with 1inch high sides, and filled the cookie sheet with water - this creates a water bath that ensures a deliciously moist pudding. I baked mine for probably 70 minutes, or until when I poked a knife in the center and the eggs didn't puddle around a knife. Let the pudding stand for about a 1/2 hour, and serve. If you are going to serve it later, put it in a warm oven or microwave it a bit, as it is much better warm!
Vanilla Custard Sauce
- 1/2 cup heavy cream
- 1/2 cup milk
- 1 teaspoon vanilla extract
- 3 tablespoons granulated sugar
- 3 egg yolks
Heat the milk and cream in a medium saucepan until boiling. Remove from heat and stir in the vanilla. In a medium bowl, whisk together the sugar and egg yolks until combined and a light yellow color. Temper the egg yolks by whisking in a few tablespoons of the hot cream mixture, until you've added about half of the cream mixture. Pour the egg yolk mixture into the pan with the remaining cream mixture and stir over medium heat with a wooden spoon until the custard thickens, I think it took maybe 15 or 20 minutes? Remove from the heat and let cool a bit before topping the bread pudding. That's it! Enjoy!
Jan 20, 2014
Meatball Sandwich (or Sub)
After we have a meal of Spaghetti and Meatballs, I can't resist one of my favorite sandwiches for lunch the next day: A Meatball Sandwich.
Slightly toasted bread, moist, saucy meatballs in marinara and a nice slice of melted provolone cheese over the top. Deliciousness!


Warm meatballs in marinara sauce. Toast bread. Place meatballs and sauce on bottom, and top with slice of provolone cheese. Top with other piece of bread. If the cheese doesn't melt enough, pop in the microwave for a few seconds. So quick and easy!
Slightly toasted bread, moist, saucy meatballs in marinara and a nice slice of melted provolone cheese over the top. Deliciousness!


Meatball Sandwich
- sub roll or bun
- marinara sauce
- meatballs
- 1 slice provolone cheese
Warm meatballs in marinara sauce. Toast bread. Place meatballs and sauce on bottom, and top with slice of provolone cheese. Top with other piece of bread. If the cheese doesn't melt enough, pop in the microwave for a few seconds. So quick and easy!
Jan 19, 2014
Marinara and Homemade Meatballs
Ah, spaghetti and meatballs; a traditional favorite. And yes, it is easy to open a jar of pre-made marinara sauce and thaw the meatballs and voila! = quick dinner. However, since I have started making my own meatballs, marinara sauce and pasta (though the pasta is another post), I have realized the extra time is worth the heaps of additional flavor - plus, you know exactly what you are putting into your food.
I make and can the marinara sauce in the summer with vine-ripened tomatoes from the garden - also adding whatever else I can from the garden - usually handfuls of fresh herbs like basil, oregano and thyme, and onions and peppers.
For the meatballs, when I have a little extra time, I like to make a big batch and freeze them so I can thaw as many as I need at a time.
As far as the pasta goes, I cheated here and used store-bought pasta, but I will be posting my pasta-making experiences soon.


For the meatballs:
Preheat oven to 400 degrees F. Mix all the ingredients in a bowl. Dip your hands in water and form meatballs of your size choice - I like to make lots of little meatballs. One of those cookie dough scoops works well to get even portion sizes. Put the meatballs on a cookie sheet - I like to put a piece of tin foil down first to make clean - up a snap. Bake in preheated oven for about 20 minutes, the internal temperature should read 170 degrees F.
For the Marinara Sauce:
For the Spaghetti and Meatballs
I make and can the marinara sauce in the summer with vine-ripened tomatoes from the garden - also adding whatever else I can from the garden - usually handfuls of fresh herbs like basil, oregano and thyme, and onions and peppers.
For the meatballs, when I have a little extra time, I like to make a big batch and freeze them so I can thaw as many as I need at a time.
As far as the pasta goes, I cheated here and used store-bought pasta, but I will be posting my pasta-making experiences soon.


Homemade Meatballs, Homemade Marinara Sauce with Pasta
For the meatballs:
- 1 pound ground beef
- 1 pound ground pork
- 1 large egg
- 1/2 cup breadcrumbs
- 1/2 cup finely chopped onion (you can use less if you wish)
- 1 teaspoon garlic powder
- 1/2 cup grated Parmesan cheese
- 1 teaspoon dried basil
- 1 teaspoon dried parsley
- 1 teaspoon salt
- 1/2 teaspoon pepper
Preheat oven to 400 degrees F. Mix all the ingredients in a bowl. Dip your hands in water and form meatballs of your size choice - I like to make lots of little meatballs. One of those cookie dough scoops works well to get even portion sizes. Put the meatballs on a cookie sheet - I like to put a piece of tin foil down first to make clean - up a snap. Bake in preheated oven for about 20 minutes, the internal temperature should read 170 degrees F.
For the Marinara Sauce:
- 20 pounds ripe tomatoes, skinned, cored and seeded
- 1 cup chopped onion
- 1 cup chopped sweet pepper
- 1 bulb of garlic, all cloves peeled and minced
- 2 tablespoons chopped fresh basil
- 2 tablespoons chopped fresh parsley
- 1/2 teaspoon chopped fresh thyme
- 1 tablespoon olive oil
- 1 tablespoon sugar
- 1 can tomato paste
- 1/4 cup red wine vinegar
- 1/4 cup rice wine vinegar
- 2 tablespoons fresh lemon juice
For the Spaghetti and Meatballs
- 1 jar marinara sauce (store bought or homemade)
- 1 pound meatballs (store bought or homemade)
- 1 box spaghetti pasta
- freshly grated Parmesan cheese
Jan 12, 2014
Sunday Morning Banana Waffles
This morning, we woke up and decided that waffles sounded like a great breakfast. As I quickly got the waffles going, I noticed that the bananas sitting on the counter were at a perfect ripeness to eat. Hmmm, I mused, I wonder if I could combine the bananas and waffles for a great breakfast?
About twenty minutes later, as I sat down to my delicious, crispy waffle topped with sliced bananas, a tiny drizzle of caramel, toasted pecans and a dash of maple syrup, I decided that yes, the waffles and bananas did make a great breakfast.


In a large bowl, whisk together flour, cornstarch, sugar, baking powder, baking soda and salt. Make a well in the center of the dry ingredients and add milk, oil, eggs and vanilla. Whisk together until combined (try not to mix too much - a few lumps are ok). If possible, let the batter rest on the counter for a half an hour to an hour (or more is fine - I think this makes a more tender finished product). If you and your family are hungry and ready to eat (10 minutes ago), get your waffle iron heating according to the manufacturers instructions - the batter will be fine and doesn't have to rest. Cook waffles - you should get about 4.
Top hot waffles with sliced bananas, a drizzle of caramel sauce, chopped pecans and maple syrup. I also think a little pile of whipped cream would be delicious, but I didn't have any. If you try the waffles with whipped cream, let me know how it is! Serve immediately.
About twenty minutes later, as I sat down to my delicious, crispy waffle topped with sliced bananas, a tiny drizzle of caramel, toasted pecans and a dash of maple syrup, I decided that yes, the waffles and bananas did make a great breakfast.
Sunday Morning Banana Waffles
- 3/4 cup flour
- 1/3 cup cornstarch
- 2 tablespoons sugar (or honey)
- 1/2 teaspoon baking powder
- 3/4 teaspoon baking soda
- 1 cup milk
- 1/3 cup vegetable oil
- 2 small or 1 large egg
- 1 teaspoon vanilla extract
- 1 to 2 bananas, sliced thinly
- 1/4 to 1/2 cup chopped pecans, toasted
- 2 tablespoons caramel sauce
- maple syrup
In a large bowl, whisk together flour, cornstarch, sugar, baking powder, baking soda and salt. Make a well in the center of the dry ingredients and add milk, oil, eggs and vanilla. Whisk together until combined (try not to mix too much - a few lumps are ok). If possible, let the batter rest on the counter for a half an hour to an hour (or more is fine - I think this makes a more tender finished product). If you and your family are hungry and ready to eat (10 minutes ago), get your waffle iron heating according to the manufacturers instructions - the batter will be fine and doesn't have to rest. Cook waffles - you should get about 4.
Top hot waffles with sliced bananas, a drizzle of caramel sauce, chopped pecans and maple syrup. I also think a little pile of whipped cream would be delicious, but I didn't have any. If you try the waffles with whipped cream, let me know how it is! Serve immediately.
Jan 11, 2014
Indian Trail Cranberry Sauce - and A Cranberry Jello
Did you ever buy that handy little tub of cranberry orange sauce, found in the freezer aisle? It was called Indian Trail Cranberry Orange Sauce. Unfortunately, I haven't been able to find it for a while. What to do? This last Thanksgiving, I decided to try to make my own. Well, it can't be that hard, I reasoned. To my surprise and delight, it was super easy and tasted the same (or better).
For those that don't know, this is what it looked like:

I started with five or six of those little clementine oranges, washed and cut them in pieces, and pulsed them in a food processor until roughly chopped. Note: you can use one or two regular oranges, but I found I liked the taste of these clementines better.

Add one bag of fresh cranberries to the food processor - just plunk them right down on top of the oranges.

Add 1/2 to 1 cup of sugar - depending on your taste buds and how sweet your darling clementines are.

Pulse until of a relish-y consistency.

Pour the mixture into a sieve and let it drain for a while.

I then used the relish to make this Cranberry Jello Salad, fixed up from a recipe I saved years ago from the back of the Indian Trail Cranberry Sauce box.
This salad looked so pretty on the Thanksgiving table, but you could make it at any time!

5 or 6 clementine oranges (or you could use 1 or 2 regular oranges)
1 whole bag fresh cranberries (frozen cranberries are fine too)
1/2 to 1 cup sugar
Wash the clementines or oranges. Cut into chunks, removing seeds and pith as necessary. Place in food processor and chop roughly. Add the cranberries and sugar. Pulse until chopped. Let the mixture drain for a while to removed some of the excess liquid (Note: I saved this liquid and it made a great drink with 7-Up and ice, or you could add something stronger if you wish...). Refrigerate or freeze cranberry orange sauce until ready to use.
2 packages (3 ounces each) cherry gelatin
2 1/2 cups boiling water
1 cup crushed pineapple (with juice)
1 package (10 ounces) Indian Trail Cranberry Orange Sauce
8 ounces Cool Whip
Dissolve gelatin in boiling water. Stir into it Indian Trail Cranberry Orange Sauce and crushed pineapple. Pour into mold, so it is about an inch thick. Refrigerate until firm enough to add next layer, about 1/2 hour. Meanwhile, remove about half of the remaining cranberry/orange/jello mixture. Gently fold in the thawed Cool Whip. Gently smooth the Cool Whip mixture into the mold, and again, refrigerate for about another half an hour. At this time, top off the mold with the remaining jello mixture (or whatever you can fit into your mold, I had a little bit extra). Refrigerate until time to remove from mold (at least 6 - 8 hours) and serve.
For those that don't know, this is what it looked like:

I started with five or six of those little clementine oranges, washed and cut them in pieces, and pulsed them in a food processor until roughly chopped. Note: you can use one or two regular oranges, but I found I liked the taste of these clementines better.

Add one bag of fresh cranberries to the food processor - just plunk them right down on top of the oranges.

Add 1/2 to 1 cup of sugar - depending on your taste buds and how sweet your darling clementines are.

Pulse until of a relish-y consistency.

Pour the mixture into a sieve and let it drain for a while.

I then used the relish to make this Cranberry Jello Salad, fixed up from a recipe I saved years ago from the back of the Indian Trail Cranberry Sauce box.
This salad looked so pretty on the Thanksgiving table, but you could make it at any time!

Cranberry Orange Sauce
5 or 6 clementine oranges (or you could use 1 or 2 regular oranges)
1 whole bag fresh cranberries (frozen cranberries are fine too)
1/2 to 1 cup sugar
Wash the clementines or oranges. Cut into chunks, removing seeds and pith as necessary. Place in food processor and chop roughly. Add the cranberries and sugar. Pulse until chopped. Let the mixture drain for a while to removed some of the excess liquid (Note: I saved this liquid and it made a great drink with 7-Up and ice, or you could add something stronger if you wish...). Refrigerate or freeze cranberry orange sauce until ready to use.
Cranberry Orange Jello Mold
2 packages (3 ounces each) cherry gelatin
2 1/2 cups boiling water
1 cup crushed pineapple (with juice)
1 package (10 ounces) Indian Trail Cranberry Orange Sauce
8 ounces Cool Whip
Dissolve gelatin in boiling water. Stir into it Indian Trail Cranberry Orange Sauce and crushed pineapple. Pour into mold, so it is about an inch thick. Refrigerate until firm enough to add next layer, about 1/2 hour. Meanwhile, remove about half of the remaining cranberry/orange/jello mixture. Gently fold in the thawed Cool Whip. Gently smooth the Cool Whip mixture into the mold, and again, refrigerate for about another half an hour. At this time, top off the mold with the remaining jello mixture (or whatever you can fit into your mold, I had a little bit extra). Refrigerate until time to remove from mold (at least 6 - 8 hours) and serve.
Jan 10, 2014
Easy Turkey Piccata
We love to watch old episodes of Alton Brown's Good Eats (you have probably guessed that by now). We usually end up watching them while we each exercise on our elliptical and recumbent bike machines. Hmmm, that sounds weird. When I think about it, it sounds strange to be watching cooking episodes while trying to lose weight/exercise! Well, I guess we just are a little weird. :)
Over the holidays (lots of need for exercise during the December, don't you know), we watched Alton's "Flat is Beautiful II" episode, where he led us on a journey through the world of flat foods. We were hooked and excited to try the recipes! The first one we tried was this Turkey Picatta.
It. Was. Amazing. End of story. Here's how it went.

I started off by trying to find the whole turkey breast the recipe called for, to no avail. Instead, I bought a package of turkey breast tenderloins. Though they were smaller than a whole breast, I think they worked out better and made a more tender finished product.
I sliced the turkey breast tenderloins into 1/2 inch - ish pieces, cross-grain.

Then, placed a piece of turkey between two pieces of plastic wrap, and spritzed the top of the plastic with a bit of water.

Then, I used this regular old sauce pan to carefully pound the piece of turkey flat. If you have a flattening device or something else that works better, please use that! I would love to hear your techniques to flatten meat.

It was a little bit challenging to pound correctly - not too flat to disintegrate, not breaking off chunks of turkey (by having the pan not level which made the bottom edge cut into the piece of turkey), and not leaving it too thick. But after a few I got the hang of it.

Then, I laid the pieces of turkey out on a cutting board and sprinkled each side with kosher salt and freshly ground black pepper.

And dipped each piece in flour.

Then quickly cooked all the pieces in a hot pan with melted butter and olive oil.

I removed the turkey from the pan, placed it in a 200 degree F oven to keep warm, and quickly made the sauce.

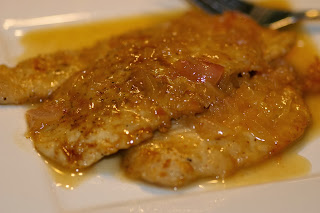
Done - and so delicious. The turkey was moist and tender. The sauce was tang-y, lemon-y, shallot-y and had such a bright flavor.
Preheat oven to 200 degrees F. Cut the turkey breast tenderloin against the grain into 1/2-inch pieces. Place pieces of turkey, one at a time, between two pieces of plastic wrap. Squirt the top of the plastic wrap with water. Pound to no less than 1/8 inch thickness.
Season both sides of meat with Kosher salt and freshly ground pepper and then dredge in flour. Shake off the excess flour. Set aside.
In a large saute pan over medium to medium high heat, heat olive oil and five tablespoons butter. Once hot, but not smoking, brown turkey pieces quickly, one to two minutes on each side, and remove to an ovenproof platter. Place in oven to keep warm.
Reduce the heat to low and add the shallots to the pan. Saute for one or two minutes or until they begin to turn translucent. Add wine and lemon juice to the pan and simmer until slightly reduced. This took me about four minutes. Add remaining three tablespoons butter and whisk to combine (this will help to thicken the sauce as well). Season with salt and pepper, to taste, if necessary (remember the meat is seasoned nicely). Pour your sauce over the turkey, and serve immediately.
Note: As I said, the sauce is lemon-y, and some might say too sour or tangy. Personally, I love that little bite, but if it is a bit too much for you, tone it down by adding a little less lemon juice and a dash of sugar or honey. Also, I think I would add a few capers to the sauce next time.
So, are you going try it? Do you think this flat turkey is beautiful?
Over the holidays (lots of need for exercise during the December, don't you know), we watched Alton's "Flat is Beautiful II" episode, where he led us on a journey through the world of flat foods. We were hooked and excited to try the recipes! The first one we tried was this Turkey Picatta.
It. Was. Amazing. End of story. Here's how it went.

I started off by trying to find the whole turkey breast the recipe called for, to no avail. Instead, I bought a package of turkey breast tenderloins. Though they were smaller than a whole breast, I think they worked out better and made a more tender finished product.
I sliced the turkey breast tenderloins into 1/2 inch - ish pieces, cross-grain.

Then, placed a piece of turkey between two pieces of plastic wrap, and spritzed the top of the plastic with a bit of water.

Then, I used this regular old sauce pan to carefully pound the piece of turkey flat. If you have a flattening device or something else that works better, please use that! I would love to hear your techniques to flatten meat.

It was a little bit challenging to pound correctly - not too flat to disintegrate, not breaking off chunks of turkey (by having the pan not level which made the bottom edge cut into the piece of turkey), and not leaving it too thick. But after a few I got the hang of it.

Then, I laid the pieces of turkey out on a cutting board and sprinkled each side with kosher salt and freshly ground black pepper.

And dipped each piece in flour.

Then quickly cooked all the pieces in a hot pan with melted butter and olive oil.

I removed the turkey from the pan, placed it in a 200 degree F oven to keep warm, and quickly made the sauce.

Done - and so delicious. The turkey was moist and tender. The sauce was tang-y, lemon-y, shallot-y and had such a bright flavor.

Turkey Piccata (adapted from Alton Brown's recipe)
- 1 package turkey breast tenderloins, 1 - 1/2 pounds
- Kosher salt
- Freshly ground black pepper
- 1/2 to 1 cup all-purpose flour
- 2 tablespoons olive oil
- 1 stick unsalted butter
- 2 to 4 tablespoons finely chopped shallots (to taste)
- 1 cup white wine
- 1/3 cup freshly squeezed lemon juice
Preheat oven to 200 degrees F. Cut the turkey breast tenderloin against the grain into 1/2-inch pieces. Place pieces of turkey, one at a time, between two pieces of plastic wrap. Squirt the top of the plastic wrap with water. Pound to no less than 1/8 inch thickness.
Season both sides of meat with Kosher salt and freshly ground pepper and then dredge in flour. Shake off the excess flour. Set aside.
In a large saute pan over medium to medium high heat, heat olive oil and five tablespoons butter. Once hot, but not smoking, brown turkey pieces quickly, one to two minutes on each side, and remove to an ovenproof platter. Place in oven to keep warm.
Reduce the heat to low and add the shallots to the pan. Saute for one or two minutes or until they begin to turn translucent. Add wine and lemon juice to the pan and simmer until slightly reduced. This took me about four minutes. Add remaining three tablespoons butter and whisk to combine (this will help to thicken the sauce as well). Season with salt and pepper, to taste, if necessary (remember the meat is seasoned nicely). Pour your sauce over the turkey, and serve immediately.
Note: As I said, the sauce is lemon-y, and some might say too sour or tangy. Personally, I love that little bite, but if it is a bit too much for you, tone it down by adding a little less lemon juice and a dash of sugar or honey. Also, I think I would add a few capers to the sauce next time.
So, are you going try it? Do you think this flat turkey is beautiful?
Jan 5, 2014
Coconut Rice Pudding
You know how you have those chilly wintery days where you just want to fix (and eat) something warm and comforting? This coconut rice pudding was my answer to the very cold weather we have been having lately. Here in Northern Minnesota, the actual temps have been consistently below zero for days now, and tonight the low is supposed to be -33 degrees F. I am not sure how much lower the windchill will be!
So I made up a nice pot of this pudding to enjoy throughout the weekend. It reheats easily in the microwave!

So I made up a nice pot of this pudding to enjoy throughout the weekend. It reheats easily in the microwave!

Coconut Rice Pudding
- 1 cup rice (a medium grain works best)
- 1 tablespoon butter
- 1 can coconut milk
- 1 cups water (or milk)
- 1/2 teaspoon salt
- 2 tablespoons sugar
- 1 teaspoon vanilla
In a large, heavy bottom pot, melt the butter over medium heat. Add the rice and cook, stirring occasionally, for about two minutes. I think that doing this enhances the flavor of the rice. Add the coconut milk, water or milk, salt, sugar, and vanilla. Stir well. Bring the rice mixture up to a boil. Make sure to stir occasionally to prevent the rice from burning. After the mixture comes to a boil, reduce the heat to medium/low. Place the lid askew on the pot, which will allow some of the steam to escape. Cook for 15-20 minutes, or until the rice has absorbed all (or nearly all) of the liquid and is tender. If after the timer goes off and the rice isn't tender enough, add a bit more water and cook for another five minutes. After it is done, remove the pan from heat. Place cover on the pot and let rest until you are ready to serve (though since it is best served warm, don't let it sit for too long!). When you are ready to serve, fluff the rice with a fork. Top with a sprinkle of cinnamon or nutmeg if desired.
Jan 3, 2014
Crab Rangoon
One of the tasty appetizers we had during the holiday season was Crab Rangoon. We love the combination of crab meat, cream cheese, green onions and other flavorings. The tasty filling mixture is folded up in a wonton wrapper and deep fried (how can you go wrong deep frying something?). We like Crab Rangoon served with duck sauce, but they would also be tasty with soy sauce or any other Asian sauce or dip. Have fun and experiment!

You start with a regular little wonton wrapper.

Put a dollop of filling in the middle. Then, using your fingers, brush two of the sides with a beaten egg (I know this shows four sides brushed with egg wash, but this was the first one I did. After a couple, Charlie mentioned that the wrapper probably needed the "glue" only on two sides - and he was right! It worked much better and the wonton wrapper a lot less slippery to press together).

Then, fold over a corner and press it to the opposite corner, making a triangle shape.

Then - gently! - working the air out from around the filling, press the remaining two sides together.

Then deep fry for three to four minutes (not pictured because I didn't want to get oil splattered on the camera) and enjoy!


Heat oil in a large heavy-bottomed pot over medium-high heat until it registers 350 degrees F. In a medium bowl, combine the cream cheese, crab meat, green onions, salt, sesame oil, chili sauce, soy sauce and Worcestershire sauce.
Now it is time to assemble the appetizer. On a flat, clean surface, lay out a wonton wrapper with one corner pointed toward you. Place one tablespoon of the filling into the center of the wonton wrapper. Dip a finger into the egg wash mixture and wet two edges of the wonton wrapper. Fold the top corner down to meet the bottom corner to form a triangle. Press out all of the air and seal the edges by pressing them together. Place finished crab rangoons on a cookie sheet or platter, covering the appetizers with a damp kitchen towel to keep them from drying out.
When your oil is heated and you are ready to fry, line a baking sheet with a double layer of paper towels. Place a wire rack upside down on top of the paper towels. Carefully lower crab rangoons into the oil, five or six at a time, and fry, until they are golden brown on both sides. This will take three or four minutes. Make sure to turn them over once halfway through the cooking time. Remove with a slotted spoon and drain on the prepared baking sheet. Allow the crab rangoons to cool for at about five minutes before serving - they are very hot when they come out and even though it is hard to wait, I would highly recommend it (coming from a voice of experience). Serve with duck sauce, soy sauce, any sauce of your choice or no sauce at all and enjoy!

You start with a regular little wonton wrapper.

Put a dollop of filling in the middle. Then, using your fingers, brush two of the sides with a beaten egg (I know this shows four sides brushed with egg wash, but this was the first one I did. After a couple, Charlie mentioned that the wrapper probably needed the "glue" only on two sides - and he was right! It worked much better and the wonton wrapper a lot less slippery to press together).

Then, fold over a corner and press it to the opposite corner, making a triangle shape.

Then - gently! - working the air out from around the filling, press the remaining two sides together.

Then deep fry for three to four minutes (not pictured because I didn't want to get oil splattered on the camera) and enjoy!


Crab Rangoon
- 8 ounces cream cheese, softened
- 8-ish ounces canned or refrigerated crab meat
- 1/2 cup green onions, thinly sliced
- 1/2 teaspoon salt
- 2 teaspoons sesame oil
- 1 teaspoon Thai Sweet Chili sauce
- 1 tablespoon soy sauce
- 2 teaspoons Worcestershire sauce
- 1 package wonton wrappers (about 48)
- 1 egg, beaten with 1 tablespoon water
- 2 to 3 quarts peanut, vegetable or canola oil (for frying)
- duck sauce (or dipping sauce of choice)
Heat oil in a large heavy-bottomed pot over medium-high heat until it registers 350 degrees F. In a medium bowl, combine the cream cheese, crab meat, green onions, salt, sesame oil, chili sauce, soy sauce and Worcestershire sauce.
Now it is time to assemble the appetizer. On a flat, clean surface, lay out a wonton wrapper with one corner pointed toward you. Place one tablespoon of the filling into the center of the wonton wrapper. Dip a finger into the egg wash mixture and wet two edges of the wonton wrapper. Fold the top corner down to meet the bottom corner to form a triangle. Press out all of the air and seal the edges by pressing them together. Place finished crab rangoons on a cookie sheet or platter, covering the appetizers with a damp kitchen towel to keep them from drying out.
When your oil is heated and you are ready to fry, line a baking sheet with a double layer of paper towels. Place a wire rack upside down on top of the paper towels. Carefully lower crab rangoons into the oil, five or six at a time, and fry, until they are golden brown on both sides. This will take three or four minutes. Make sure to turn them over once halfway through the cooking time. Remove with a slotted spoon and drain on the prepared baking sheet. Allow the crab rangoons to cool for at about five minutes before serving - they are very hot when they come out and even though it is hard to wait, I would highly recommend it (coming from a voice of experience). Serve with duck sauce, soy sauce, any sauce of your choice or no sauce at all and enjoy!
Jan 1, 2014
Happy New Years!
For Halloween, I made my traditional Yummy Pork Mummy (I apologize this isn't a better picture. We were too anxious to eat it and it was dark outside = not good photos). The recipe takes a pork tenderloin, coats it in a yummy homemade mustard cream sauce, and covers it in strips of phyllo dough to resemble a "mummy." It is fun and tasty.

For Thanksgiving, we experimented by frying a turkey. Charlie rigged a scaffold and pulley system so the project was (disappointingly to my youngest brother) very unexciting and uneventful (i.e. none of those gigantic fire geysers you see videos of on you tube).
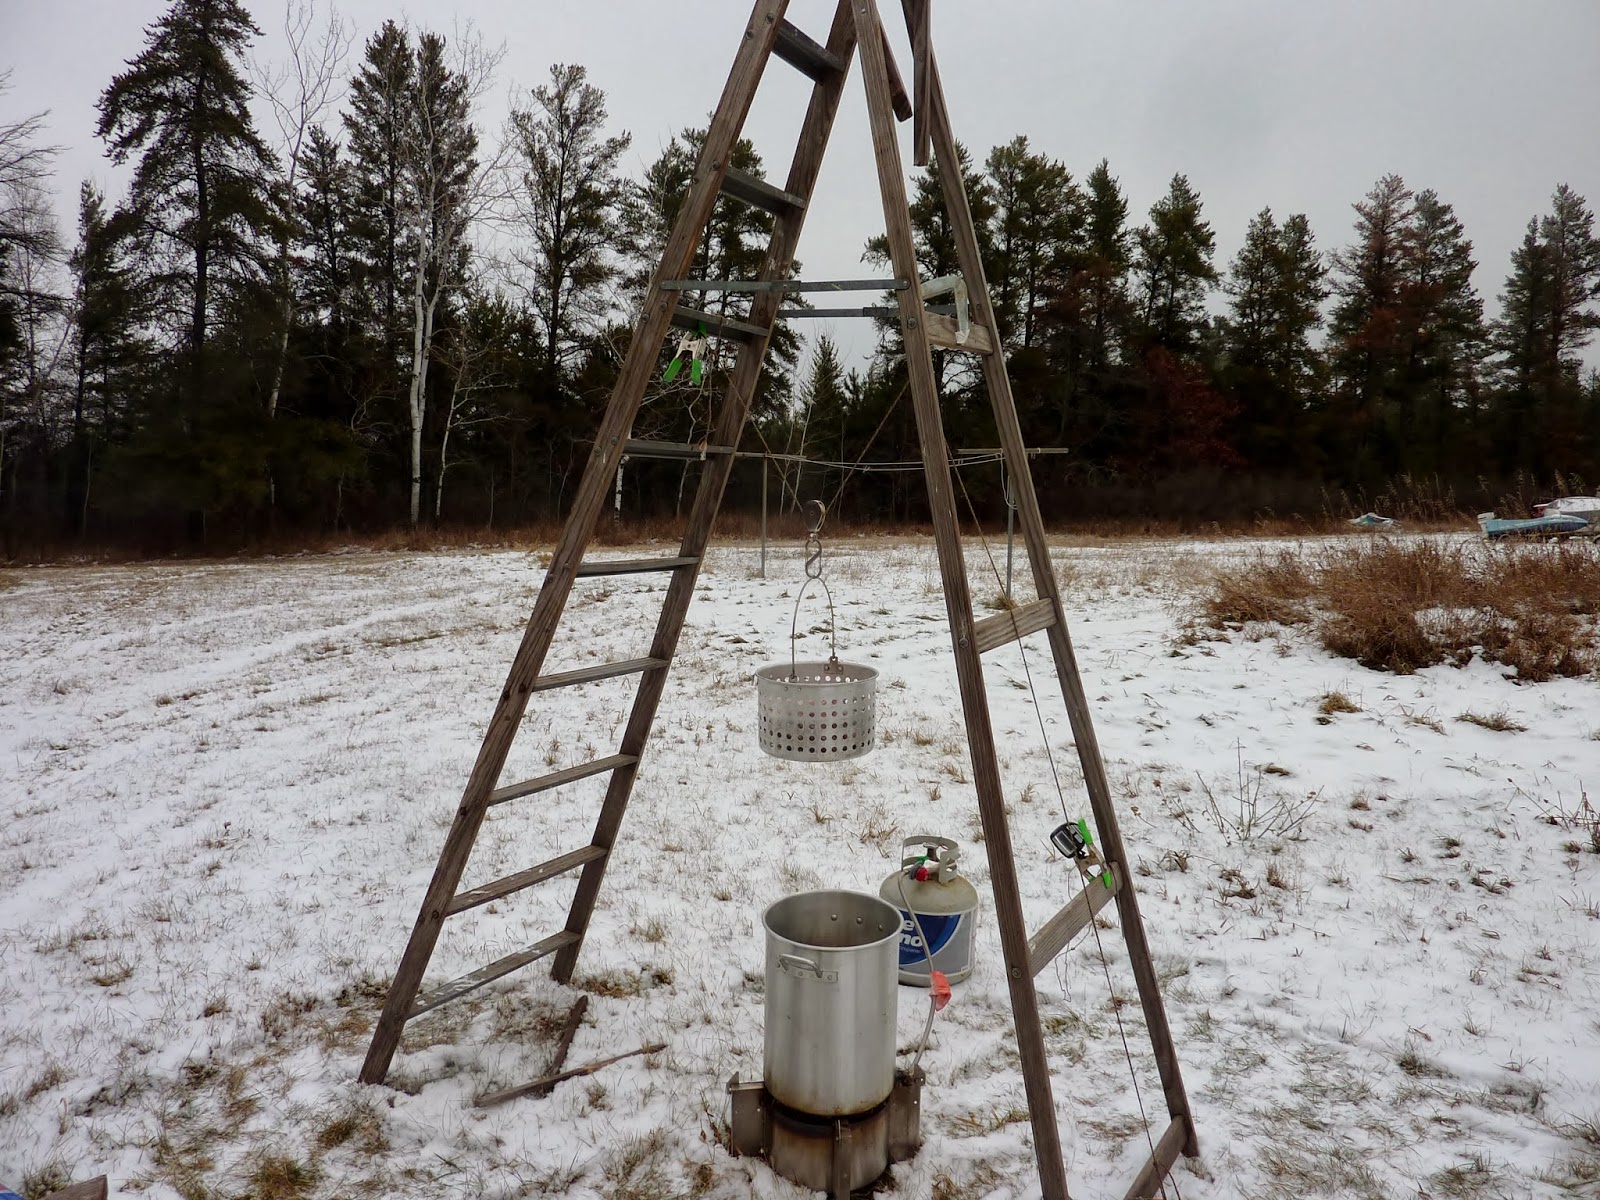

The results were delicious. The turkey was flavorful, moist and had a just-slightly fried flavor. No gravy needed!

One of the things I made was a layered cranberry salad.

And among the several pies I made, one was a lattice top mincemeat pie.

And a Pecan Pie (Charlie's favorite).

I was able to explore outside some (on the warmer days).

And then started the Christmas cookie baking! Rather than making a whole bunch at once, I decided to just make one batch at a time, and my plan is to spread it out even into January.
These are Charlie's favorite Christmas cookies: Pistachio Orange Cookies.

Of course, the traditional Peanut Butter Blossoms.

The next Christmas cookies I made were called Fudge Filled Sandies. I think they are Charlie's very-close-to-first-favorite-Christmas-cookie recipe.

And, I guess that is all the Christmas cookies I have made so far. Like I said, it has been busy.
I did get a bunch of fruit cakes made. I use my Great - Grandma Dorothy's old, old "Boiled Raisin Cake" recipe and add a bunch of candied fruit and nuts to it.

We also got a couple of batches of lefse made. Charlie and I love making lefse - and we enjoy eating it as well!


I also had a lot of fun making a Kumquat Tart - my first experiment working with kumquats. My uncle grows them and sent up a package from Alabama.

We had a little gingerbread house decorating party, which was fun.


I tye-dyed some tee shirts for my brother for Christmas.

We also had some tasty dinners, including: Turkey Picatta...


Mexican Grande's...

Alton's Beef Palliard..... bad pictures but sooooooo easy and tasty.

Homemade Buffalo Wings with homemade buffalo sauce, blue cheese dressing and celery.

Spaghetti, Homemade Meatballs and tomato sauce canned from the garden last fall.

Of course, with the leftovers, we made Marinara and Meatball sandwiches, so tasty.

I also tried making a batch of Spiced Pecans for a gift (I think they turned out ok).

And to finish off the year, a Peanut Butter Trifle to celebrate New Years Eve.

Along with a glass of homemade eggnog (and other assorted goodies).

I hope you have had a wonderful Holiday season, and are looking forward to a wonderful 2014!
Subscribe to:
Posts (Atom)